Wednesday, 14 June 2023

Generate and Download XML file from Database using C# and VB.Net in ASP.Net

I want it should generate xml code and give xml download link so user can download xml file in their machine and than use it. 

Check this example. Now please take its reference and correct your code.

HTML

<asp:Button ID="Button1" runat="server" OnClick="GenerateXML" Text="Generate XML" />
<asp:Button ID="Button2" runat="server" OnClick="DownloadXML" Text="Download XML" />

Namespaces

C#

using System;
using System.Configuration;
using System.Data;
using System.Data.SqlClient;

VB.Net

Imports System.Data.SqlClient
Imports System.Data

Code

C#

protected void GenerateXML(object sender, EventArgs e)
{
    SqlConnection con = new SqlConnection(ConfigurationManager.ConnectionStrings[1].ConnectionString);
    SqlDataAdapter dt = new SqlDataAdapter("SELECT * FROM Customers", con);
    DataSet ds = new DataSet();
    dt.Fill(ds, "Customers");
    ds.WriteXml(Server.MapPath("~/Customers.xml"));
}

protected void DownloadXML(object sender, EventArgs e)
{
    if (System.IO.File.Exists(Server.MapPath("~/Customers.xml")))
    {
        DownloadFile(Server.MapPath("~/Customers.xml"));
    }
}

private void DownloadFile(string filePath)
{
    Response.ContentType = "application/xml";
    Response.AddHeader("Content-Disposition", "attachment;filename=Customers.xml");
    Response.WriteFile(filePath);
    Response.End();
}

VB.Net

Protected Sub GenerateXML(ByVal sender As Object, ByVal e As EventArgs)
    Dim con As SqlConnection = New SqlConnection(ConfigurationManager.ConnectionStrings(1).ConnectionString)
    Dim dt As SqlDataAdapter = New SqlDataAdapter("SELECT * FROM Customers", con)
    Dim ds As DataSet = New DataSet()
    dt.Fill(ds, "Customers")
    ds.WriteXml(Server.MapPath("~/Customers.xml"))
End Sub

Protected Sub DownloadXML(ByVal sender As Object, ByVal e As EventArgs)
    If System.IO.File.Exists(Server.MapPath("~/Customers.xml")) Then
        DownloadFile(Server.MapPath("~/Customer.xml"))
    End If
End Sub

Private Sub DownloadFile(ByVal filePath As String)
    Response.ContentType = "application/xml"
    Response.AddHeader("Content-Disposition", "attachment;filename=Customers.xml")
    Response.WriteFile(filePath)
    Response.[End]()
End Sub

Generated xml

<?xml version="1.0" standalone="yes"?>
<NewDataSet>
  <Customers>
    <CustomerId>1</CustomerId>
    <Name>Mudassar Khan</Name>
    <Country>India</Country>
  </Customers>
  <Customers>
    <CustomerId>2</CustomerId>
    <Name>Maria </Name>
    <Country>Austria</Country>
  </Customers>
  <Customers>
    <CustomerId>3</CustomerId>
    <Name>Ana Trujillo </Name>
    <Country>France</Country>
  </Customers>
  <Customers>
    <CustomerId>4</CustomerId>
    <Name>Antonio Moreno </Name>
    <Country>Brazil</Country>
  </Customers>
  <Customers>
    <CustomerId>5</CustomerId>
    <Name>Christina Berglund</Name>
    <Country>Ireland</Country>
  </Customers>
</NewDataSet>

How to download xml file in asp.net using C#

 If you return FileResult it will be file, if you return string it will be open in browser.

Update: This code will return file for downloading

public FileResult GetXmlFile()
{
    string xml=""; //string presented xml
    var stream = new MemoryStream();
    var writer = XmlWriter.Create(stream);
    writer.WriteRaw(xml);
    stream.Position = 0;
    var fileStreamResult = File(stream, "application/octet-stream", "xml.xml");
    return fileStreamResult;        
}

Friday, 9 June 2023

How to Fix “This Program Is Blocked by Group Policy” Error

This Program Is Blocked by Group Policy

Group policy is a Windows utility for network administrators, which can be used to deploy user, security and networking policies to a whole network of computers on the individual machine level.

In almost all cases, “This program is blocked by group policy” error is caused by the affected user enabling the Software Restriction Policy and forgetting about it or another application or bug somehow enabling the Software Restriction Policy.

Additionally, the “application or program cannot be opened” situation may also be caused by a program (such as a third-party security program) configured to block certain applications from running. Next, I will introduce the methods to fix the “this program is blocked by group policy” error.


How to Fix “This Program Is Blocked by Group Policy” Error

Method 1: Use Group Policy

If your computer disables the device driver, you can change the setup to repair this problem. Here are the steps:

Step 1: Press the Windows + R keys to open the Run dialog. Then you should type gpedit.msc and click OK to open the Group Policy window.

Step 2: Expand User Configuration > Administrative Templates > System. In the right pane, navigate to Don’t run specified Windows applications and double-click it.

Step 3: Then click the Show button.

Step 4: Remove the target program or application from the disallowed list and click OK.

If the method cannot fix the error, you can move down to the next method.

Method 2: Use Control Panel

This method is to use Control Panel to fix “This program is blocked by group policy” error. Here is the tutorial.

Step 1: Open Control Panel, search for Administrative Tools and open it.

Step 2: Navigate to Local Security Policy and double-click it.

navigate to Local Security Policy

Step 3: Expand Software Restriction Policies > Enforcement.

Step 4: Select All users except local administrators. Click Apply and restart your PC.

Then you can check if the error still exists.

Method 3: Use Registry Editor

If you still meet “This program is blocked by group policy” error, you can use Registry Editor to fix this error. You can follow the steps below.

Step 1: Press the Windows + R keys at the same time to open the Run dialog and input regedit. Then click OK to open Registry Editor.

Step 2: Navigate to the following path and delete all items in the Microsoft folder.

HKEY_LOCAL_MACHINE\Software\Policies\Microsoft

navigate to the path


Final Words

As there are a variety of different possible causes of this issue, there is also a wide range of different prospective methods above. You can try them one by one to find the most effective one to fix “This program is blocked by group policy” error.


Monday, 5 June 2023

Connection Management in FRID reader in Android


Overview

This guide provides steps to perform various connection related task using RFID3 API

Connect to an Handheld Reader

Connection is the first step to talk to an Handheld reader

  1. Import the package
  2. 
    import com.zebra.rfid.api3.*;
  3. Create instance of Readers class with passing activity context as first parameter and enum value SERVICE_SERIAL as second parameter
  4. 
    readers = new Readers(this, ENUM_TRANSPORT.SERVICE_SERIAL);

    Note : For RFD40XX USB connectivity create reader instance with

    
    readers = new Readers(this, ENUM_TRANSPORT.SERVICE_USB)
  5. The Readers class instance gives a list of all available/paired RFID readers with an Android device. Readers list is in the form of ReaderDevice class.
  6. 
    ArrayList readersListArray = readers.GetAvailableRFIDReaderList(); 
    ReaderDevice readerDevice = availableRFIDReaderList.get(0);
  7. ReaderDevice class includes instance of RFIDReader class; which is root class to interface and performing all operations with RFID reader.
  8. 
    // Establish connection to the Handheld Reader
    rfidReader.connect();

Connect to an Fixed Reader

Connection is the first step to talk to an Fixed reader

  1. Import the package
  2. 
    import com.zebra.rfid.api3.*;
  3. For fixed readers create instance of RFIDReader class with passing hostname(ip address) as first parameter and port number 5084 as second parameter and timeout in milliseconds as third paramater
  4. 
    reader = new RFIDReader(hostname, 5084, 1000);
  5. ReaderDevice class includes instance of RFIDReader class; which is root class to interface and performing all operations with RFID reader.
  6. 
    // Establish connection to the Fixed Reader
    rfidReader.connect();

Special Connection Handling Cases

In a normal scenario, the reader connects fine, but the following are the cases which require special handling at the time of connection. The following example demonstrates the connection is handled under try-catch block and OperationFailure exception is thrown by connection API is stored and used for further analysis


private OperationFailureException ex; 
try { 
    // Establish connection to the RFID Reader 
    rfidReader.connect(); 
} 
catch (InvalidUsageException e) 
{ 
    e.printStackTrace(); 
} 
catch (OperationFailureException e) 
{   
   e.printStackTrace(); 
   ex = e; 
}

Disconnect

When the application is done with the connection and operations on the RFID reader, it calls the following API to close the connection, and to release and clean up the resources.


// Disconnects reader and performs clean-up 
rfidReader.disconnect();
NOTE: If a reader disconnection occurs, the reader.isConnected() flag may return the value false. If application has called the reader.connect() then application should call reader.disconnect() regardless of the flag status

Detecting Connection Loss and Reconnecting

In order to detect connection loss the user should subscribe for Reader Disconnection event and implement RfidEventsListener class, the eventStatusNotify method of RfidEventsListener will notify the connection loss. The below code can be used for detecting connection loss and reconnecting.


public EventHandler eventHandler;
if (eventHandler == null)
    eventHandler = new EventHandler();
reader.Events.addEventsListener(eventHandler);
reader.Events.setTagReadEvent(true);
reader.Events.setReaderDisconnectEvent(true);

class EventHandler implements RfidEventsListener {
     public void eventReadNotify(RfidReadEvents e) {
        TagData[] tag = reader.Actions.getReadTags(200);
    }
    public void eventStatusNotify(RfidStatusEvents rfidStatusEvents) {
        if(rfidStatusEvents.StatusEventData.getStatusEventType() == DISCONNECTION_EVENT){
            try {
                reader.disconnect();
                reader.connect();
                if (reader.isConnected()) {
                    if (eventHandler == null)
                        eventHandler = new EventHandler();

                    reader.Events.addEventsListener(eventHandler);
                    reader.Events.setTagReadEvent(true);
                    reader.Events.setReaderDisconnectEvent(true);
                }
                reader.Actions.Inventory.perform();
            } catch (OperationFailureException | InvalidUsageException e) {
                     e.printStackTrace();
            }
        }
    }
}
                                                        

Dispose

When the application main activity is destroyed, it is required to dispose the SDK instance so that it can cleanly exit (unregistration and unbind by SDK as required).


readers.Dispose();

Creating Project using Android Studio


Overview

This tutorial will aid you creating a new Android application project using Android Studio.

Creating The Project

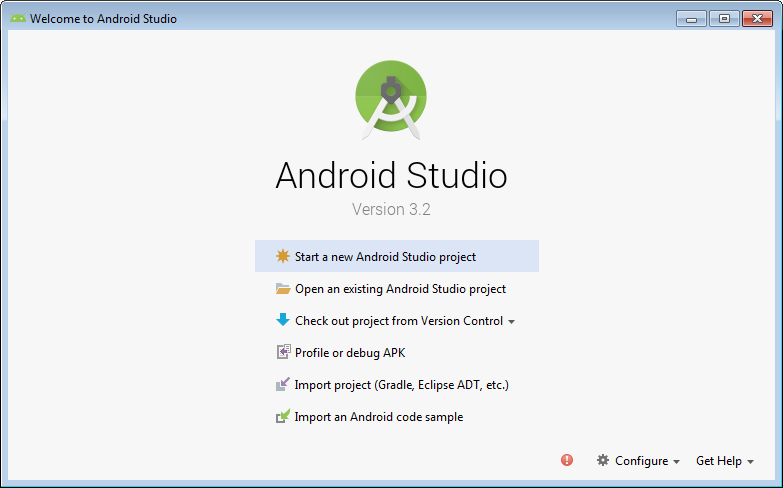
Open Android Studio. If you have a previous project open, close the project by clicking Close Project from the File menu.

  1. Select Start a new Android Studio project under Quick Start section.

    img

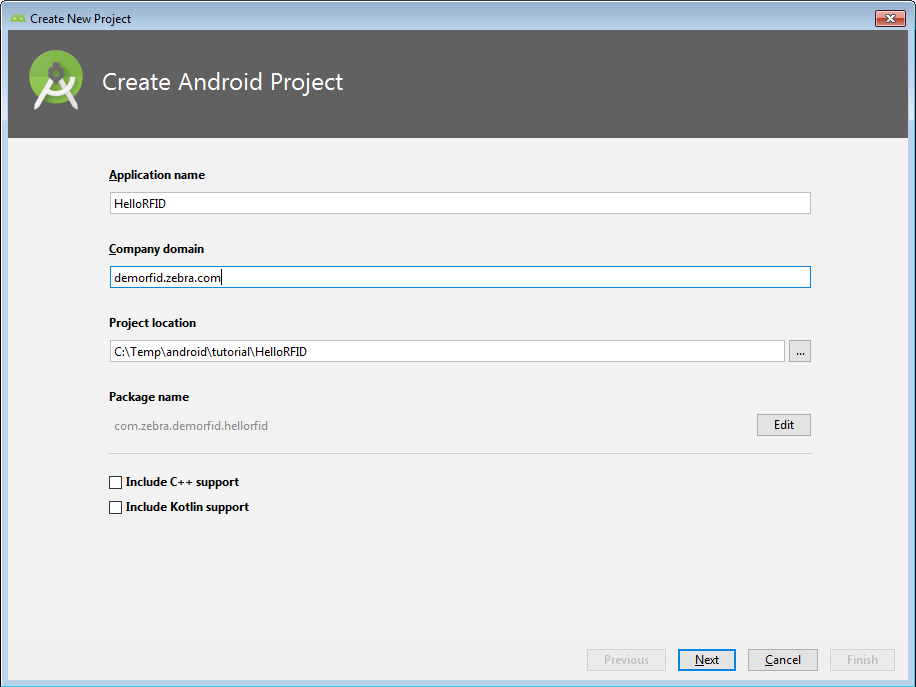
  2. In the new project wizard we need to assign Application Name specific to your tutorial of RFID feature along with Company Domain and click "Next".

    img

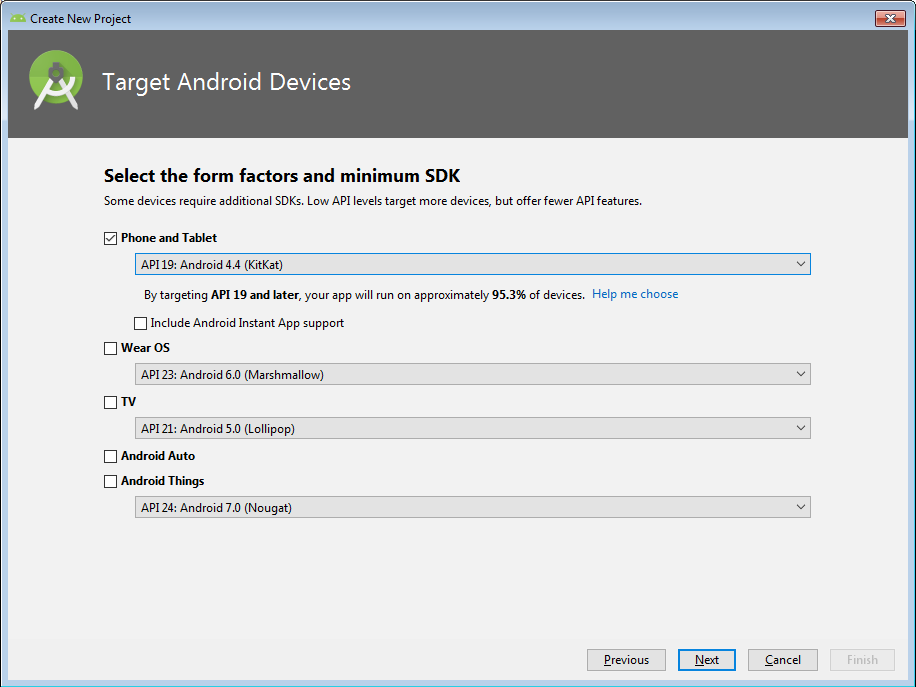
  3. Select the Minimum SDK that supports the SDK features your project requires and click Next.

    img

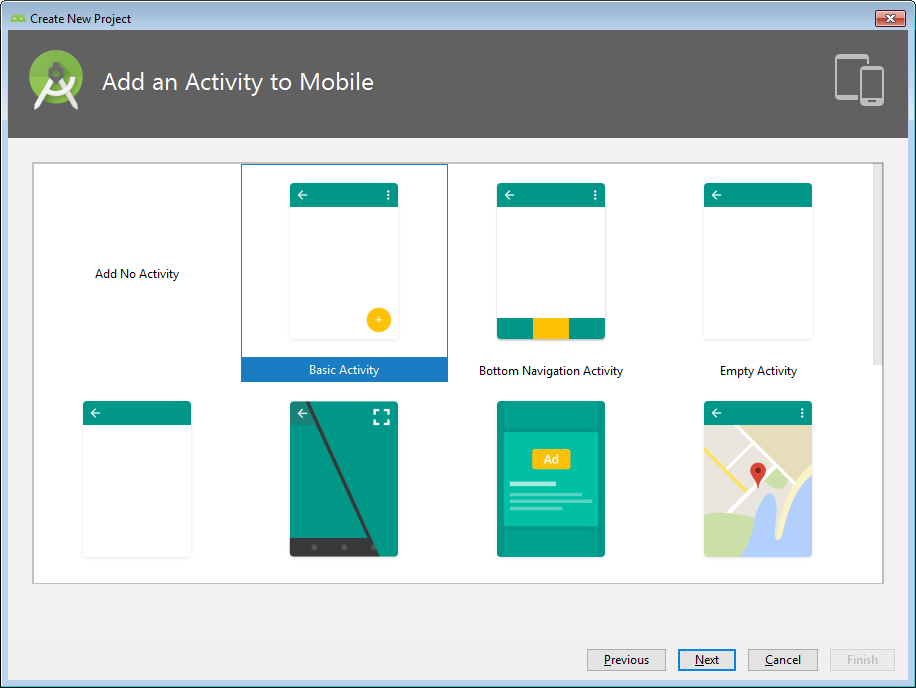
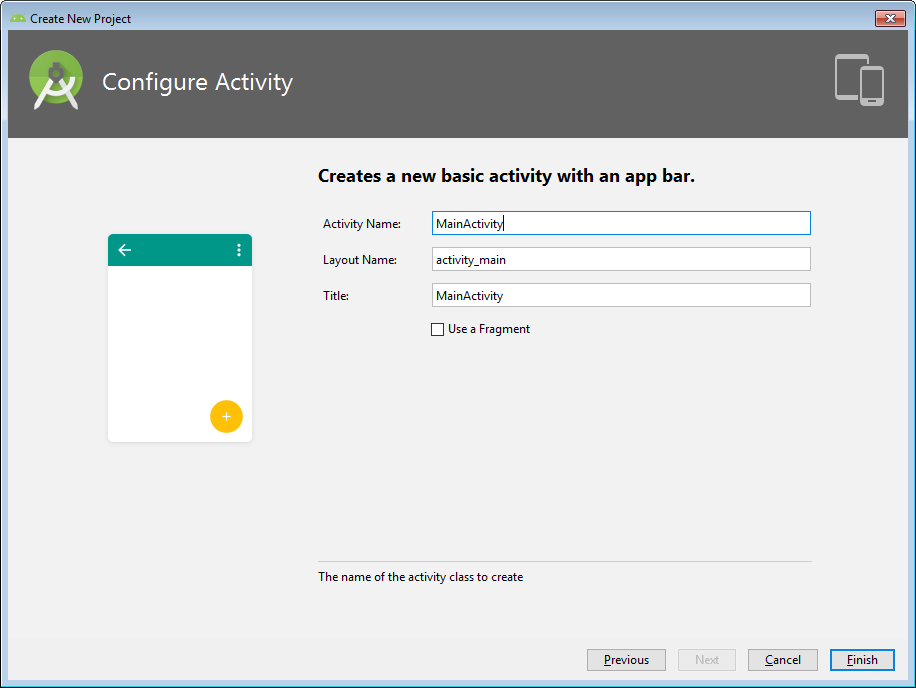
  4. Select Blank Activity option on Add an activity to Mobile screen and click Next.

    img

  5. Click Finish and your new Android Studio project will be created.

    img

Enable the RFID SDK in project

Importing RFID SDK as Module

After completing the steps in Creating The Project

  1. Unzip *.aar from Zebra_RFIDAPI3_SDK package to folder named RFIDAPI3Library outside of the project directory
  2. Create build.gradle in RFIDAPI3Library folder with following content and rename *.aar to 'API3_LIB-release.aar'
  3. 
    configurations.maybeCreate("default")
    artifacts.add("default", file('API3_LIB-release.aar'))
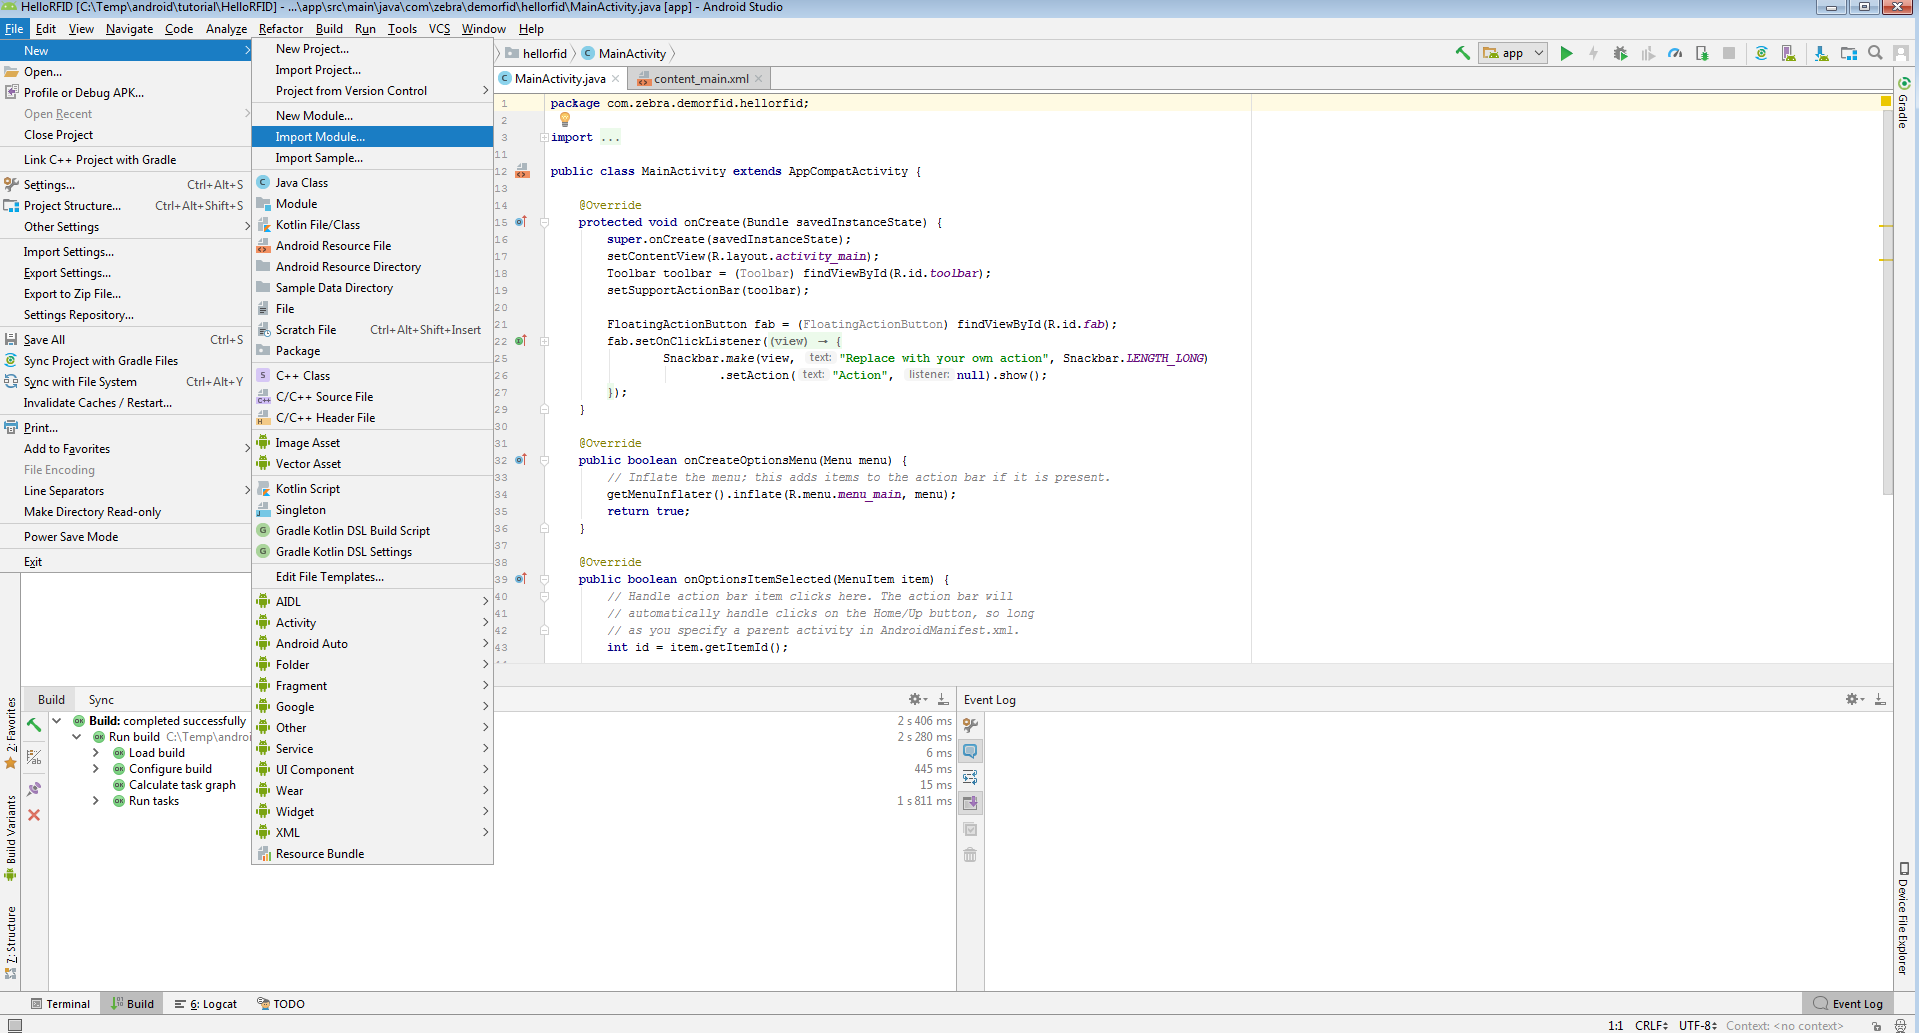
  4. Select New Import Module from the File menu.
  5. img

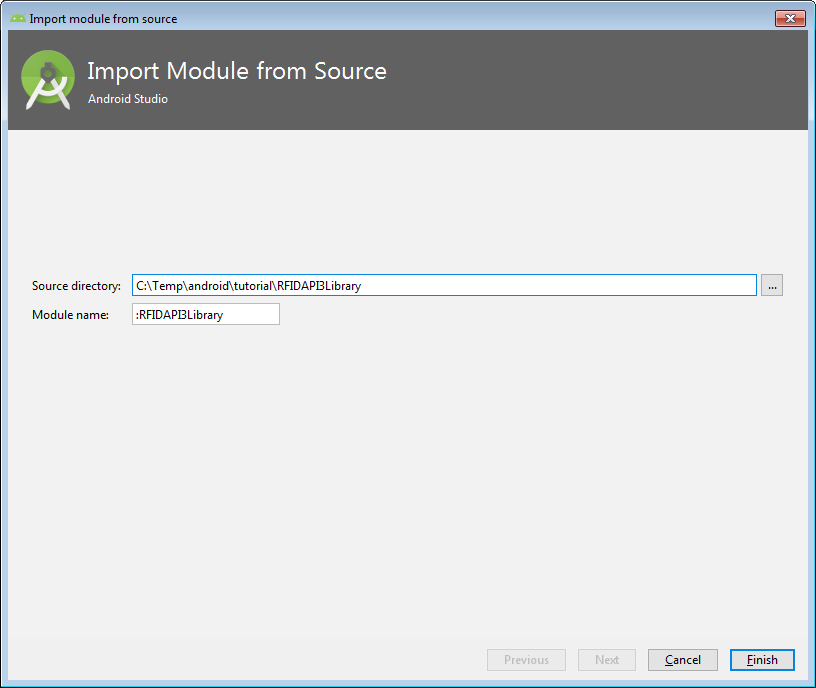
  6. Browse path to folder RFIDAPI3Library
  7. img

  8. Now click the Finish button.
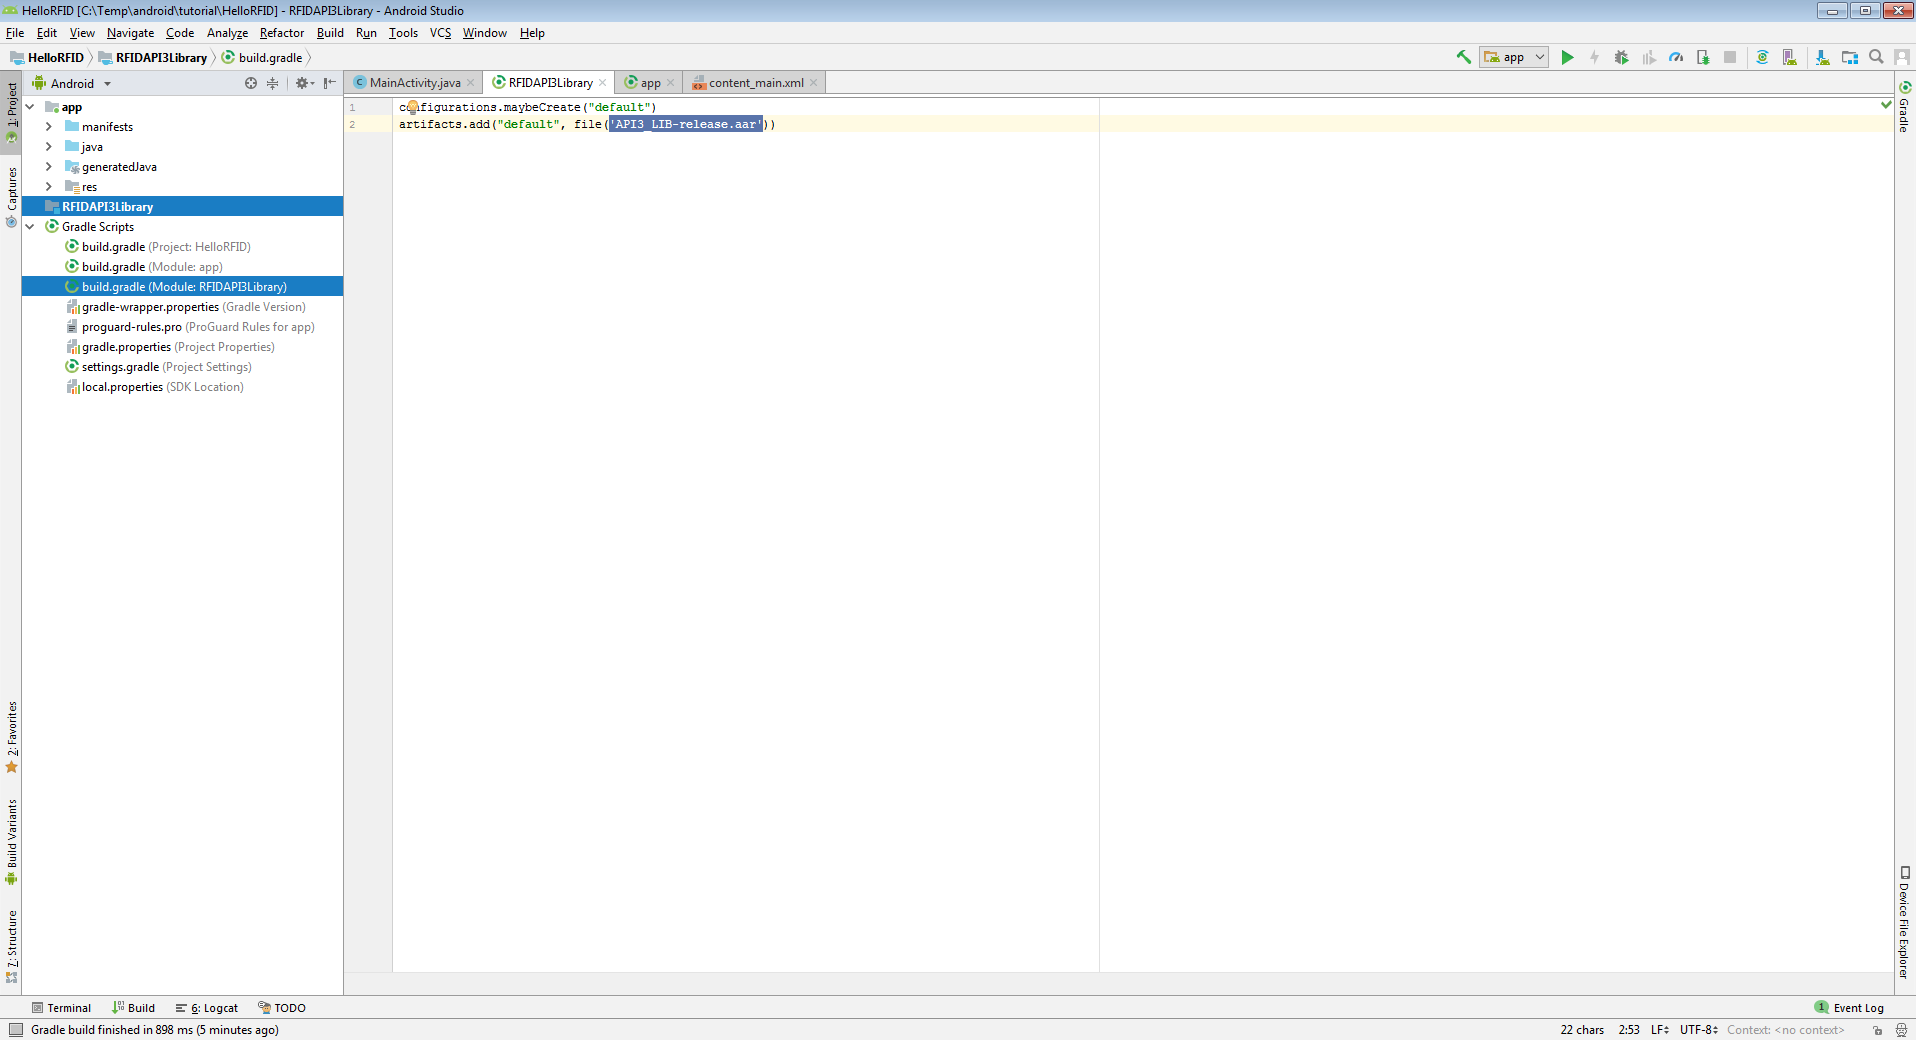
  9. Once RFID SDK Module RFIDAPI3Library imported successfully, project will look like following
  10. img

Your project is now ready with RFID SDK for Android Module

RFID3 API Library as a dependency in gradle.build

After completing the steps in Importing module

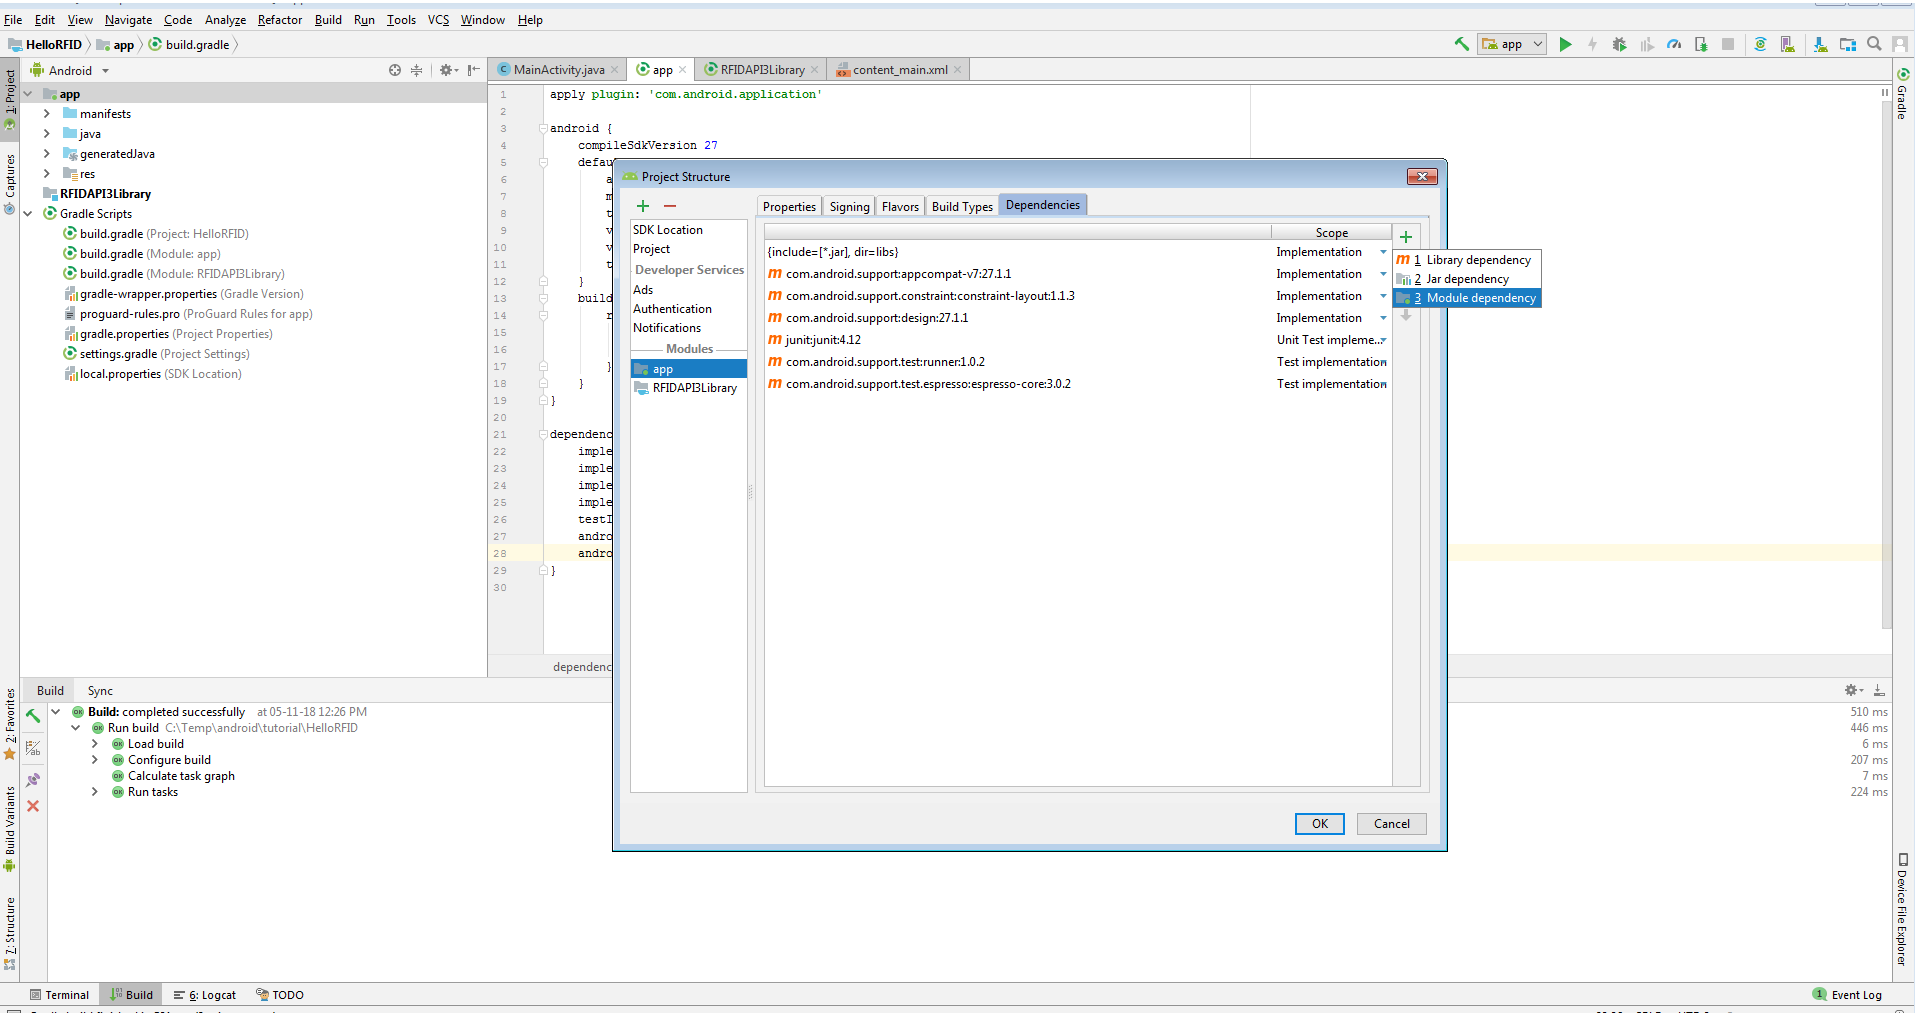
  1. Select Project Structure from the File menu.
  2. In the Project Structure window select app from the left pane under Modules.
  3. Select Dependencies on the right pane and select Module dependency
  4. img

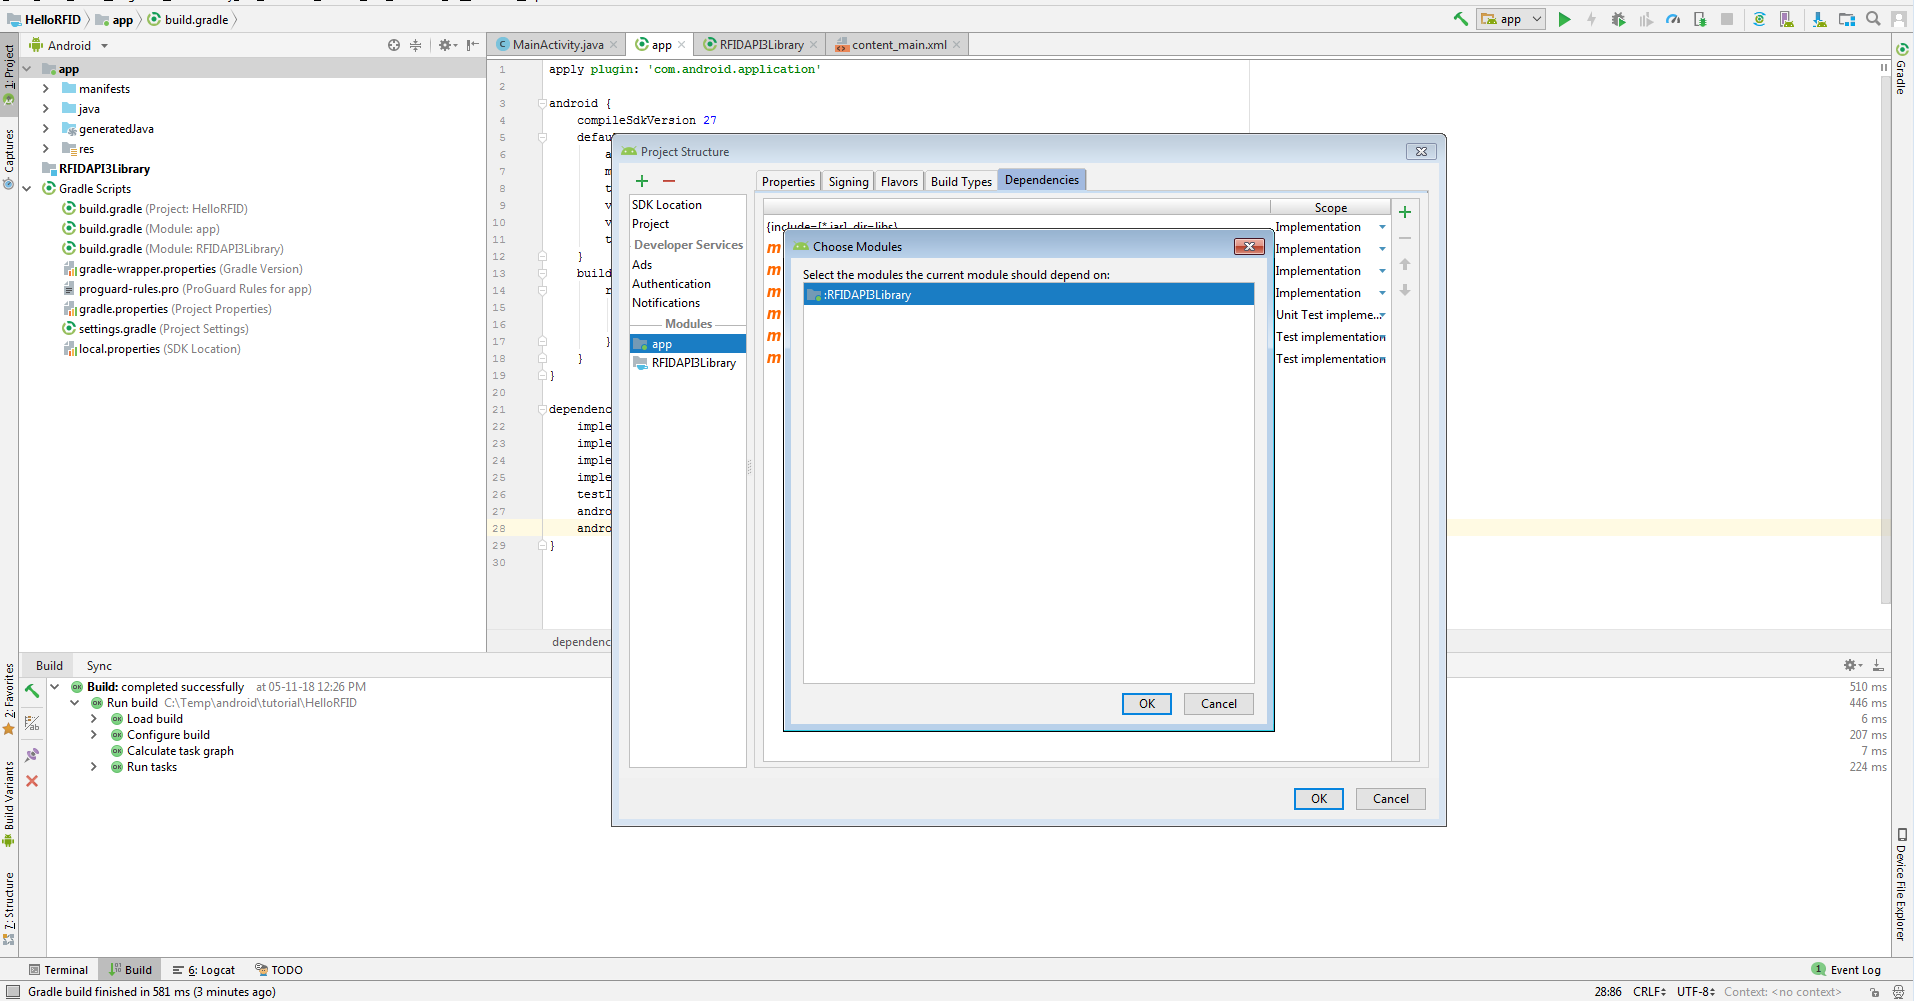
  5. In Choose Modules add RFIDAPI3Library as the dependencies. Press OK to finish and close all dialogue boxes

    img

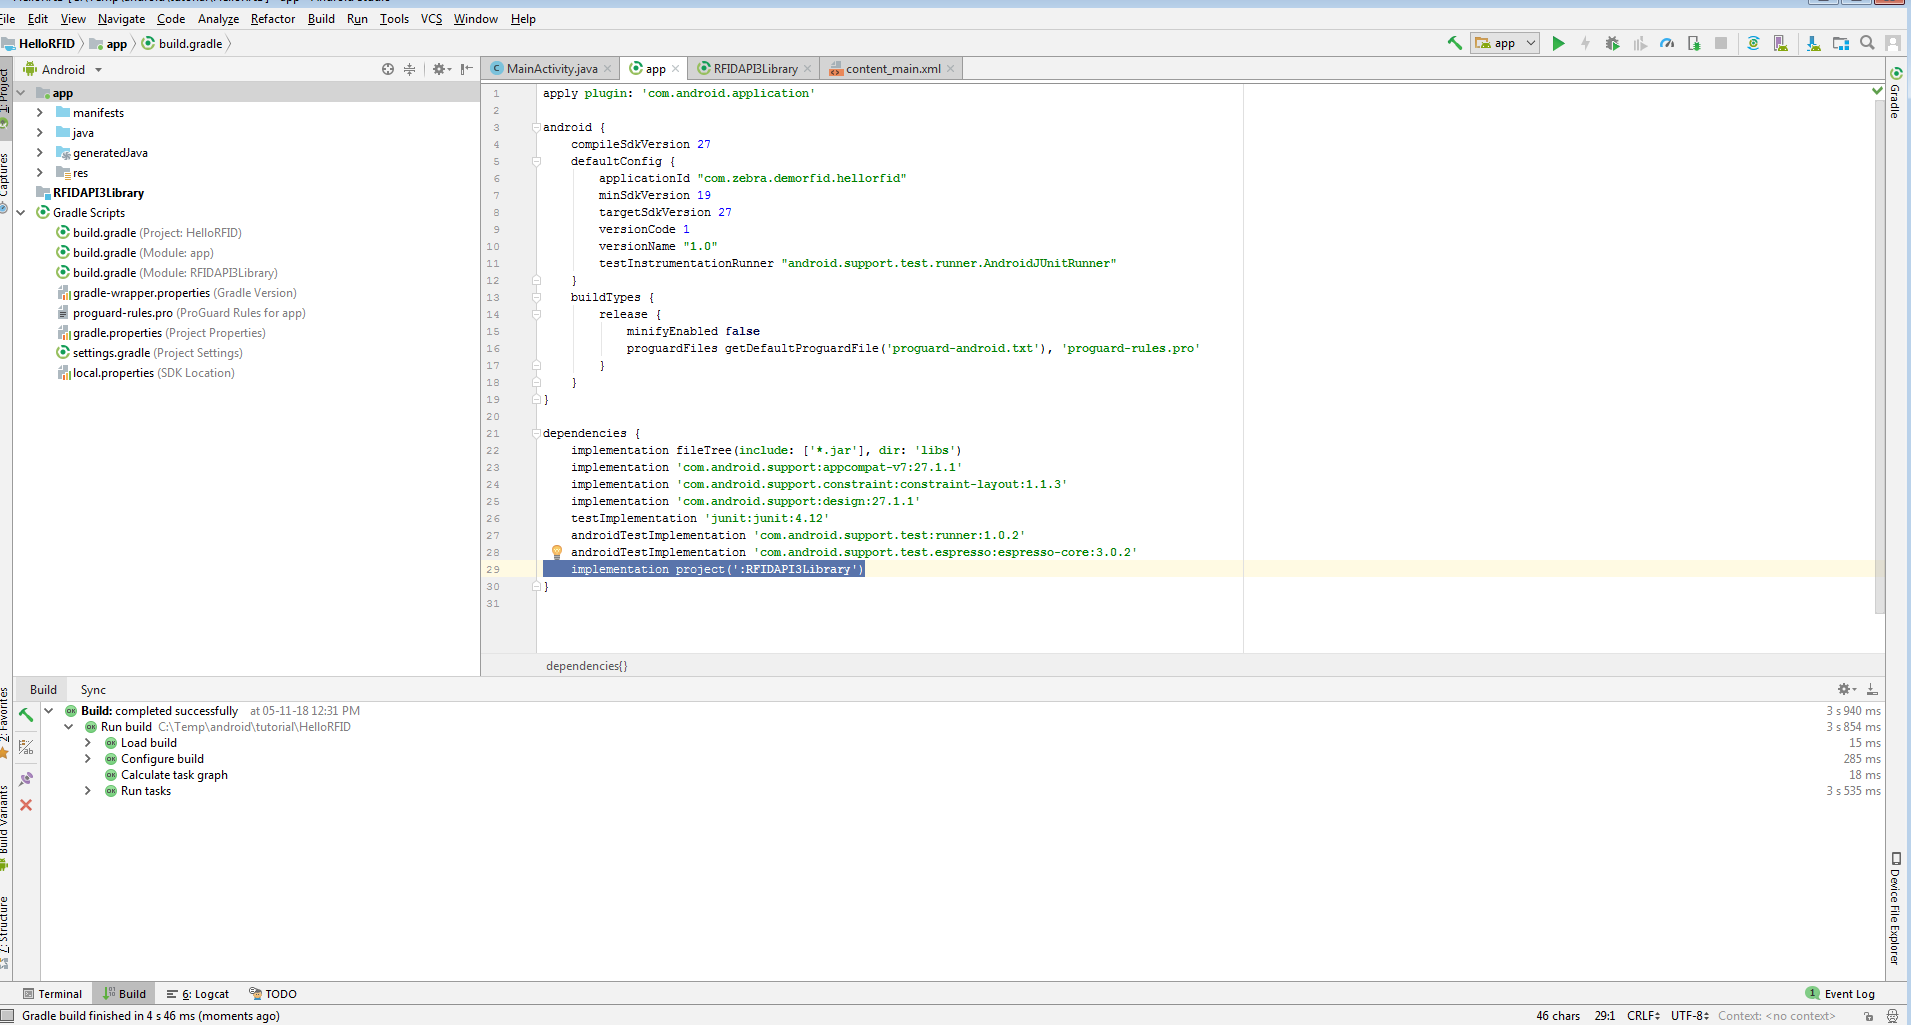
  6. In Project window left hand side, expan gradle list and open build.gralde (Module.app) to confirm

    img

  7. 
        implementation project(':RFIDAPI3Library')

Import RFID3 API package

After completing the steps in Adding dependency in gradle.build

  1. Open MainActivity.java in editor
  2. Add import com.zebra.rfid.api3 in MainActivity.java
  3. 
    import com.zebra.rfid.api3.*;

Your project is now ready to use the RFID SDK for Android