Wednesday 11 November 2020

Server.MapPath not working in ASP.Net Core

 Here Santosh Kumar Singh has explained why Server.MapPath not working in ASP.Net Core and what is the alternative solution for using the functionality in ASP.Net Core.

Microsoft has permanently removed Server.MapPath function from .Net Core and introduced a new interfaces IHostingEnvironment for .Net Core 2.0 and IWebHostEnvironment for .Net Core 3.0.

In this article I will explain why Server.MapPath not working in ASP.Net Core and what is the alternative solution for using the functionality in ASP.Net Core.
Microsoft has permanently removed Server.MapPath function from .Net Core and introduced a new interfaces IHostingEnvironment for .Net Core 2.0 and IWebHostEnvironment for .Net Core 3.0.  
What are IHostingEnvironment and IWebHostEnvironment
The IHostingEnvironment is an interface for .Net Core 2.0 and IWebHostEnvironment has replaced IHostingEnvironment in .Net Core 3.0.
Both these interfaces need to be injected as dependency in the Controller and then later used throughout the Controller.
Both these interfaces have two properties.
1. WebRootPath – Path of the www folder.
2. ContentRootPath – Path of the root folder which contains all the Application files. 
 
Namespaces
You will need to import the following namespace.
using Microsoft.AspNetCore.Hosting;
 
Using IHostingEnvironment
In the below example, the IHostingEnvironment is injected in the Controller and assigned to the private property Environment and later used to get the WebRootPath and ContentRootPath.
public class HomeController : Controller
{
    private IHostingEnvironment Environment;
 
    public HomeController(IHostingEnvironment _environment)
    {
        Environment = _environment;
    }
 
    public IActionResult Index()
    {
        string wwwPath = this.Environment.WebRootPath;
        string contentPath = this.Environment.ContentRootPath;
 
        return View();
    }
}
 
Using IWebHostEnvironment
In the below example, the IWebHostEnvironment is injected in the Controller and assigned to the private property Environment and later used to get the WebRootPath and ContentRootPath.
public class HomeController : Controller
{
    private IWebHostEnvironment Environment;
 
    public HomeController(IWebHostEnvironment _environment)
    {
        Environment = _environment;
    }
 
    public IActionResult Index()
    {
        string wwwPath = this.Environment.WebRootPath;
        string contentPath = this.Environment.ContentRootPath;
 
        return View();
    }
}

Output:
wwwPath ="ApplicationName\\wwwroot";
contentPath ="ApplicationName";

Friday 6 November 2020

Binding Dropdown List With Database In ASP.NET Core MVC

 Topic

  1. Database part.
  2. Creating an Application.
  3. Installing package for an Entity Framework Core From NuGet.
  4. Adding the Connection string and Setting up DbContext.
  5. Adding Model CountryMaster in Models Folder.
  6. Adding DbSet for CountryMaster Model in DatabaseContext class.
  7. Adding Controller.
  8. Getting Data from the database, using Entity Framework Core.
  9. Adding View.
  10. Binding Dropdownlist, using new Tag helper.
  11. Adding Index Action method to handle POST request and getting the selected values.
  12. Saving and running an Application.

Step 1

Database part

Create a sample database with the name “AllSampleCode” to show demo


Inside this database, I have added a simple table, CountryMaster, and you can see the structure, as shown below.


Step 2
 
Creating application

Now, let’s create a .NET Core Web Application. Open Visual Studio IDE from the start page and click New Project link.


Afterwards, click New Project link and it will open a new dialog with the name “New Project” inside it. From the left pane, choose templates and inside it, choose Visual C#. Afterwards, choose .NET Core template. In the middle of your pane, you will see .NET Core project templates. In templates, choose “ASP.NET Core Web Application (.NET Core)” project templates.


After choosing project template next we are going to name the project as “MVCCore1” and finally click OK button to create a project, but it will pop up another dialog with the name “New ASP.NET Core Web Application (.NET Core)”.


Inside this dialog, we are going to choose “Web application” project template to create “Web Application” and click OK button to create a project.

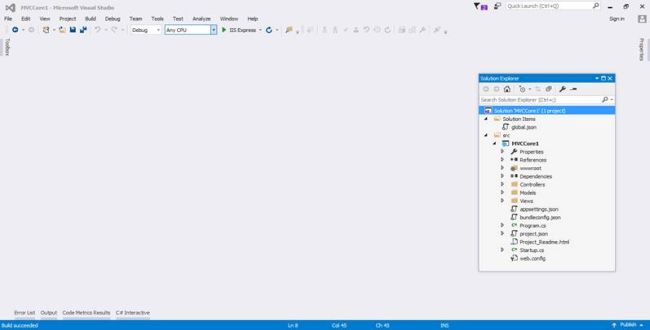
Below is the newly-created complete project view


After creating an Application, we are going to add the reference required for Entity Framework Core.

Step 3

Installing Package for Entity framework core From NuGet

To install the package just right click on the project (MVCCore1) and then select Manage NuGet package. Below dialog of NuGet Package Manager will pop up. In the browse tab, there is a search box, where you are required to type “Microsoft.EntityFrameworkCore.SqlServer” and just click Install button to install.
  1. Microsoft.EntityFrameworkCore.SqlServer


Step 4

Adding Connection string and Setting up DbContext

After adding the reference, there is a need to add a connection string in appsetting.json file.


After adding the connection string, next step is to add a class, which will inherit DbContext class, but before doing this, let's start creating a folder for Models and inside it, we are going to add this class.

For adding a folder, just right click on the project (MVCCore1), then choose Add from Menu that pops up and inside it and choose New Folder.

Add - New Folder.


Now, let’s add a class with the name DatabaseContext in model folder.

For adding model, just right click on Models folder, then select add. Inside it, select Class and add New Item; a dialog will pop up with default class selected, followed by naming class as DatabaseContext and clicking Add button.


After adding a DatabaseContext class, we are going to inherit DbContext class.

After inheriting with DbContext, we are having a constructor, which takes DbContextOptions as an input parameter and also inherits base class constructor (: base(options)) [DbContext].


Now, we are going to add new Service in Startup.cs class to inject dependency.

Now, whenever you are going to use DatabaseContext class, DbContext instance will be injected.


After completing with add Service, we are going to add Model.

Step 5
 
Adding Model CountryMaster in Models Folder

For adding model, just right click on Models folder and select Add. Inside it, select Class and add New Item. The dialog will pop up with default class, which is selected, then we are going to name class as CountryMaster and click Add button.


Step 6
 
Adding DbSet for CountryMaster Model in DatabaseContext class

After adding CountryMaster Model, now let's add DbSet for CountryMaster Model in DatabaseContext class, as shown below.


Step 7
 
Adding Controller

For adding controller, just right click on Controller folder. Select Add and inside it, select New Item. After selecting New Item, a new dialog of Add New Item will pop up.

Inside it, just choose “MVC Controller Class”, followed by naming Controller as “DemoController” and click Add button to create Controller.


Afterwards, we have clicked Add button and it creates DemoController in Controller folder, as shown below.


Step 8
 
Getting Data from Database using Entity framework core

In DemoController, we are using constructor injection to get a dependency.


Step 9
 
Adding View

For adding view, right click on the Views folder. Add New Folder and name the folder “Demo”.


After adding Demo folder, now we are going to add View inside this folder.

To add view, right click on the Demo folder, which we have added and then select Add. Inside it, select New Item followed by a new dialog with Name of Add New Item will pop up.


From Add New Item dialogs, just choose “MVC View Page” to add view. In the next step, give a name to View. The View name must be the name, which is similar to Action method name, and we are going to name it “Index” [“Index.cshtml”] and click Add button to add View.


After adding a view, we are going to use new tag helper for a binding drop-down list.

Step 10
 
Binding Dropdownlist, using new Tag helper


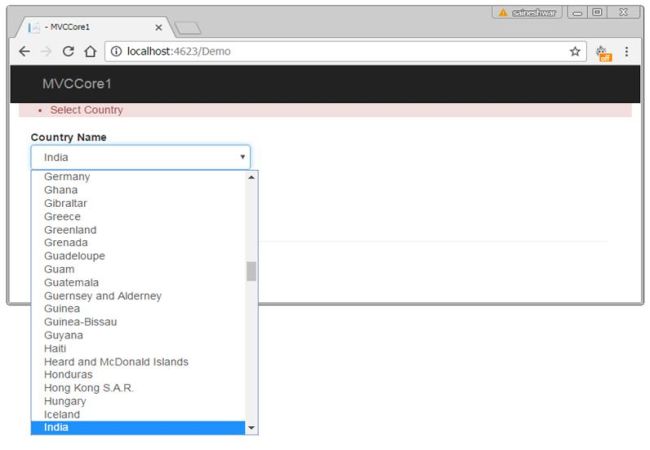
Now, save the Application and run the URL: - http://localhost:####/demo/index


Next step is to read the value, which the user will select after submitting the form.

For doing it, I have added a submit button and a @ViewBag.SelectedValue to show the selected value on view.


Complete Code Snippet of Demo.cshtml
  1. @model MVCCore1.Models.CountryMaster  
  2. @{  
  3.     <form asp-controller="Home" asp-action="Demo" method="post" class="form-horizontal" role="form">  
  4.         <div class="form-group">  
  5.             <div class="row">  
  6.                 <div class="alert-danger" asp-validation-summary="ModelOnly"></div>  
  7.                 <div class="col-xs-12 col-sm-6 col-md-6 col-lg-4">  
  8.                     <label asp-for="Name" class="control-label"></label>  
  9.                     <select asp-for="ID"   
  10.                       class="form-control"   
  11.                       asp-items="@(new SelectList(@ViewBag.ListofCountry,"ID", "Name"))">  
  12.                     </select>  
  13.                 </div>  
  14.             </div>  
  15.         </div>  
  16.         <div class="form-group">  
  17.             <div class="row">  
  18.                 <div class="col-xs-12 col-sm-6 col-md-6 col-lg-4">  
  19.                     <input id="Submit1" type="submit" value="submit" />  
  20.                 </div>  
  21.             </div>  
  22.         </div>  
  23.         <div class="form-group">  
  24.             <div class="row">  
  25.                 <div class="col-xs-12 col-sm-6 col-md-6 col-lg-4">  
  26.                     @if (ViewBag.SelectedValue != null)  
  27.                     {  
  28.                         <text>Selected Country ID: </text> @ViewBag.SelectedValue;  
  29.                     }  
  30.                 </div>  
  31.             </div>  
  32.         </div>  
  33.     </form>  
  34. }  
Step 11
 
Adding Index Action method for handling post request and getting selected values

For handling Http POST request, I have added a new action method, which takes CountryMaster model as an input parameter. This model will contain the selected value of dropdown list, which the user has selected.


Step 12
 
Saving and Running Application

Now, save and run the Application followed by accessing URL - http://localhost:####/demo/index 
  1. We are going to test validation


  2. Choose value from dropdown list.


  3. Submit the chosen value from dropdown list


  4. Debugging the values after submitting the form is given below.


Note

Thanks for reading the article. If you like it, please share it.

Thursday 5 November 2020

Managing Authentication Token Expiry In WebAssembly-based Blazor

 The Blazor WebAssembly project template doesn't feature an option to include authentication. If you want to add authentication to a WebAssembly-based Blazor application, you need to do it yourself. This article shows how to add application-wide authentication management and then to use built-in Razor components to protect the FetchData page in the standard template from unauthorised users.

There are some good starting points when looking at Authentication in Blazor applications. The official docs explain how to apply authentication to a Blazor Server application. On the client side, Chris Sainty has looked at managing authentication with an Identity database in one of his excellent series of Blazor articles. And Steve Sanderson (main Blazor bloke at Microsoft) provides a demo app that he showed at NDC Oslo in June this year.

Like the other examples, this article will show how to use a Web API endpoint to issue a JSON Web Token (JWT) to a validated user. Where this article builds on the other examples is in demonstrating how to manage the expiry of the token in the browser.

warning Warning

Just like input validation, client side authentication and authorisation management in Blazor can be circumvented. It is therefore very important that you properly protect server-side resources as well.

This walkthrough starts with the standard ASP.NET Core Hosted WebAssembly Blazor project:

Blazor WASM

I've called mine BlazorWasmAuthentication if you want to copy and paste code from here. The resulting solution includes 3 projects: Server, Client and Shared. Each will require amending.

Amend the Shared Project

The first changes are made to the Shared project. This is the .NET class library that holds code (mainly model classes) that are shared between the Client and Server projects. Add two classes, Credentials and LoginResult:

using System.ComponentModel.DataAnnotations;

namespace BlazorWasmAuthentication.Shared
{
    public class Credentials
    {
        [Required]
        public string Email { get; set; }

        [Required]
        public string Password { get; set; }
    }
}
using System;

namespace BlazorWasmAuthentication.Shared
{
    public class LoginResult
    {
        public string Token { get; set; }
        public DateTime Expiry { get; set; }
    }
}

Amend the Server Project

The Server project requires a few amendments. It needs to be configured to make use of ASP.NET Core authentication management with JWT bearer tokens. It also needs to provide an API that allows users to authenticate, and it needs to store the authorised user's credentials securely.

To simplify things, I won't configure an Identity database for the user credentials. Chris Sainty provides clear instructions on how to do this in his article, should you need help. The credentials for this example will be stored in an appSettings file, with the password hashed using the Identity PasswordHasher introduced in this article.

  1. Add an appSettings.json file to the server project with the following content:
    {
      "Jwt": {
        "Key": ITNN8mPfS2ivOqr1eRWK0Rac3sRAchQdG8BUy0pK4vQ3",
        "Issuer": "MyApp",
        "Audience": "MyAppAudience"
      },
      "Credentials": {
        "Email": "user@test.com",
        "Password": "AQAAAAEAACcQAAAAENsLEigZGIs6kEdhJ7X1d7ChFZ4TKQHHYZCDoLSiPYy/GpYw4lmMOalsn8g/7debnA=="
      }
    }
    
    The password has been hashed. Its original value was "test-password".
  2. The next step is to amend project to include an additional package: Microsoft.AspNetCore.Authentication.JwtBearer. You can add this in any way that you prefer. The simplest way is to add a package reference to the project file:
    <PackageReference Include="Microsoft.AspNetCore.Authentication.JwtBearer" Version="3.0.0" />
  3. Next, you need to configure the application to use JWT bearer tokens. This is done in Startup, and first requires the addition of some using directives:
    using System.Text;
    using Microsoft.IdentityModel.Tokens;
    using Microsoft.AspNetCore.Authentication.JwtBearer;
    using Microsoft.Extensions.Configuration;
  4. Then you need to access the Configuration API. Inject the IConfiguration service into a constructor, and assign it to a public property:
    public Startup(IConfiguration configuration) => Configuration = configuration;
    
    public IConfiguration Configuration { get; }
  5. Configure authentication in ConfigureServices:
    services.AddAuthentication(JwtBearerDefaults.AuthenticationScheme).AddJwtBearer(options =>
    {
        options.TokenValidationParameters = new TokenValidationParameters
        {
            ValidateIssuer = true,
            ValidateAudience = true,
            ValidateLifetime = true,
            ValidateIssuerSigningKey = true,
            ValidIssuer = Configuration["Jwt:Issuer"],
            ValidAudience = Configuration["Jwt:Audience"],
            IssuerSigningKey = new SymmetricSecurityKey(Encoding.UTF8.GetBytes(Configuration["Jwt:Key"]))
        };
    }); 
  6. Then add authentication and authorisation middleware to the request pipeline in the Configure method. Ensure that they are added after Routing and before EndPoint configuration:
    app.UseAuthentication();
    app.UseAuthorization();
  7. Add an [Authorize] attribute to the existing WeatherForecast controller:
    namespace BlazorWasmAuthentication.Server.Controllers
    {
        [Authorize]
        [ApiController]
        [Route("[controller]")]
        public class WeatherForecastController : ControllerBase
        {
    
    Remembering the warning at the top of this article, this is an important step. If you don't want unauthorised users to be able to access the information provided by the weather forecast service, it is not enough to use client side code to prevent access. Anyone with fairly basic knowledge of browser developer tools might be able to circumvent client-side restrictions.
  8. Finally, create a Web API controller named LoginContoller:
    using BlazorWasmAuthentication.Shared;
    using Microsoft.AspNetCore.Identity;
    using Microsoft.AspNetCore.Mvc;
    using Microsoft.Extensions.Configuration;
    using Microsoft.IdentityModel.Tokens;
    using System;
    using System.IdentityModel.Tokens.Jwt;
    using System.Security.Claims;
    using System.Text;
    
    namespace BlazorWasmAuthentication.Server.Controllers
    {
    
        [ApiController]
        public class LoginController : ControllerBase
        {
            private readonly IConfiguration_configuration;
    
            public LoginController(IConfiguration configuration) => _configuration = configuration;
    
            [HttpPost("api/login")]
    
            public LoginResult Login(Credentials credentials)
            {
                var expiry = DateTime.Now.AddMinutes(2);
                return ValidateCredentials(credentials) ? new LoginResult { Token = GenerateJWT(credentials.Email, expiry), Expiry = expiry } : new LoginResult();
            }
    
            bool ValidateCredentials(Credentials credentials)
            {
              var user = _configuration.GetSection("Credentials").Get<Credentials>();
              var passwordHasher = new PasswordHasher<string>();
              return passwordHasher.VerifyHashedPassword(null, user.Password, credentials.Password) == PasswordVerificationResult.Success;
            }
    
            private string GenerateJWT(string email, DateTime expiry)
            {
              var securityKey = new SymmetricSecurityKey(Encoding.UTF8.GetBytes(_configuration["Jwt:Key"]));
              var token = new JwtSecurityToken(
                  _configuration["Jwt:Issuer"],
                  _configuration["Jwt:Audience"],
                  new[] { new Claim(ClaimTypes.Name, email) },
                  expires: expiry,
                  signingCredentials: new SigningCredentials(securityKey, SecurityAlgorithms.HmacSha256)
              );
              var tokenHandler = new JwtSecurityTokenHandler();
              return tokenHandler.WriteToken(token);
            }
        }
    }
    For the purposes of demonstration, the token expiry is set to 2 minutes. This is so that you can test expiry without growing old. The Web API entry point validates the credentials. In this example, the code simply reads the credentials stored in the configuration file and compares them to the posted values. If they are valid, a LoginResult is returned complete with a token and an expiry. Otherwise an empty LoginResult is returned. The code for generating the token is pretty much boilerplate, and lifted directly out of Steve Sanderson's demo.

The Client Application

Authentication management in the client application relies on two principal actors: a class that derives from AuthenticationStateProvider, implementing its GetAuthenticationStateAsync method; and a CascadingAuthenticationState component. The CascadingAuthenticationState component obtains the current authentication state of the user by subscribing to the AuthenticationStateProvider's AuthenticationStateChanged event. Then the CascadingAuthenticationState component makes that information available to children via a cascading value of type Task<AuthenticationState>. The AuthenticationStateProvider is responsible for setting the authentication status of the user.

  1. Start by adding a package reference to Microsoft.AspNetCore.Components.Authorization in the Client project's csproj file:
    <PackageReference Include="Microsoft.AspNetCore.Authentication.JwtBearer" Version="3.1.0-preview1.19508.20" />
  2. Add a using directive to the _Imports.razor file to bring the contents of the package into scope along with the ASP.NET Core authentication package:
    @using Microsoft.AspNetCore.Authorization
    @using Microsoft.AspNetCore.Components.Authorization
  3. Add a folder named AuthenticationStateProviders, and inside it, add a C# class file named TokenAuthenticationStateProvider.cs with the following code:
    using Microsoft.AspNetCore.Components.Authorization;
    using Microsoft.JSInterop;
    using System;
    using System.Collections.Generic;
    using System.Linq;
    using System.Security.Claims;
    using System.Text.Json;
    using System.Threading.Tasks;
    
    namespace BlazorWasmAuthentication.Client.AuthenticationStateProviders
    {
        public class TokenAuthenticationStateProvider : AuthenticationStateProvider
        {
            private readonly IJSRuntime_jsRuntime;
    
            public TokenAuthenticationStateProvider(IJSRuntime jsRuntime)
            {
                _jsRuntime = jsRuntime;
            }
            
            public async Task SetTokenAsync(string token, DateTime expiry = default)
            {
                if (token == null)
                {
                    await _jsRuntime.InvokeAsync<object>("localStorage.removeItem", "authToken");
                    await _jsRuntime.InvokeAsync<object>("localStorage.removeItem", "authTokenExpiry");
                }
                else
                {
                    await _jsRuntime.InvokeAsync<object>("localStorage.setItem", "authToken", token);
                    await _jsRuntime.InvokeAsync<object>("localStorage.setItem", "authTokenExpiry", expiry);
                }
    
                NotifyAuthenticationStateChanged(GetAuthenticationStateAsync());
            }
    
            public async Task<string> GetTokenAsync()
            {
                var expiry = await _jsRuntime.InvokeAsync<object>("localStorage.getItem", "authTokenExpiry");
                if(expiry != null)
                {
                    if(DateTime.Parse(expiry.ToString()) > DateTime.Now)
                    {
                        return await _jsRuntime.InvokeAsync<string>("localStorage.getItem", "authToken");
                    }
                    else
                    {
                        await SetTokenAsync(null);
                    }
                }    
                return null;
            }
    
    
            public override async Task<AuthenticationState> GetAuthenticationStateAsync()
            {
                var token = await GetTokenAsync();
                var identity = string.IsNullOrEmpty(token)
                    ? new ClaimsIdentity()
                    : new ClaimsIdentity(ParseClaimsFromJwt(token), "jwt");
                return new AuthenticationState(new ClaimsPrincipal(identity));
            }
    
            private static IEnumerable<Claim> ParseClaimsFromJwt(string jwt)
            {
                var payload = jwt.Split('.')[1];
                var jsonBytes = ParseBase64WithoutPadding(payload);
                var keyValuePairs = JsonSerializer.Deserialize<Dictionary<string, object>>(jsonBytes);
                return keyValuePairs.Select(kvp => new Claim(kvp.Key, kvp.Value.ToString()));
            }
    
            private static byte[] ParseBase64WithoutPadding(string base64)
            {
                switch (base64.Length % 4)
                {
                    case 2: base64 += "=="; break;
                    case 3: base64 += "="; break;
                }
                return Convert.FromBase64String(base64);
            }
        }
    }
    This code is largely based on the Mission Control demo. The AuthenticationStateProvider includes a SetTokenAsync method and a GetTokenAsync method. The SetTokenAsync method uses Blazor's JavaScript interop service to use the browser's local storage feaure to store the token, if one is provided. It also stores the token's expiry time. If no token is provided, the method removes both the storage keys related to the token and its expiry time, effectively logging the user out. Finally, the method calls NotifyAuthenticationStateChanged, which raises the AuthenticationStateChanged event that the CascadingAuthenticationState component subscribes to, updating the CascadingAuthenticationState component about the current authentication status of the user.

    The GetTokenAsync method checks the expiry time of the token. If the expiry time has expired, the SetToken method is called without a token being provided, logging the user out. Otherwise a valid token is returned, if one exists.

    The final public method, which must be overridden in classes that derive from AuthenticationStateProvider, is the GetAuthenticationStateAsync method. This method parses the JSON Web Token and creates a ClaimsPrincipal (representing the current user) with either the identity information (ClaimsIdentity) obtained from the token, or an empty ClaimsIdentity if no token exists.
    info The method for parsing the JWT is taken from the Mission Control demo. JWTs contain three parts: a header, a payload (the source of the ClaimsIdentity information) and a signature. Each part is Base64 Url encoded and then the parts are joined using dots. The final output e.g. header.payload.signature forms the token. When using Base64 Url encoding, output padding is optional, and in fact is not included in the generation of JWTs. The System.Convert.FromBase64String method expects the input string to have output padding where necessary, and will raise a FormatException if it is missing. Therefore the additional private method at the end of the class is used to put padding characters (=) on to the end of the payload if they are needed before the string is decoded.
  4. The AuthenticationStateProvider needs to be registered with the dependency injection system. This is done in the ConfigureServices method in Startup. Add authentication services to the application too:
    public void ConfigureServices(IServiceCollection services)
    {
        services.AddAuthorizationCore();
        services.AddScoped<TokenAuthenticationStateProvider>();
        services.AddScoped<AuthenticationStateProvider>(provider => provider.GetRequiredService<TokenAuthenticationStateProvider>());
    }
    The TokenAuthenticationStateProvider is registered so that it can be injected directly into components etc, and then the injected service is registered as the implementation of AuthenticationStateProvider. This isn't necessarily a recommended pattern. But it makes things simpler for demo purposes. If you want to adopt a more robust approach, move the methods that get and set tokens from the TokenAuthenticationStateProvider into a separate service and use that where this demo explicitly injects the TokenAuthenticationStateProvider. Check Chris Sainty's AuthService for some inspiration.
  5. The next step involves creating the Login form. Add a new Razor Component to the Pages folder named Login.razor wih the following code:
    @inject HttpClient Http
    @inject TokenAuthenticationStateProvider AuthStateProvider
    
    <div class="container col-6">
        @if (loginFailure)
        {
            <div class="alert alert-danger">Your credentials did not work. Please try again.</div>
        }
        <div class="card">
            <div class="card-body">
                <h5 class="card-title">Login</h5>
                  <EditForm @ref="loginform" Model="credentials" OnValidSubmit="SubmitCredentials">
                    <DataAnnotationsValidator />
    
                    <div class="form-group">>
                        <label>Email address</label>
                        <InputText class="form-control" @bind-Value="credentials.Email" />
                        <ValidationMessage For="@(()=> credentials.Email)" />
                    </div>
                    <div class="form-group">
                        <label>Password</label>
                        <InputText type="password" class="form-control" @bind-Value="credentials.Password" />
                        <ValidationMessage For="@(()=> credentials.Password)" />
                    <div/>
                    <button type="submit" class="btn btn-outline-primary btn-sm">Submit</button>
                </EditForm>
            </div>
        </div>
    </div>
    @code {
        Credentials credentials = new Credentials();
        bool loginFailure;
    
        EditForm loginform { get; set; }
    
        async Task SubmitCredentials()
        {
            var result = await Http.PostJsonAsync<LoginResult>("api/login", credentials);
            loginFailure = result.Token == null;
            if (!loginFailure)
            {
                await AuthStateProvider.SetTokenAsync(result.Token, result.Expiry);
            }
        }
    }
    
    There is not much to explan here. If the form validation succeeds, the SubmitCredentials method is called. If the login is successful (indicated by the presence of a token in the response from the LoginController), the injected TokenAuthenticationStateProvider sets the token, which as you remember, results in the authentication status being updated with any component that subscribes to the NotifyAuthenticationStateChanged event.
  6. Now it's time to introduce the component that does subscribe to the NotifyAuthenticationStateChanged event, the CascadingAuthenticationState component. Open the App.razor file and replace the existing content with the following:
    <CascadingAuthenticationState>
        <Router AppAssembly="@typeof(Program).Assembly">
            <Found Context="routeData">
                <AuthorizeRouteView RouteData="@routeData" DefaultLayout="@typeof(MainLayout)">
                    <NotAuthorized>
                        <Login/>
                    </NotAuthorized>
                </AuthorizeRouteView>
            </Found>
            <NotFound>
                <LayoutView Layout="@typeof(MainLayout)">
                    <p>Sorry, there's nothing at this address.</p>
                </LayoutView>
            </NotFound>
        </Router>
    </CascadingAuthenticationState>
    
    First, you added the wrapped the entire application in the CascadingAuthenticationState component, ensuring that any other application component is able to receive its Task<AuthenticationState> cascading value as a parameter. You changed the RouteView component for an AuthorizeRouteView, which does the same except that it only displays the content of the page if the user is authenticated. If the user is not authenticated, the child content of the NotAuthorized component is displayed, i.e. the login component that you just created.
  7. Change the top of the FetchData.razor file to look like this:
    @page "/fetchdata"
    @using BlazorWasmAuthentication.Shared
    @using System.Net.Http.Headers;
    @inject HttpClient Http
    @inject TokenAuthenticationStateProvider TokenProvider
    @attribute[Authorize]
    <h1>Weather forecast</h1>
    You changes involve the addition of a using directive to bring System.Net.Http.Headers into scope; you injected the TokenAuthenticationStateProvider; and you added an [Authorize] attribute to the page. If you try to run the page at this stage, you should see the login form that you created:
    login form
  8. Now amend the @code block in Fetchdata as follows:
    @code {
        private WeatherForecast[] forecasts;
    
        protected override async Task OnInitializedAsync()
        {
            var token = await TokenProvider.GetTokenAsync();
            if (token != null)
            {
                Http.DefaultRequestHeaders.Authorization = new AuthenticationHeaderValue("Bearer", token);
                forecasts = await Http.GetJsonAsync<WeatherForecast[]>("WeatherForecast");
            }
        }
    }
    
    The existing code has been altered to obtain the JWT token and then add it to the api request for weather forecast data as a request header. Without this, there is no way for the API to authenticate the user. Remember, the GetTokenAsync method will log the user out if the token has expired. If that happens, the user will be presented with the login form again.
  9. Open the MainLayout.razor file and replace the About link with the following code:
    <AuthorizeView>Logged in as @context.User.Identity.Name 
        <button class="btn btn-sm btn-outline-dark" @onclick="@(() => TokenProvider.SetTokenAsync(null))">Logout</button>
    </AuthorizeView>
    

This last step completes the demo. Ensuring that the Server project is set as the Startup project, run the application in the browser. Navigate to the FetchData page and log in. You should see the data, and the message at the top of the page telling you that you are logged in together with a log out button. Click it, and you should be presented with the login form again. This time, after you have logged in, wait for a couple of minutes. Then refresh the page. You should get logged out and presented with the login form again.