Wednesday 22 March 2023

Is possible to use a 'DeviceWatcher' in a WinForms?

 Yes, it is possible, provided you are running on Win 8 / Win Server 2012.

Scott Hanselman has a nice article on how to call WinRT methods from a desktop app.

The basics of it are, add the following to your project file (Unload it, edit it, reload it):

<PropertyGroup>
    <TargetPlatformVersion>8.0</TargetPlatformVersion>
</PropertyGroup>

Then add a reference to C:\Program Files (x86)\Reference Assemblies\Microsoft\Framework\.NETFramework\v4.5\Facades\System.Runtime.InteropServices.WindowsRuntime.dll

You also need to add references to the Windows.Devices and Windows.Foundation through the Add References Dialog under the Windows tab:

enter image description here

Once you do that, you can instantiate the Watcher and add event handlers:

DeviceWatcher dw = Windows.Devices.Enumeration.DeviceInformation.CreateWatcher();

dw.Added += dw_Added;
dw.Removed += dw_Removed;

dw.Start();

Monday 13 March 2023

Setting Receive Sensitivity and Transmit Power on Impinj Readers using LLRP

 When configuring the Impinj RAIN RFID readers, one of the most common questions is how to set the Receive Sensitivity and Transmit Power settings. This article describes how to set those settings using LLRP, such as in the Octane LTK.

These settings are configured in the C# code sample below using the SET_READER_CONFIG class of the AntennaConfiguration message. You can override these settings in each antenna AI Spec using the AddROSpec code via SET_READER_CONFIG message.

For both Receive Sensitivity and Transmit Power settings, you will use the index (not the literal Receive Sensitivity/Transmit Power value) to configure those settings in LLRP. Therefore, it is important that you identify the correct index first.

Note: In the Octane SDK, you will use the literal value when configuring the Receive Sensitivity/Transmit Power settings.

If you want to jump to the Index-Value tables and quickly look up the correct index for the Receive Sensitivity and Transmit Power settings, click here.

Although the Receive Sensitivity and Transmit Power can be set independently on each antenna port of the reader, this example configures all of them the same by using the antenna Id value zero (0).

Setting Receive Sensitivity

If you want to set Receive Sensitivity, you have to identify the correct Index to input.

If we query the capabilities of the reader using the RShell command ">show rfid llrp capabilities", we can see the Receive Sensitivity Table, part of which is shown here:

<ReceiveSensitivityTableEntry>
<Index>1</Index>
<ReceiveSensitivityValue>0</ReceiveSensitivityValue>
</ReceiveSensitivityTableEntry>
<ReceiveSensitivityTableEntry>
<Index>2</Index>
<ReceiveSensitivityValue>10</ReceiveSensitivityValue>
</ReceiveSensitivityTableEntry>
<ReceiveSensitivityTableEntry>
<Index>3</Index>
<ReceiveSensitivityValue>11</ReceiveSensitivityValue>
</ReceiveSensitivityTableEntry>

Each Index is associated with a ReceiveSensitivityValue, which you can use to help you find the correct index.

The ReceiveSensitivityValue is the offset in dB that the reader will implement from its lowest (i.e. most sensitive) receive sensitivity to filter out tag reads if their RSSI is too low. The ReceiveSensitivityValue is 0 by default, which means that the reader is at its lowest receive sensitivity and won’t filter out tag reads.

Translating the ReceiveSensitivityValue to the true receive sensitivity setting in dBm requires that the user know the reader’s lowest possible sensitivity value. The basic equation is as follows:

  • Receive Sensitivity = ReceiveSensitivityValue + Reader Lowest Receive Sensitivity

(Note: the Reader Lowest Receive Sensitivity is always a negative number.)

For Impinj Speedway RAIN RFID readers, the lowest receive sensitivity is -80 dBm, and for Impinj R700 RAIN RFID readers, the lowest receive sensitivity is -90 dBm. For each index, you can calculate the actual sensitivity setting on the reader as follows:

Impinj Speedway readers (R120, R220, R420)

Receive Sensitivity = ReceiveSensitivityValue + (-80 dBm)

<Example>
Index 1 -> ReceiveSensitivityValue 0 -> 0 + (-80) = -80 dBm
Index 2 -> ReceiveSensitivityValue 10 -> 10 + (-80) = -70 dBm
Index 3 -> ReceiveSensitivityValue 11 -> 11 + (-80) = -69 dBm
Index 4 -> ReceiveSensitivityValue 12 -> 12 + (-80) = -68 dBm
(Continues on in 1dB steps up to Index 42)
Index 42 -> ReceiveSensitivityValue 50 = 50 + (-80) = -30dBm (the highest, least sensitive setting)

For Impinj Speedway readers, Index 1 is associated with the lowest receive sensitivity, ReceiveSensitivityValue 0, or -80 dBm. The next lowest receive sensitivity, Index 2, is associated with ReceiveSensitivityValue 10, or -70 dBm, a 10 dB jump higher in receive sensitivity.

(Note: There are no selectable receive sensitivity values between -80 dBm and -70 dBm.)

Each index following Index 2 increases by 1 dB until the user reaches Index 42, associated with ReceiveSensitivityValue 50, or -30 dBm, the highest, least sensitive reader sensitivity setting.

Impinj R700 readers

Receive Sensitivity = ReceiveSensitivityValue + (-90 dB)

<Example>
Index 1 -> ReceiveSensitivityValue 0 -> 0 + (-90) = -90 dB
Index 2 -> ReceiveSensitivityValue 10 -> 10 + (-90) = -80 dB
Index 3 -> ReceiveSensitivityValue 11 -> 11 + (-90) = -79 dB
Index 4 -> ReceiveSensitivityValue 12 -> 12 + (-90) = -78 dB
(Continues on in 1dB steps up to Index 52)
Index 52 -> ReceiveSensitivityValue 60 = 60 + (-90) = -30dB (the highest, least sensitive setting)

For Impinj R700 readers, Index 1 is associated with the lowest receive sensitivity, ReceiveSensitivityValue 0, or -90 dBm. The next lowest receive sensitivity, Index 2, is associated with ReceiveSensitivityValue 10, or -80 dBm, a 10 dB jump higher in receive sensitivity.

(Note: There are no selectable receive sensitivity values between -90 dBm and -80 dBm.)

Each Index following Index 2 increases by 1 dB until the user reaches Index 52, associated with ReceiveSensitivityValue 50, or -30 dBm, the highest, least sensitive reader sensitivity setting.

Setting Transmit Power

Transmit power is a little more straightforward. Each Index is associated with a TransmitPowerValue, which is equal to the Transmit Power in dBm multiplied by 100.

<TransmitPowerLevelTableEntry>
<Index>1</Index>
<TransmitPowerValue>1000</TransmitPowerValue>
</TransmitPowerLevelTableEntry>
<TransmitPowerLevelTableEntry>
<Index>2</Index>
<TransmitPowerValue>1025</TransmitPowerValue>
</TransmitPowerLevelTableEntry>
<TransmitPowerLevelTableEntry>
<Index>3</Index>
<TransmitPowerValue>1050</TransmitPowerValue>
</TransmitPowerLevelTableEntry>

<Example>
An Index of ‘1’ is associated with TransmitPowerValue of 1000 or +10.00 dBm (the lowest transmit power on both the Impinj R700 readers and the Impinj Speedway readers). Each step in the index table increases the transmit power value by 0.25dB up to the maximum power, according to the following tables:

Note: The following tables show only the reader's maximum hardware capabilities. For the actual implementation in each country/region, please make sure to comply with the local RFID regulations for the maximum allowed transmit power.

If you want to jump to the Index-Value tables and quickly look up the correct index for the Transmit Power settings, click here.

Impinj Speeday R420 and R220 (dBm)

 FCC, GX1, 2, 3EU1EU2JP2
HLA 1.x

AC: 32.5

PoE: 30.0

AC: 31.5

PoE: 30.0

N/A

AC: 30.0

PoE: 30.0

HLA 2.x

AC: 32.5

PoE: 31.5

AC: 31.5

PoE: 30.0

N/A

AC: 30.0

PoE: 30.0

HLA 3.x

AC: 32.5

PoE: 31.5

AC: 31.5

PoE: 30.0

AC: 33.0

PoE: 33.0

AC: 30.0

PoE: 30.0

Note: HLA - High Level Assembly. Refer to the sticker attached to the side of the reader.

Impinj Speedway R120 (dBm)

 FCC, GX1, 2, 3EU1EU2JP2
Without Antenna Hub

AC: 30.0

PoE: 30.0

AC: 30.0

PoE: 30.0

N/A

AC: 30.0

PoE: 30.0

With Antenna Hub

AC: 32.5

PoE: 31.5

AC: 31.5

PoE: 30.0

N/A

AC: 30.0

PoE: 30.0


Impinj R700 (dBm)

 FCCEU1EU2JP
PoE30.030.030.030.0
PoE+33.031.533.030.0


Below is an example of configuring both Receive Sensitivity and Transmit Power in the Octane LTK.

msg.AntennaConfiguration = new PARAM_AntennaConfiguration[1];
msg.AntennaConfiguration[0] = new PARAM_AntennaConfiguration();
msg.AntennaConfiguration[0].AirProtocolInventoryCommandSettings = new
UNION_AirProtocolInventoryCommandSettings();
 
msg.AntennaConfiguration[0].AirProtocolInventoryCommandSettings.Add(cmd);
msg.AntennaConfiguration[0].AntennaID = 0;
 
msg.AntennaConfiguration[0].RFReceiver = new PARAM_RFReceiver();
// Receiver sensitivity
msg.AntennaConfiguration[0].RFReceiver.ReceiverSensitivity = 1;
 
msg.AntennaConfiguration[0].RFTransmitter = new PARAM_RFTransmitter();
msg.AntennaConfiguration[0].RFTransmitter.ChannelIndex = 1;
msg.AntennaConfiguration[0].RFTransmitter.HopTableID = 1;
// Transmit power
msg.AntennaConfiguration[0].RFTransmitter.TransmitPower = 61;

LLRP (Low-Level Reader Protocol)

 This article will cover the "Hello World" LLRP application in C# .NET Framework 4.6.1. It will show how to setup an Impinj Speedway RAIN RFID reader with minimal configuration and start reading tags. To keep things concise, much of the error handling required in a production application has been omitted.


First, you'll need to download the LLRP Toolkit (LTK) for .NET. It's available at the following link as well as through NuGet.

If using Visual Studio, you can add the NuGet package through the solution explorer by first creating an empty C# application project, and then right clicking on the solution's name and selecting "Manage NuGet Packages..". You should then be able to switch to the 'Browse' tab and search for "Impinj", which should show the following NuGet package listed:

mceclip0.png

You will then want to click on this NuGet package and select the "Install" button after ensuring you've selected the latest stable version from the dropdown, example shown below:

mceclip2.png

Assuming you are on .Net Framework 4.6.1 or greater, this should install without issue, and you should now be able to use the Octane LTK libraries in your application to communicate with your Speedway reader.

If manually installing the libraries instead, after downloading the libraries to your system, create a new sub-directory called 'lib' in your project and extract these four LTK files to it:

LLRP.dll
LLRP.Impinj.dll

Open up your project in Visual Studio and add references to these libraries by selecting "Project->Add Reference" from the menu. You will need to choose the "Browse" option and navigate to these .dll files in the 'lib' folder you just created.

mceclip0.png

Add the library import statements at the top of your class.

An ROSpec tells the Speedway reader what data you want to read and when you want to read it. The Speedway readers support one ROSpec on the reader at a time. Before you can add a new ROSpec, you must delete any existing ones. This can be done by sending a DELETE_ROSPEC message.

using Org.LLRP.LTK.LLRPV1;
using Org.LLRP.LTK.LLRPV1.DataType;
using Org.LLRP.LTK.LLRPV1.Impinj;

static void Delete_RoSpec()
{
   MSG_DELETE_ROSPEC msg = new MSG_DELETE_ROSPEC();
   msg.ROSpecID = 0;
   MSG_ERROR_MESSAGE msg_err;
 
   MSG_DELETE_ROSPEC_RESPONSE rsp =
   reader.DELETE_ROSPEC(msg, out msg_err, 2000);
 
   if (rsp != null)
   {
      // Success
      Console.WriteLine(rsp.ToString());
   }
   else if (msg_err != null)
   {
      // Error
      Console.WriteLine(msg_err.ToString());
   }
   else
   {
      // Timeout
      Console.WriteLine("Timeout Error.");           
   }
}

Now you can add a new ROSpec using the ADD_ROSPEC message.

static void Add_RoSpec()
{
   MSG_ERROR_MESSAGE msg_err;
   MSG_ADD_ROSPEC msg = new MSG_ADD_ROSPEC();
 
   // Reader Operation Spec (ROSpec)
   msg.ROSpec = new PARAM_ROSpec();
   // ROSpec must be disabled by default
   msg.ROSpec.CurrentState = ENUM_ROSpecState.Disabled;
   // The ROSpec ID can be set to any number
   // You must use the same ID when enabling this ROSpec
   msg.ROSpec.ROSpecID = 123;
 
   // ROBoundarySpec
   // Specifies the start and stop triggers for the ROSpec
   msg.ROSpec.ROBoundarySpec = new PARAM_ROBoundarySpec();
   // Immediate start trigger
   // The reader will start reading tags as soon as the ROSpec
// is enabled msg.ROSpec.ROBoundarySpec.ROSpecStartTrigger = new PARAM_ROSpecStartTrigger(); msg.ROSpec.ROBoundarySpec.ROSpecStartTrigger
.ROSpecStartTriggerType = ENUM_ROSpecStartTriggerType.Immediate;
// No stop trigger. Keep reading tags until the ROSpec is disabled. msg.ROSpec.ROBoundarySpec.ROSpecStopTrigger =
new PARAM_ROSpecStopTrigger(); msg.ROSpec.ROBoundarySpec.ROSpecStopTrigger.ROSpecStopTriggerType = ENUM_ROSpecStopTriggerType.Null; // Antenna Inventory Spec (AISpec) // Specifies which antennas and protocol to use msg.ROSpec.SpecParameter = new UNION_SpecParameter(); PARAM_AISpec aiSpec = new PARAM_AISpec(); aiSpec.AntennaIDs = new UInt16Array(); // Enable all antennas aiSpec.AntennaIDs.Add(0); // No AISpec stop trigger. It stops when the ROSpec stops. aiSpec.AISpecStopTrigger = new PARAM_AISpecStopTrigger(); aiSpec.AISpecStopTrigger.AISpecStopTriggerType = ENUM_AISpecStopTriggerType.Null; aiSpec.InventoryParameterSpec =
new PARAM_InventoryParameterSpec[1]; aiSpec.InventoryParameterSpec[0] =
new PARAM_InventoryParameterSpec(); aiSpec.InventoryParameterSpec[0].InventoryParameterSpecID = 1234; aiSpec.InventoryParameterSpec[0].ProtocolID = ENUM_AirProtocols.EPCGlobalClass1Gen2; msg.ROSpec.SpecParameter.Add(aiSpec); // Report Spec msg.ROSpec.ROReportSpec = new PARAM_ROReportSpec(); // Send a report for every tag read msg.ROSpec.ROReportSpec.ROReportTrigger = ENUM_ROReportTriggerType.Upon_N_Tags_Or_End_Of_ROSpec; msg.ROSpec.ROReportSpec.N = 1; msg.ROSpec.ROReportSpec.TagReportContentSelector = new PARAM_TagReportContentSelector(); MSG_ADD_ROSPEC_RESPONSE rsp =
reader.ADD_ROSPEC(msg, out msg_err, 2000); if (rsp != null) { // Success Console.WriteLine (rsp.ToString()); } else if (msg_err != null) { // Error Console.WriteLine (msg_err.ToString()); } else { // Timeout Console.WriteLine("Timeout Error."); } }

When an ROSpec is added, it is disabled by default. Before it can be used, it must be enabled with the ENABLE_ROSPEC message.

static void Enable_RoSpec()
{
   MSG_ERROR_MESSAGE msg_err;
   MSG_ENABLE_ROSPEC msg = new MSG_ENABLE_ROSPEC();
   msg.ROSpecID = 123;
   MSG_ENABLE_ROSPEC_RESPONSE rsp =
   reader.ENABLE_ROSPEC(msg, out msg_err, 2000);
   if (rsp != null)
   {
      // Success
      Console.WriteLine (rsp.ToString());
   }
   else if (msg_err != null)
   {
      // Error
      Console.WriteLine (msg_err.ToString());
   }
   else
   {
      // Timeout
      Console.WriteLine("Timeout Error.");
   }
}

Since we set our ROSpec start trigger type to "immediate", the Speedway reader will begin reading tags as soon as the ENABLE_ROSPEC message is sent. In order to receive tag reports you must specify an event handler to call when data is ready. Here's an example of what that function should look like.

static void OnReportEvent(MSG_RO_ACCESS_REPORT msg)
{
   // Loop through all the tags in the report
   for (int i = 0; i < msg.TagReportData.Length; i++)
   {
      if (msg.TagReportData[i].EPCParameter.Count > 0)
      {
         string epc;
         // Two possible types of EPC: 96-bit and 128-bit
         if (msg.TagReportData[i].EPCParameter[0].GetType() ==
            typeof(PARAM_EPC_96))
         {
            epc = ((PARAM_EPC_96)
               (msg.TagReportData[i].EPCParameter[0]))
.EPC.ToHexString(); } else { epc = ((PARAM_EPCData) (msg.TagReportData[i].EPCParameter[0]))
.EPC.ToHexString(); } Console.WriteLine("epc = " + epc); } } }

Now that we have all of the basic functions written, let's write the main function that will connect to the reader and send all of the messages.

static LLRPClient reader;
 
static void Main(string[] args)
{
   // Create a LLRPClient instance.
   reader = new LLRPClient();
 
   /*
      Connect to the reader.
      Replace "SpeedwayR-10-25-32" with your reader's hostname.
      The second argument (2000) is a timeout value in milliseconds.
      If a connection cannot be established within this timeframe,
      the call will fail.
   */
   ENUM_ConnectionAttemptStatusType status;
   reader.Open("SpeedwayR-10-25-32", 2000, out status);
 
   // Check for a connection error
   if (status != ENUM_ConnectionAttemptStatusType.Success)
   {
      // Could not connect to the reader.
      // Print out the error
      Console.WriteLine(status.ToString());
      // Do something here.
      // Your application should not continue.
      return;
   }
 
   /*
      If you successfully connect to the reader, the next step is to
      create a delegate. The delegate determines which function gets
      called when a report event occurs.
   */
   reader.OnRoAccessReportReceived += new
   delegateRoAccessReport(OnReportEvent);
 
   // Send the messages
   Delete_RoSpec();
   Add_RoSpec();
   Enable_RoSpec();
 
   // Keep reading tags until the user presses return
   Console.ReadLine();
 
   // Cleanup the reader by deleting the ROSpec
   Delete_RoSpec();
}

Saturday 11 March 2023

Stored Procedure in SQL Server

 A stored procedure is a group of one or more pre-compiled SQL statements into a logical unit. It is stored as an object inside the database server. It is a subroutine or a subprogram in the common computing language that has been created and stored in the database. Each procedure in SQL Server always contains a name, parameter lists, and Transact-SQL statements. The SQL Database Server stores the stored procedures as named objects. We can invoke the procedures by using triggers, other procedures, and applications such as Java, Python, PHP, etc. It can support almost all relational database systems.

SQL Server builds an execution plan when the stored procedure is called the first time and stores them in the cache memory. The plan is reused by SQL Server in subsequent executions of the stored procedure, allowing it to run quickly and efficiently.

Features of Stored Procedures in SQL Server

The following are the features of stored procedure in SQL Server:

  • Reduced Traffic: A stored procedure reduces network traffic between the application and the database server, resulting in increased performance. It is because instead of sending several SQL statements, the application only needs to send the name of the stored procedure and its parameters.
  • Stronger Security: The procedure is always secure because it manages which processes and activities we can perform. It removes the need for permissions to be granted at the database object level and simplifies the security layers.
  • Reusable: Stored procedures are reusable. It reduces code inconsistency, prevents unnecessary rewrites of the same code, and makes the code transparent to all applications or users.
  • Easy Maintenance: The procedures are easier to maintain without restarting or deploying the application.
  • Improved Performance: Stored Procedure increases the application performance. Once we create the stored procedures and compile them the first time, it creates an execution plan reused for subsequent executions. The procedure is usually processed quicker because the query processor does not have to create a new plan.

Types of Stored Procedures

SQL Server categorizes the stored procedures mainly in two types:

  1. User-defined Stored Procedures
  2. System Stored Procedures

User-defined Stored Procedures

Database developers or database administrators build user-defined stored procedures. These procedures provide one or more SQL statements for selecting, updating, or removing data from database tables. A stored procedure specified by the user accepts input parameters and returns output parameters. DDL and DML commands are used together in a user-defined procedure.

We can further divide this procedure into two types:

  • T-SQL Stored Procedures: Transact-SQL procedures are one of the most popular types of SQL Server procedures. It takes parameters and returns them. These procedures handle INSERT, UPDATE, and DELETE statements with or without parameters and output row data.
  • CLR Stored Procedures: The SQL Server procedures are a group of SQL commands, and the CLR indicates the common language runtime. CLR stored procedures are made up of the CLR and a stored procedure, which is written in a CLR-based language like VB.NET or C#. CLR procedures are .Net objects that run in the SQL Server database's memory.

System Stored Procedures

The server's administrative tasks depend primarily on system stored procedures. When SQL Server is installed, it creates system procedures. The system stored procedures prevent the administrator from querying or modifying the system and database catalog tables directly. Developers often ignore system stored procedures.

SQL Server Stored Procedures Syntax

The following are the basic syntax to create stored procedures in SQL Server:

  1. CREATE PROCEDURE [schema_name].procedure_name  
  2.                 @parameter_name data_type,   
  3.                 ....   
  4.                 parameter_name data_type  
  5. AS  
  6.    BEGIN  
  7.       -- SQL statements  
  8.       -- SELECT, INSERT, UPDATE, or DELETE statement  
  9.    END  

Parameter Explanations

The stored procedure syntax has the following parameters:

Schema_name: It is the name of your database or schema. By default, a procedure is associated with the current database, but we can also create it into another database by specifying the DB name.

Procedure_Name: It represents the name of your stored procedure that should be meaningful names so that you can identify them quickly. It cannot be the system reserved keywords.

Parameter_Name: It represents the number of parameters. It may be zero or more based upon the user requirements. We must ensure that we used the appropriate data type. For example, @Name VARCHAR(50).

SET NOCOUNT ON in Stored Procedure

In some cases, we use the SET NOCOUNT ON statement in the stored procedure. This statement prevents the message that displays the number of rows affected by SQL queries from being shown. NOCOUNT denotes that the count is turned off. It means that if SET NOCOUNT ON is set, no message would appear indicating the number of rows affected.

How to execute/call a stored procedure?

We can use the EXEC command to call/execute stored procedures in SQL Server. The following syntax illustrates the execution of a stored procedure:

  1. EXEC procedure_name;  
  2. Or,  
  3. EXECUTE procedure_name;  

If we are using the SSMS, we need to use the below steps to execute stored procedures:

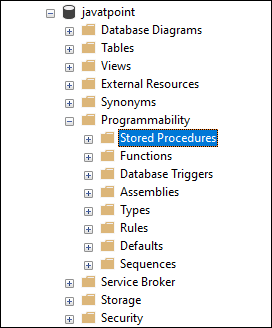
  1. Navigate to the Programmability -> Stored Procedures.
  2. Next, select the Stored Procedure menu and expand it. You will see the available stored procedures.
  3. Right-click on the stored procedure you want to execute and choose the Execute Stored Procedure
  4. The Execute Procedure window will appear. If the procedure has any parameters, we must assign/pass them before clicking OK to execute it. If no parameters are defined, click OK to run the procedure.

Stored Procedure Simple Example

We can create a stored procedure in SQL Server in two ways:

  • Using T-SQL Query
  • Using SQL Server Management Studio

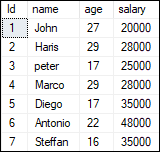
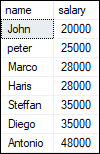
We will take a student table to demonstrate the stored procedure examples. This table has the following data:

Stored Procedure in SQL Server

The below example uses the CREATE PROCEDURE SQL statement for creating a stored procedure that displays the student's list in the increasing order of a salary from the STUDENT table in the selected database:

  1. CREATE PROCEDURE studentList  
  2. AS  
  3. BEGIN  
  4.     SELECT name, age, salary  
  5.     FROM STUDENT  
  6.     ORDER BY salary;  
  7. END;   

In this syntax, the studentList is the name of the stored procedure, and the AS keyword distinguishes the stored procedure's heading and body. The BEGIN and END keywords that accompany a single statement in a stored procedure are optional. However, it's a good idea to include them to make the code more understandable.

When we run this statement, and everything is correct, the following message will appear: "Commands completed successfully." It indicates that the stored procedure was successfully compiled and saved to the database system.

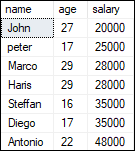
We can execute this procedure by using the below command:

  1. EXEC studentList;  

It will return the output as follows:

Stored Procedure in SQL Server

If we are using the SSMS, use the following steps for creating the stored procedure:

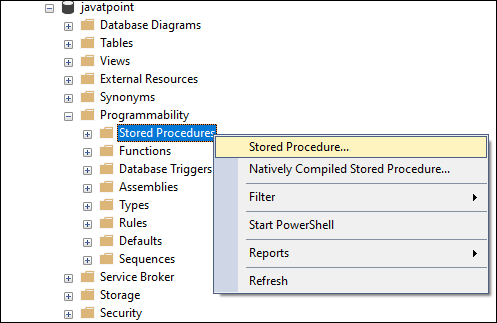
Step 1: Select the Database -> Programmability -> Stored Procedures.

Stored Procedure in SQL Server

Step 2: Right-click on the Stored Procedures folder to open the menu and then select the New -> Stored Procedure option as follows:

Stored Procedure in SQL Server

Step 3: When we select the New Stored Procedure option, we will get the new query window containing the default Stored Procedure Template. Here, we can add the procedure name, parameters (if any), and the SQL query we want to use.

How to rename stored procedures in SQL Server?

SQL Server does not allow us to change the name of a stored procedure. Because renaming a stored procedure does not modify the name of the corresponding object in the sys.sql_modules. Therefore, if we need to change the existing stored procedure, simply DROP and recreate it with a new name.

How to modify stored procedures in SQL Server?

We need to update or modify the stored procedure over a period of time. SQL Server allows us to update or modify an existing stored procedure in two ways:

  • Using T-SQL Query
  • Using SQL Server Management Studio

Modify Stored Procedures using SSMS

The following steps help to learn how we can modify or make changes in stored procedures:

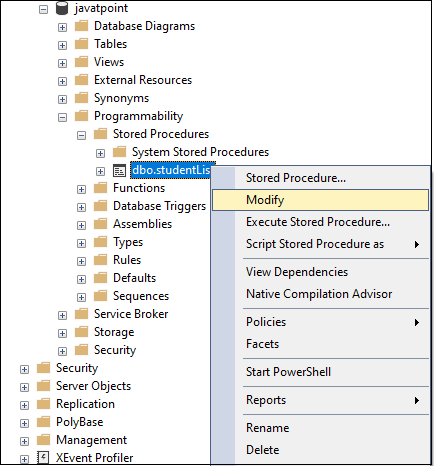
Step 1: Navigate to the Database -> Programmability -> Stored Procedures.

Step 2: Expand the Stored Procedures folder, right-click on the stored procedure that you want to modify, and then select the Modify option as follows:

Stored Procedure in SQL Server

Step 3: Once we click the Modify option, we will get a new query window with an auto-generated ALTER PROCEDURE code. Here we can make changes as per our needs.

Modify Stored Procedures using T-SQL Query

SQL Server provides an ALTER PROCEDURE statement to make modifications in the existing stored procedures. If we want to modify the above created stored procedure, we can write the ALTER PROCEDURE statement as follows:

  1. ALTER PROCEDURE [dbo].[studentList]  
  2. AS  
  3. BEGIN  
  4.     SET NOCOUNT ON;  
  5.     SELECT name, salary  
  6.     FROM STUDENT  
  7.     ORDER BY salary;  
  8. END;   

Let's run the procedure to check whether we have successfully updated the studentList procedure or not. Using the EXECUTE statement, we will get the below output where we can see that our stored procedure is successfully modified.

Stored Procedure in SQL Server

How to list all stored procedures in SQL Server?

When we have several procedures, it is very important to list all procedures. Because sometimes the procedure names are the same in many databases. In that case, this query is very useful. We can list all stored procedure in the current database as follows:

  1. SELECT * FROM sys.procedures;  

The best way for listing all user-defined stored procedures in a database is to use the ROUTINES information schema view as below:

  1. SELECT ROUTINE_SCHEMA, ROUTINE_NAME  
  2. FROM INFORMATION_SCHEMA.ROUTINES  
  3. WHERE ROUTINE_TYPE = 'PROCEDURE';  

OR,

  1. SELECT *   
  2.  FROM db_name.INFORMATION_SCHEMA.ROUTINES  
  3.  WHERE ROUTINE_TYPE = 'PROCEDURE'  

Another way to return a list of stored procedures is to query the sys.objects system catalog view.

  1. SELECT   
  2.   SCHEMA_NAME(schema_id) AS [Schema],  
  3.   name  
  4. FROM sys.objects  
  5. WHERE type = 'P';  

How to delete/drop stored procedures in SQL Server?

We can delete the stored procedure in SQL Server permanently. SQL Server removes the stored procedure in two ways:

  • Using T-SQL Query
  • Using SQL Server Management Studio

DROP Stored Procedures using SSMS

The following steps help to learn how we can delete stored procedures:

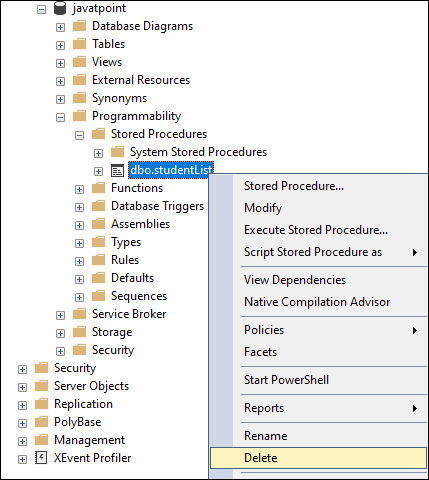
Step 1: Go to the Database -> Programmability -> Stored Procedures.

Step 2: Expand the Stored Procedures folder, right-click on the stored procedure that you want to remove, and then select the Delete option as follows:

Stored Procedure in SQL Server

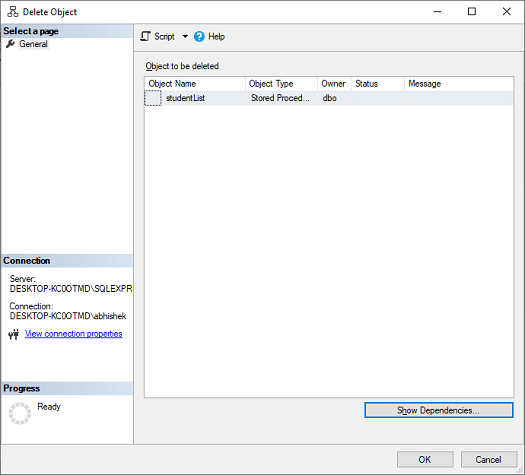
Step 3: Once we click the Delete option, we will get a Delete Object window. We can check the dependencies by clicking on the Show Dependencies button and then click OK to remove the stored procedure.

Stored Procedure in SQL Server

Delete Stored Procedures using T-SQL Query

SQL Server provides a DROP PROCEDURE statement to remove the existing stored procedures. We can write the DROP PROCEDURE statement as follows:

  1. IF OBJECT_ID ('procedure_name''P'IS NOT NULL     
  2.     DROP PROCEDURE procedure_name;    

NOTE: It's a good idea to use IF OBJECT ID ('procedure name', 'P') IS NOT NULL to see if the stored procedure exists in the database.

Input Parameters in Stored Procedure

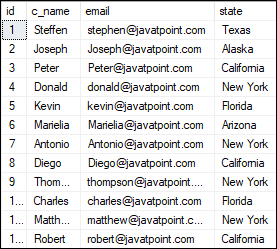
SQL Server allows us to create input parameters stored procedures. This type of stored procedure can enable us to pass one or more parameters to get the filtered result. Let us understand it with the help of an example. Consider the following 'customer' table:

Stored Procedure in SQL Server

The below statement creates a stored procedure with an input parameter:

  1. CREATE PROCEDURE getEmployeeDetails (@States VARCHAR(50))  
  2. AS  
  3. BEGIN  
  4.   SET NOCOUNT ON;  
  5.   SELECT c_name, email, state  
  6.   FROM customer  
  7.   WHERE state = @States  
  8. END  

If we want to execute this stored procedure, we need to pass the value for the @States parameter. We can pass the parameter value in any of the following ways:

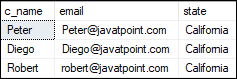
  1. EXEC [dbo].[getEmployeeDetails] 'California';  
  2.   
  3. --OR we can write  
  4.   
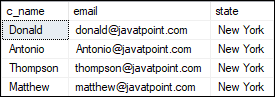
  5. EXEC [dbo].[getEmployeeDetails] @States = 'New York';  

We will get the output as below:

Stored Procedure in SQL Server

Output Parameters in Stored Procedure

SQL Server enables us to provide many output parameters in a stored procedure. These output parameters can be of any valid data type, such as integer, date, or character. We can use the below syntax to create an output parameter in the stored procedure:

  1. parameter_name data_type OUTPUT  

Let us understand how to use Output Parameters in a stored procedure with the help of an example. The following statement will create a procedure called countStudent, in which we will declare an integer type variable called @StudentCount and use the OUTPUT keyword. The procedure uses the COUNT function to find the number of students in the STUDENT table, and then the value is assigned to the output parameter.

  1. CREATE PROCEDURE countStudent (@StudentCount INT OUTPUT)  
  2. AS  
  3. BEGIN  
  4.     SELECT @StudentCount = COUNT(Id)FROM STUDENT;  
  5. END;  

Now, we will execute the stored procedure. Here, we need to pass the output parameter @StudentaCouns as follows:

  1. -- Declare an Int Variable that corresponds to the Output parameter in SP  
  2. DECLARE @TotalStudents INT   
  3.   
  4. -- Don't forget to use the keyword OUTPUT  
  5. EXEC  [dbo].[countStudent] @TotalStudents OUTPUT  
  6.   
  7. -- Print the result  
  8. PRINT @TotalStudents   

We will get the following output:

Stored Procedure in SQL Server

Temporary Stored Procedure

We can create temporary procedures in the same way as we can create temporary tables. The tempdb database is used to create these procedures. We can divide the temporary procedures into two types:

  • Local Temporary Stored Procedures
  • Global Temporary Procedures.

Local Temporary Stored Procedures: We can create this type of procedure by using the # as prefix and accessed only in the session in which they were created. When the connection is closed, this process is immediately terminated.

Here's an example of how to create a local temporary procedure:

  1. CREATE PROCEDURE #Temp  
  2. AS  
  3. BEGIN  
  4. PRINT 'Local temp procedure'  
  5. END  

Global Temporary Stored Procedure: We can create this type of procedure by using the ## as a prefix and accessed from any sessions. When the connection that was used to create the procedure is closed, this procedure is automatically terminated.

Here's an example of how to create a global temporary procedure:

  1. CREATE PROCEDURE ##TEMP  
  2. AS  
  3. BEGIN  
  4. PRINT 'Global temp procedure'  
  5. END  

Disadvantages of Stored Procedures

The following are the limitations of stored procedures in SQL Server:

Debugging: Since debugging stored procedures is never simple, it is not advised to write and execute complex business logic using them. As a result, if we will not handle it properly, it can result in a failure.

Dependency: As we know, professional DBAs and database developers handle vast data sets in large organizations. And the application developers must depend on them because any minor changes must be referred to a DBA, who can fix bugs in existing procedures or build new ones.

Expensive: Stored procedures are costly to manage in terms of DBAs because organizations would have to pay extra costs for specialist DBAs. A DBA is much more qualified to handle complex database procedures.

Specific to a Vendor: Stored procedures written in one platform cannot run on another. Since procedures written in Oracle are more complicated, we will need to rewrite the entire procedure for SQL Server.