Thursday 23 September 2021

How to Dart Installation?

Install the Dart SDK on Windows

Follow the below instructions to install Dark SDK in Windows.

Step -1: Go to the browser and type the following link to download the SDK.

http://www.gekorm.com/dart-windows/

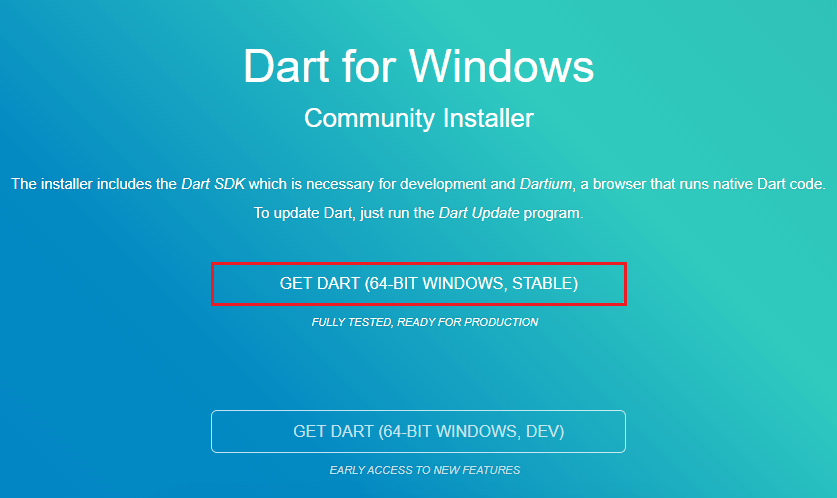
It will open the given page. Click on the following link.

Dart Installation

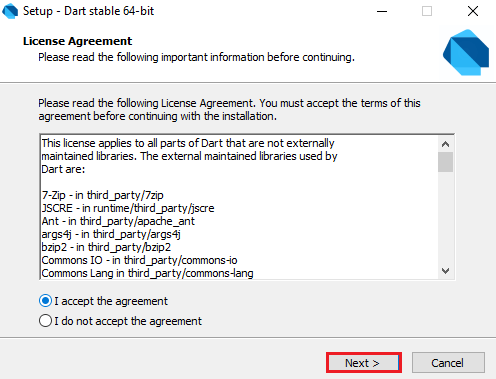
Step - 2: Run the Dart installer(It is the .exe file that we downloaded in the previous step) and click on the Next button.

Dart Installation

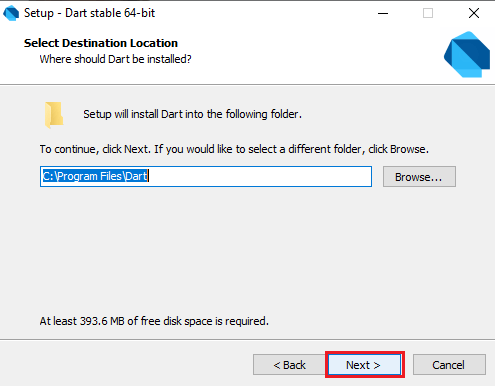
Step - 3: It provides the option to select the Dart installation path. After the path is selected, click on the Next button.

Dart Installation
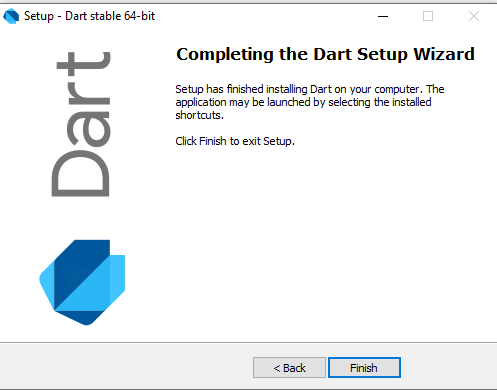
Dart Installation

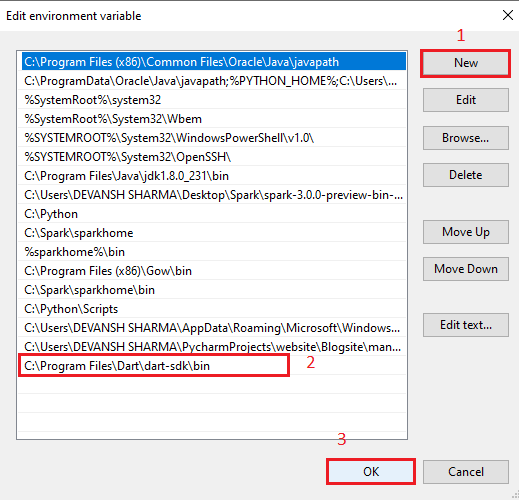
Step - 4: After the download is completed, set the PATH environment variable to "C:\Program Files\Dart\dart-sdk\bin" in advance system properties.

Dart Installation

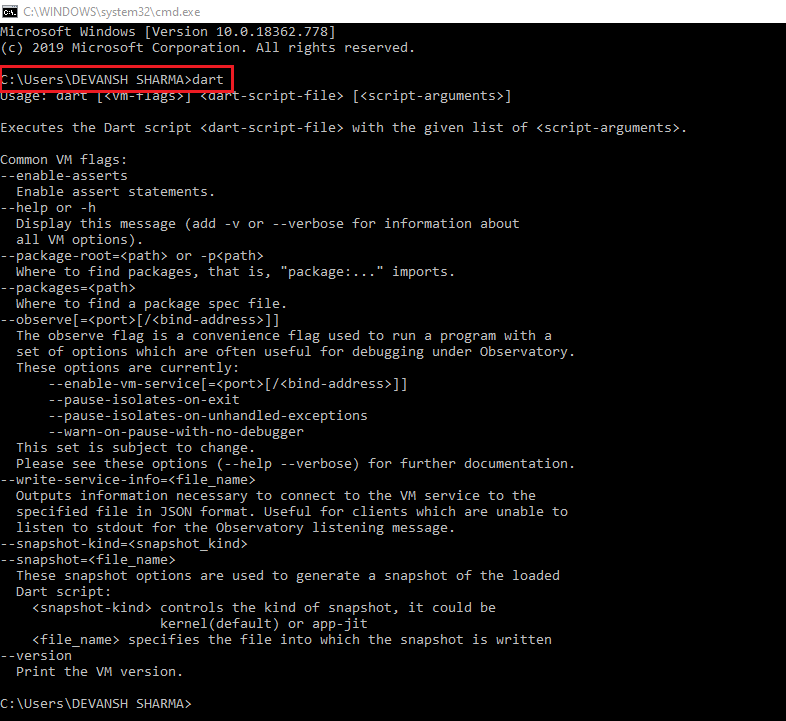
Step - 5: Now open the terminal and verify the Dart installation by typing dart.

Dart Installation

If it is successfully installed then it looks like the above image.

Install the Dart SDK on Linux

The steps of Dart installation on Linux is given below.

Before installing the Dart, if you are Debian/Ubuntu on AMD64(64-bit Intel) in your local machine, you can install the Dart through one of the following options.

  • Install using apt-get
  • Install a Debian package

Installation using apt-get

Step -1: Type the following commands for a one-time setup.

  1. $sudo apt-get update  
  2. $ sudo apt-get install apt-transport-https  
  3.   
  4. $ sudo sh -c 'wget -qO- https://dl-ssl.google.com/linux/linux_signing_key.pub | apt-key add -'  
  5.   
  6. $ sudo sh -c 'wget -qO- https://storage.googleapis.com/download.dartlang.org/linux/debian/dart_stable.list > /etc/apt/sources.list.d/dart_stable.list'  

Step - 2: Type the following command in terminal to install the Dart SDK using apt-get option.

  1. $sudo apt-get update  
  2. $ sudo apt-get install dart  

It will successfully download the Dart SDK.

Installation a Debian Package

We can download Dart SDK as a Debian package in the .deb package format. To make all Dart binaries accessible, we have to change the PATH by typing the following command.

  1. export PATH="$PATH:/usr/lib/dart/bin"  

To change the PATH for upcoming terminal sessions, use a below command:


  1. $ echo 'export PATH="$PATH:/usr/lib/dart/bin"' >> ~/.profile  

Install the Dark SDK on Mac

Step -1: We should have Homebrew package manager, but if we don't have it then install the Homebrew and run the following command. It will successfully download the Dart on the Mac.

  1. $brew tap dart-lang/dart  
  2. $ brew install dart  

Step -2: To verify which version we have installed, use the following command.

  1. $brew info dart  

Online Dart Editor

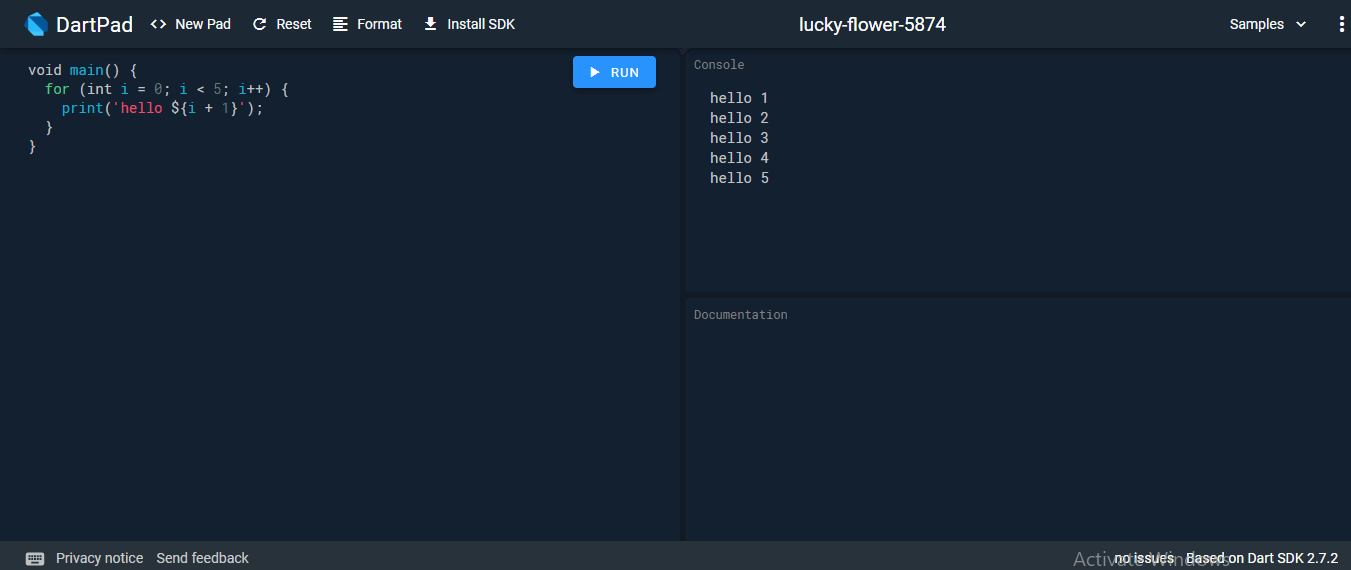
We have discussed Dark installation on the various operating systems so far, but if we do not want to install Dart then there is an online Dark editor (Known as DartPad) is available to run the Dark programs. The online DartPad is provided at https://dartpad.dev/. The DartPad offers to execute the dart scripts and display HTML and also console output. The online DartPad looks like the below image.

Dart Installation

Dart IED Support

The Eclipse, IntelliJ, and WebStorm are the IDEs from the Jet brains that support the Dart Programming, but WebStorm is more popular than others. We can download it from https://www.jetbrains.com/webstorm/download/#section=windows-version.

The dart2js Tool

The Dark SDK comes with the dart2js tool, which transmits the Dart code into runnable JavaScript code. It is necessary because few web browsers do not support the Dart VM.

Use the following command in the terminal to compile the Dart code into JavaScript code.

  1. dart2js - - out = <output_file>.js  <dart_script>.dart  

The above command will create a file that contains the JavaScript code corresponding to the Dart code.

Dart Features

 The Dart is an object-oriented, open-source programming language which contains many useful features. It is the new programming language and supports an extensive range of programming utilities such as interface, collections, classes, dynamic and optional typing. 

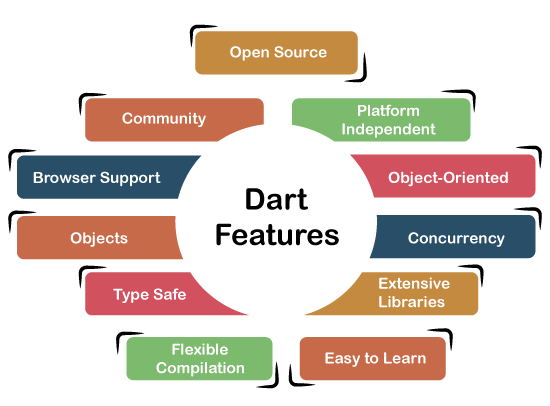
It is developed for the server as well as the browser. Below is the list of the important Dart features.

Dart Features

Open Source

Dart is an open-source programming language, which means it is freely available. It is developed by Google, approved by the ECMA standard, and comes with a BSD license.

Platform Independent

Dart supports all primary operating systems such as Windows

Linux
, Macintosh, etc. The Dart has its own Virtual Machine which known as Dart VM, that allows us to run the Dart code in every operating system.

Object-Oriented

Dart is an object-oriented programming language and supports all oops concepts such as classes, inheritance, interfaces and optional typing features. It also supports advance concepts like mixin, abstract, classes, reified generic, and robust type system.

Concurrency

Dart is an asynchronous programming language, which means it supports multithreading using Isolates. The isolates are the independent entities that are related to threads but don't share memory and establish the communication between the processes by the message passing. The message should be serialized to make effective communication. The serialization of the message is done by using a snapshot that is generated by the given object and then transmits to another isolate for desterilizing.

Extensive Libraries

Dart consists of many useful inbuilt libraries including SDK (Software Development Kit), core, math

, async, math, convert, html

, IO, etc. It also provides the facility to organize the Dart code into libraries with proper namespacing. It can reuse by the import statement.

Easy to learn

As we discussed in the previous section, learning the Dart is not the Hercules task as we know that Dart's syntax is similar to Java

C#

JavaScript

kotlin

, etc. if you know any of these languages then you can learn easily the Dart.

Flexible Compilation

Dart provides the flexibility to compile the code and fast as well. It supports two types of compilation processes, AOT (Ahead of Time) and JIT (Just-in-Time). The Dart code is transmitted in the other language that can run in the modern web-brewers.

Type Safe

The Dart is the type safe language, which means it uses both static type checking and runtime checks to confirm that a variable's value always matches the variable's static type, sometimes it known as the sound typing.

Although types are required, type annotations are optional because of type interference. This makes it code more readable. The other advantage to being type-safe language is, when we change the part of code, the system warns us about that modification that we have modified earlier.

Objects

The Dart treats everything as an object. The value which assigns to the variable is an object. The functions, numbers, and strings are also an object in Dart. All objects inherit from Object class.

Browser Support

The Dart supports all modern web-browser. It comes with the dart2js compiler that converts the Dart code into optimized JavaScript code that is suitable for all type of web-browser.

Community

Dart has a large community across the world. So if you face problem while coding then it is easy to find help. The dedicated developers' team is working towards enhancing its functionality.

Here we have discussed essential features of the Dart language. We will more concepts of Dart language in upcoming tutorials.

Tuesday 21 September 2021

What is Dart?

 Dart is a general-purpose, high-level modern programming language which is originally developed by Google. It is the new programming language which is emerged in 2011, but its stable version was released in June 2017. Dart is not so popular at that time, but It gains popularity when it is used by the Flatter.

Dart is a dynamic, class-based, object-oriented programming language with closure and lexical scope. Syntactically, it is quite similar to JavaC, and JavaScript. If you know any of these programming languages, you can easily learn the Dart programming language.

Dart is an open-source programming language which is widely used to develop the mobile application, modern web-applications, desktop application, and the Internet of Things (IoT) using by Flatter framework. It also supports a few advance concepts such as interfaces, mixins, abstract classes, refield generics, and type interface. It is a compiled language and supports two types of compilation techniques.

  • AOT (Ahead of Time) - It converts the Dart code in the optimized JavaScript code with the help of the dar2js compiler and runs on all modern web-browser. It compiles the code at build time.
  • JOT (Just-In-Time) - It converts the byte code in the machine code (native code), but only code that is necessary.

History

Dart was revealed for the first time in the GOTO conference in the month of 10th - 12th October 2011 at Aarhus, Denmark. It is initially designed by the Lars bark and Kespar and developed by Google.

The first version 1.0 of Dart was released on November 14th, 2013, intended as a replacement of JavaScript.

In July 2014, the first edition of Dart language was approved by Ecma International approved at its 107th General Assembly.

The first version was criticized due to a malfunction on the web and this plan was dropped in 2015 with the 1.9 release of Dart.

The second version of Dart 2.0 was released in August, including a sound type system.

The recent version Dart 2.7 is supplemented with the extension method, which enables us to add any type of functionality.

Why Dart?

We define the characteristics of Dart in the following point.

  • Dart is a platform-independent language and supports all operating systems such as Windows, Mac, Linux, etc.
  • It is an open-source language, which means it available free for everyone. It comes with a BSD license and recognized by the ECMA standard.
  • It is an object-oriented programming language and supports all features of oops such as inheritance, interfaces, and optional type features.
  • Dart is very useful in building real-time applications because of its stability.
  • Dart comes with the dar2js compiler which transmits the Dart code into JavaScript code that runs on all modern web browser.
  • The stand-alone Dart VM permits Dart code to run in a command-line interface environment.

Key Points to Remember

Before learning the Dart, we should keep these concepts in mind. These concepts are given below.

  • Everything in Dart is treated as an object including, numbers, Boolean, function, etc. like Python. All objects inherit from the Object class.
  • Dart tools can report two types of problems while coding, warnings and errors. Warnings are the indication that your code may have some problem, but it doesn't interrupt the code's execution, whereas error can prevent the execution of code.
  • Dart supports sound typing. We will learn about this in the next tutorial.
  • Dart supports generic types, like List<int>(a list of integers) or List<dynamic> (a list of objects of any type).

Monday 20 September 2021

Hello World .NET Core On Linux

 In this article, we will explain how to install .NET Core on a Linux operating system (Ubuntu 20.04 LTS) and be able to run .NET Core applications, in addition to running them and also being able to run for example ASP.NET Core and that you can see from the client to test its operation.

 
Why run Microsoft applications on Linux? The answers can be many, we could say for going beyond the walls that existed for a long time and the “rivalry” that they supposedly made to see between these two OS environments, another for attracting all that Linux community so that they can work more comfortably, well supported C # applications or web pages with all the power of .NET Core, also another answer may be to reduce costs in a development company or for yourself as a user programmer, in short, there are many reasons why.NET Core is supported on Linux based operating systems.
 
.NET Core is compatible with Ubuntu.This article describes how to install .NET Core on Ubuntu. When a version of Ubuntu is no longer supported, .NET Core is no longer compatible with that version. However, there are slightly more custom instructions where you can install .NET Core on those versions.
 

Supported Distributions


In the following graph, according to the source (https://docs.microsoft.com/en-us/dotnet/core/install/linux-ubuntu) we have the comparative table of versions with support so far and some that do not have it.
 
Hello World .NET Core On Linux
 
In the case of this article, we will use Ubuntu 20.04 LTS (https://ubuntu.com/#download) together with .NET Core 3.1 later we will go with .NET Core 5.0
 
We will need the following:
  • Linux installed in some installed and configured instance (https://www.process.st/checklist/ubuntu-server-setup-process/) I left it until step 14 this way you already have a well-configured installation.
  • Putty to access the Linux server via SSH.
  • Very eager to learn.
Table of Contents
  1. Installation of .NET Core 3.1 SDK and Runtime in a Linux environment.
  2. Creation and compilation of your first application in .NET Core.
  3. Create an application in ASP.NET Core.
  4. Test our ASP.NET Core application from a web browser.

Installation of .NET Core 3.1 SDK and Runtime in Linux environment

 
Once Ubuntu is installed, go to the link where it explains step by step for who is their first time, we have to access the operating system via SSH (Secure Shell) where I use Putty as a reference, but they can use the one that has the most affinity.

Now, we need to have interconnection between two computers or virtual machines, call a client and another server, in my case it is two computers on the same network to be able to have control over the Linux environment that is just where we want to run .NET Core, for this once the Putty is installed, we check whether both computers are well connected to the network with the Ping command in the Windows console.
 
Hello World .NET Core On Linux
 
Now we run Putty and put the IP address of the remote computer where our Linux is installed.
 
Hello World .NET Core On Linux
 
Next, we already establish a connection via SSH, if everything should appear, the window of the Linux Shell where it requests access, which are the previously configured credentials of the Ubuntu user (username/password)
 
Hello World .NET Core On Linux
 
Hello World .NET Core On Linux
 
Up to this point, we are already inside the Linux machine, now, since we are going to run installations, it is important to try to switch to the root user who has been the one with the most privileges at the UNIX level, therefore, we must execute the first commands to change from our normal user to root.
 
hughfernandez@neptuno:~$ su -
 
It will ask for the root user password and up to this point we can proceed to install .NET Core, but first, it is always recommended to run recent updates with the following commands.
 
sudo apt-get update # Gets the list of available updates.
sudo apt-get upgrade # Strictly update current packages
sudo apt-get dist-upgrade # Install (new) updates
sudo reboot # Restart th
e operating system
 
Since you rebooted the system before installing .NET, run the following commands to add the Microsoft package signing key to your list of trusted keys, and add the package repository.
 
wget https://packages.microsoft.com/config/ubuntu/20.04/packages-microsoft-prod.deb -O packages-microsoft-prod.deb
sudo dpkg -i packages-microsoft-prod.deb
 

SDK Installation


To install the .NET Core SDK, run the following commands:
 
sudo apt-get update; \
sudo apt-get install -y apt-transport-https && \
sudo apt-get update && \
sudo apt-get install -y dotnet-sdk-3.1
 

Runtime installation


The following commands install ASP.NET Core Runtime, which is the most compatible runtime for .NET Core.In your terminal, run the following commands.
 
sudo apt-get update; \
sudo apt-get install -y apt-transport-https && \
sudo apt-get update && \
sudo apt-get install -y aspnetcore-runtime-3.1
 
As an alternative to the ASP.NET Core Runtime, you can install the .NET Core Runtime that does not include ASP.NET Core support: replace aspnetcore-runtime-3.1 in the above command with dotnet-runtime-3.1.
 
sudo apt-get install -y dotnet-runtime-3.1
 

Creation and compilation of your first application in .NET Core

 
In this way, we can already have .NET Core 3.1 already installed both its SDK version and Runtime to run our applications. If you want to know what projects you can run that are included in this framework where you can get a complete list by executing the following command:
 
dotnet new --help
 
Hello World .NET Core On Linux
 
We are going to start our "hello world" firstly by taking an order where we are going to have our projects in Linux, to advance we go to the Home folder as root user and we will see the folder of our Ubuntu user, in this case, my user is "hughfernandez”And there inside we are going to create the folder where we are going to execute our first application with the command.
 
mkdir holamundoConsola
 
We access it and see that we have nothing, but we are already on the folder.
 
Hello World .NET Core On Linux
 
We execute the following command:
 
dotnet new console
 
Hello World .NET Core On Linux
 
If we do an inspection of the generated listing the files of our console project with the command:
 
ls -1l
 
Hello World .NET Core On Linux
 
If we already want to review a specific file such as "Program.cs" we have to execute the following command (it is important to write the file exactly as it appears otherwise the nano will open a new file)
 
sudo nano Program.cs
 
Hello World .NET Core On Linux
 
As you can see in the previous image, I was able to access the .cs file called “Program” and I was able to add “Hello world from Linux!”, To save the changes we press Control + X, it will ask to overwrite the changes and return to the command environment again in Linux.
 
Hello World .NET Core On Linux
 
Up to this point, we can already compile our application and run it with the following commands
 
dotnet build
 
Hello World .NET Core On Linux
 
dotnet run
 
Hello World .NET Core On Linux
 
In this way we already created the console solution, we entered the file "Program.cs", we modified the line of code with our hello world and finally the compilation and execution of the program, but this time under a Linux environment.
 

Create an application in ASP.NET Core


For the ASP.NET core theme, we must create the folder as in the previous example, in my case I gave it the name of “demoAsp”, we enter it and execute the following command to create an ASP.NET Core project,
 
dotnet new razor
 
or
 
dotnet new mvc
 
Hello World .NET Core On Linux
 
If they ask for the project name, the command "dotnet new" defaults to the name of the folder they created where they are executing the command
 
Hello World .NET Core On Linux
 
To run our app in ASP.NET Core, you must first compile it with the command "dotnet build" so that it generates the folder "/bin/Debug/netcoreapp3.1", then execute the following command within the last folder mentioned above
 
dotnet demoAsp.dll
 
Hello World .NET Core On Linux
 
To only do a direct test, if everything is just not located in the root folder of the project and normally run the "dotnet run".
 

Test our ASP.NET Core application from a web browser


Already in this way and our application in ASP.NET Core is running on the Kestrel server of .NET Core, but we do not yet have an exit to be able to access it from a browser, this because it runs within localhost and Linux assumes that it can only be accessed, therefore, the following command must be executed from Linux itself,
 
dotnet run --urls "http://0.0.0.0:5000"
 
Hello World .NET Core On Linux
 
In this case, the “URLs” argument specifies Kestrel on which IP addresses and ports it should listen to. By default, Kestrel will only listen to the localhost address so we must explicitly specify that we want it to listen to any IP address to perform this test.

Now to test that we can access from any client we go to the Windows computer and open any web browser and enter the IP address of the Linux machine and port 5000 "http: // the-ip-of-your-server: 5000"To verify that the web application is working,

Host ASP.NET Core Web API On Linux Azure VM

 We will create a Virtual Machine in Azure using the Ubuntu Operating System. 

Let's see the step by step implementation,
 

Steps

  1. Create ASP.NET Core Web API Application
  2. Publish Web API Application
  3. Create Virtual Machine in Azure
  4. Install .NET Core and Apache in Virtual Machine
  5. Host Web API Application in Virtual Machine

Create ASP.NET Web API Application

 
Create new project, select API as template and click on create button, which will create web API application with WeatherForcast Controller having get method.
 
Host ASP.NET Core Web API On Linux Azure VM 
 
Configure Swagger in AspnetCoreWebApi, so that we can see exposed method in UI.
 
In order to enable swagger, add the below nuget packages
  • AspNetCore
  • AspNetCore.Swagger
Add the below code in startup.cs under ConfigureServices method
  1. services.AddSwaggerGen(c =>  
  2.             {  
  3.                 c.SwaggerDoc("v1"new Microsoft.OpenApi.Models.OpenApiInfo { Title = "Aspnet Core Web Api", Version = "v1" });  
  4.                 var xmlFile = $"{Assembly.GetExecutingAssembly().GetName().Name}.xml";  
  5.                 var xmlPath = Path.Combine(AppContext.BaseDirectory, xmlFile);  
  6.                 c.IncludeXmlComments(xmlPath);  
  7.             });  
Add the below code in startup.cs under Configure method
  1. app.UseSwagger();  
  2.            app.UseSwaggerUI(c =>  
  3.            {  
  4.                c.SwaggerEndpoint("/swagger/v1/swagger.json""Aspnet Core Web Api");  
  5.                c.InjectJavascript("/swagger/custom.js");  
  6.   
  7.            });  
Create AspnetCoreWebApi.xml file with the below content:
  1. <?xml version="1.0"?>  
  2. <doc>  
  3. </doc>  
Copy AspnetCoreWebApi.xml to D:\AspnetCoreWebApi\AspnetCoreWebApi\bin\Debug\netcoreapp3.0
 
Now run the application and see the result in UI.
 
Host ASP.NET Core Web API On Linux Azure VM
 
Our application is running under localhost in our system.
 

Publish Web API Application

 
Right click on project and click on Publish
 
Click on Folder from left panel and select the path where you would like to save publish copy
 
Host ASP.NET Core Web API On Linux Azure VM 
 
Click on Advanced link, which will open below window
 
Select Release as Configuration, netcoreapp3.0 as Target Framework and Framework-Dependent as Deployment Mode
 
Select linux-x64 as Target Runtime, as we want to host our application in Linux environment
 
Click on Save button
 
Host ASP.NET Core Web API On Linux Azure VM 
 
Click on CreateProfile which will create a profile for us and will be useful for further releases
 
Click on Publish button which will publish our application and save it in a predefined path
 
Host ASP.NET Core Web API On Linux Azure VM 
 
Explore our selected path i.e. D:\AspnetCoreWebApi\AspnetCoreWebApi\bin\Release\netcoreapp3.0\publish and we can see the published data
 
Host ASP.NET Core Web API On Linux Azure VM 
 

Create Virtual Machine in Azure

 
Log into portal.azure.com and click on "Virtual machines".
 
Click on 'Add', which will open the "Create a virtual machine" wizard. 
 
Host ASP.NET Core Web API On Linux Azure VM 
  1. Select your Azure subscription. Duly note that all resources in an Azure subscription are billed together.
  2. Select existing or create a new resource group. It is a collection of resources that share the same lifecycle, permissions, and policies.
  3. Provide your virtual machine a name. For demo purposes, I have given it a name like 'AspNetCoreLinuxVM'.
  4. Select the region that is right for you and your customers. Not all VM sizes are available in all regions.
  5. Azure offers a range of options for managing the availability and resiliency of your application. We can select 'Availability Set' also but as of now, select 'No infrastructure redundancy required'.
  6. Choose the base operating system or application for your VM.
  7. Change the size as per your requirement and the price will be calculated accordingly.
  8. Provide Username and Password which will be used later on to connect your VM.
  9. Select SSH and HTTP as inbound ports
Host ASP.NET Core Web API On Linux Azure VM

Select your disk option.
  1. Premium SSD
    Offers high-performance, low-latency disk support for I/O-intensive applications and production workloads. 

  2. Standard SSD
    Cost-effective storage option optimized for workloads that need consistent performance at lower IOPS (Input/Output Operations Per Second) levels.

  3. Standard HDD
    For dev/test scenarios and less critical workloads at the lowest cost.
For best performance, reliability, scalability, and access control, it is recommended to select Managed Disk for most of the virtual machine configuration. Use unmanaged disks if you need to support certain classic scenarios or want to manage Disk VHDs in your own storage account.
 
Host ASP.NET Core Web API On Linux Azure VM 
 
Keep the networking option as it is and move to Management.
 
Host ASP.NET Core Web API On Linux Azure VM 
 
Boot the diagnostics capture serial console output and screenshots of the virtual machine running on a host to help diagnose startup issues.
 
OS guest diagnostics get metrics every minute for our virtual machine. We can use them to create alerts and stay informed on our applications.
 
Metrics are written on a storage account.
 
If Identity is enabled, all necessary permissions can be granted via Azure Role-based access control.
 
Enable auto-shutdown configures our virtual machine to automatically shut down daily.
 
Provide the time when we want to shutdown VM
 
Provide the time zone in which shutdown time is given
 
Subscribe for notification before the VM is shutdown
 
To guard our VM against accidental deletion and corruption, enable backup.
 
Host ASP.NET Core Web API On Linux Azure VM 
 
Keep the Advanced option as it is and move to the Tags
 
Host ASP.NET Core Web API On Linux Azure VM 
 
A tag is not required as of now. Skip this stage and move to Review + Create.
 
Host ASP.NET Core Web API On Linux Azure VM 
 
It will validate all the inputs and show the status message.
 
Click on the 'Create' button.
 
Host ASP.NET Core Web API On Linux Azure VM 
 
Once the VM is created, you will be able to see the deployment details as below.
 
Host ASP.NET Core Web API On Linux Azure VM 
 
Now, in the next step, let's try to connect our recently created VM. For this, we need a public IP Address and port.
 
Host ASP.NET Core Web API On Linux Azure VM 
 

Install .NET Core and Apache in Virtual Machine

 
Open a command prompt to connect a virtual machine
 
Execute below command with username and IpAddress
 
>ssh akshayblevel@13.82.17.110
 
It will ask for the password
 
>akshayblevel@13.82.17.110's password:************
 
Once it is connected, execute the below command to point to the root
 
>akshayblevel@AspNetCoreLinuxVM:~$ sudo -i
root@AspNetCoreLinuxVM:~#
 
Execute the below commands to register microsoftkey, product repository, and required dependencies. Need to execute once per machine.
 
>wget -q https://packages.microsoft.com/config/ubuntu/18.04/packages-microsoft-prod.deb -O packages-microsoft-prod.deb
>sudo dpkg -i packages-microsoft-prod.deb
 
Execute the below commands in sequence in order to install .Net Core SDK,
  • >sudo add-apt-repository universe
  • >sudo apt-get update
  • >sudo apt-get install apt-transport-HTTPS
  • >sudo apt-get update
  • >sudo apt-get install dotnet-sdk-3.1
Install Asp.Net Core runtime
 
>sudo apt-get install aspnetcore-runtime-3.1
 
Install .Net Core runtime
 
>sudo apt-get install dotnet-runtime-3.1
 
In order to expose our application to the internet, we need IIS, Nginx or Apache as reverse proxy server that will accept HTTP request and forwards to Kestrel.
 
Execute below command to install Apache
 
>sudo apt-get install apache2
 
Copy public ip and run in the browser, if apache is installed correctly then you can see the apache default page
 
Host ASP.NET Core Web API On Linux Azure VM 
 
Enable modproxy modules in Apache server to make it work as a reverse proxy.
 
First we need to restart apache
 
>systemctl restart apache2
 
Enable modproxy module
 
>a2enmod proxy proxy_http proxy_html
 

Host Web API Application in Virtual Machine

 
All the configuration files in Apache are stored at /etc/apache2/conf-enabled directory. We need to create a .conf file for our application.
 
Execute the below command to create a conf file
 
>vi /etc/apache2/conf-enabled/aspnetcorewebapi.conf
 
Insert below text to add in the aspnetcorewebapi.conf
  1. <VirtualHost *:80>  
  2.    ProxyPreserveHost On  
  3.    ProxyPass / http://127.0.0.1:5000/  
  4.    ProxyPassReverse / http://127.0.0.1:5000/  
  5.    ErrorLog /var/log/apache2/aspnetcorewebapi-error.log  
  6.    CustomLog /var/log/apache2/aspnetcodewebapi-access.log common  
  7. </VirtualHost>  
Execute below command to save the file and return back to root
 
>:x
 
Let's verify whether file is saved correctly or not by executing below command
 
>cat /etc/apache2/conf-enabled/aspnetcorewebapi.conf
 
Restart apache
 
>systemctl restart apache2
 
Create directory where we can transfer our published files.
 
Go to var directory
 
cd /var/
 
Create WebApi directory
 
mkdir WebApi
 
Go inside WebApi directory
 
cd WebApi
 
Now we need to transfer our published files to WebApi directory on server, for that we can use filezilla or winscp software.
 
Install winscp from below link
 
https://winscp.net/eng/download.php
 
Connect to server using publicip, username and password. Once it is connected we can see the folder with name as username.
 
Drag and drop Publish folder from left panel to right panel i.e. on server
 
Host ASP.NET Core Web API On Linux Azure VM 
 
Explore publish folder from the right side and verify all the files are uploaded correctly.
 
Upload Transfer files including .xml into the same folder in order to support swagger.
 
Host ASP.NET Core Web API On Linux Azure VM 
 
Now all the files are uploaded on the server, in the next step we need to move files from akshayblevel directory to WebApi Directory.
 
Go to the akshayblevel directory
 
>cd /home/akshayblevel
 
Verify if publish folder is there or not.
 
>Ls
 
Go inside publish folder.
 
>cd publish
 
Verify if all the files are there or not.
 
>Ls
 
Copy all the files from publish folder to WebApi folder.
 
>cp -R * /var/WebApi/
 
Go to WebApi folder.
 
>cd /var/WebApi
 
Verify if all the files are there or not.
 
>Ls
 
Restart apache service and server.
 
systemctl restart apache2 
sudo service apache2 restart
 
Create service file to start and monitor web app.
 
>vi /etc/systemd/system/kestrel-aspnetcorewebapi.service
 
Add the below content to the above service file, we need to provide working directory and which file should be executed.
  1. [Unit]  
  2. Description=Aspnet Core Web Api running on Ubuntu 18.04  
  3. [Service]  
  4. WorkingDirectory=/var/WebApi  
  5. ExecStart=/usr/bin/dotnet /var/WebApi/aspnetcorewebapi.dll  
  6. Restart=always  
  7. RestartSec=10  
  8. SyslogIdentifier=dotnet-demo  
  9. User=www-data  
  10. Environment=ASPNETCORE_ENVIRONMENT=Production  
  11. [Install]  
  12. WantedBy=multi-user.target  
Execute the below command to save the file and return back to root.
 
>:x
 
Enable and start recently created service.
  1. sudo systemctl enable kestrel-aspnetcorewebapi.service  
  2. sudo systemctl start kestrel-aspnetcorewebapi.service  
Now hosting is done, let's verify in the browser using public ip and we can see that our Asp.Net Core Web Application is successfully running in Linux environment.
 
Host ASP.NET Core Web API On Linux Azure VM