Monday 19 September 2022

How to create Create a SQL database in Azure?

 Tailwind Traders has chosen Azure SQL Database for part of its migration. You've been tasked with creating the database.

In this exercise, you'll create a SQL database in Azure and then query the data in that database.

Task 1: Create the database

In this task, you'll create a SQL database based on the AdventureWorksLT sample database.

  1. Sign in to the Azure portal.

  2. Select Create a resource > Databases > SQL database. The Create SQL Database pane appears.

  3. Enter the following values for each setting.

    SettingValue
    Project details
    SubscriptionConcierge Subscription
    Resource group[Sandbox resource group]
    Database details
    Database namedb1
    ServerSelect Create new

    The Create SQL Database Server pane appears.

  4. Enter the following values for each setting.

    SettingValue
    Server details
    Server namesqlservernnnn (replace nnnn with letters and digits for a globally unique name)
    Location(US) East US
    Authentication
    Authentication methodUse SQL Authentication
    Server admin loginsqluser
    PasswordPa$$w0rd1234
  5. Select OK.

  6. Complete the remaining fields for Create SQL Database using the following values.

    SettingValue
    Want to use SQL elastic pool?No (default)
    Compute + storageGeneral Purpose (default)
    Backup storage redundancy
    Backup storage redundancyGeo-redundant backup storage

    Screenshot of create SQL database with fields filled in.

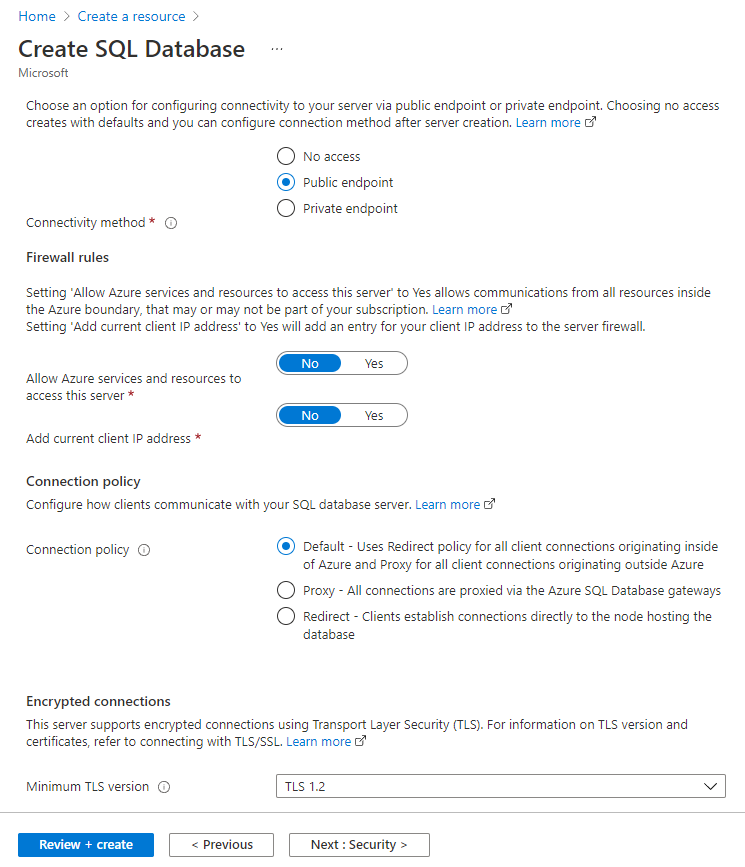
  7. Select Next : Networking, and configure the following settings (accept defaults for fields not specified).

    SettingValue
    Network connectivity
    Connectivity methodPublic endpoint

    Screenshot of the Create SQL Database Networking tab with settings configured.

  8. Select Next : Security, and for Enable Azure Defender for SQL, choose Not now. Leave the remaining settings as default (not configured).
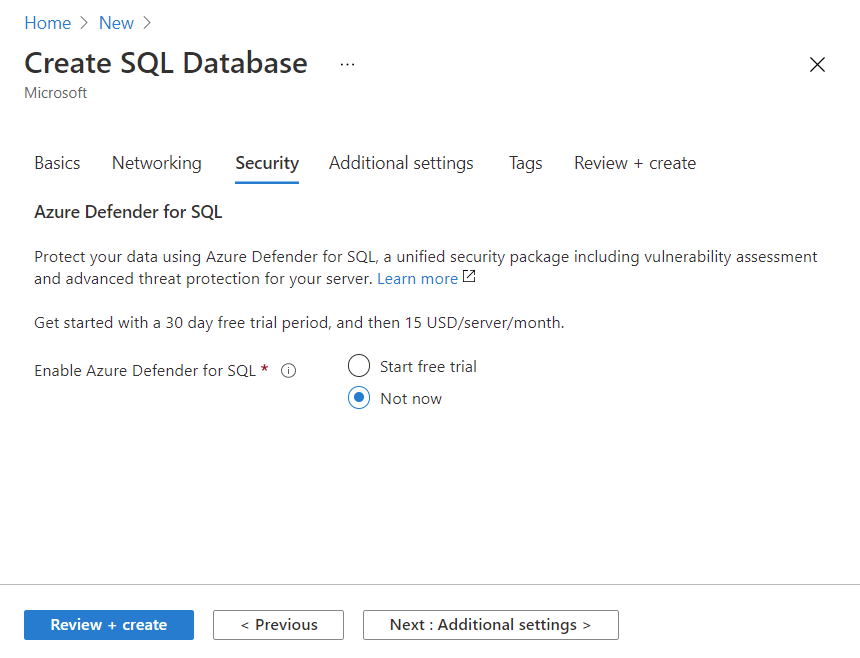
    Screenshot of the Create SQL Database Security tab showing the first configured setting.

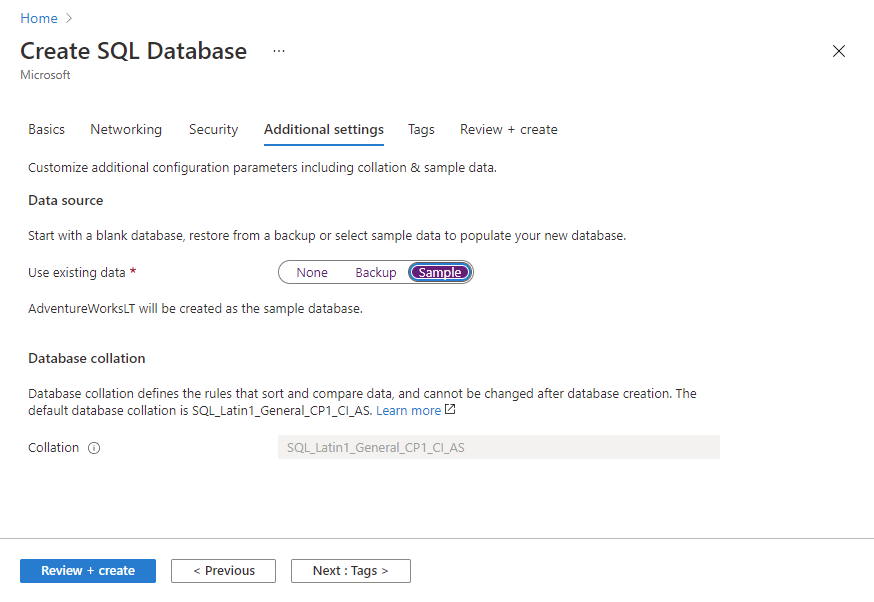
  9. Select Next : Additional settings, and configure the following settings.

    SettingValue
    Data source
    Use existing dataSample
    Database collation
    CollationSQL_Latin1_General_CP1_CI_AS (default)

    Screenshot of the Additional settings tab of the Create SQL Database pane with settings selected.

  10. Select Review + create to validate configuration entries.

  11. Select Create to deploy the server and database. It can take approximately two to five minutes to create the server and deploy the sample database. The deployment pane shows the status, with updates for each resource that is created.

  12. When deployment is complete, select Go to resource. The db1 SQL database Overview pane shows the essentials of the newly deployed database

  13. In the command bar, select Set server firewall. The Firewall settings page appears.

  14. Check the box next to Allow Azure services and resources to access this server at the bottom of the page, leaving other settings as default.

  15. Select Save to update firewall settings, then close the Firewall settings pane.

Task 2: Test the database

In this task, you'll configure the server and run a SQL query.

  1. In Azure resources menu, select All resources. Search for and select the SQL database resource Type, and ensure that your new database was created. You might need to refresh the page.

    Screenshot of the SQL database Query editor preview.

  2. Select db1, the SQL database you created.

  3. In the SQL database menu, select Query editor (preview). The Query editor (preview) pane appears.
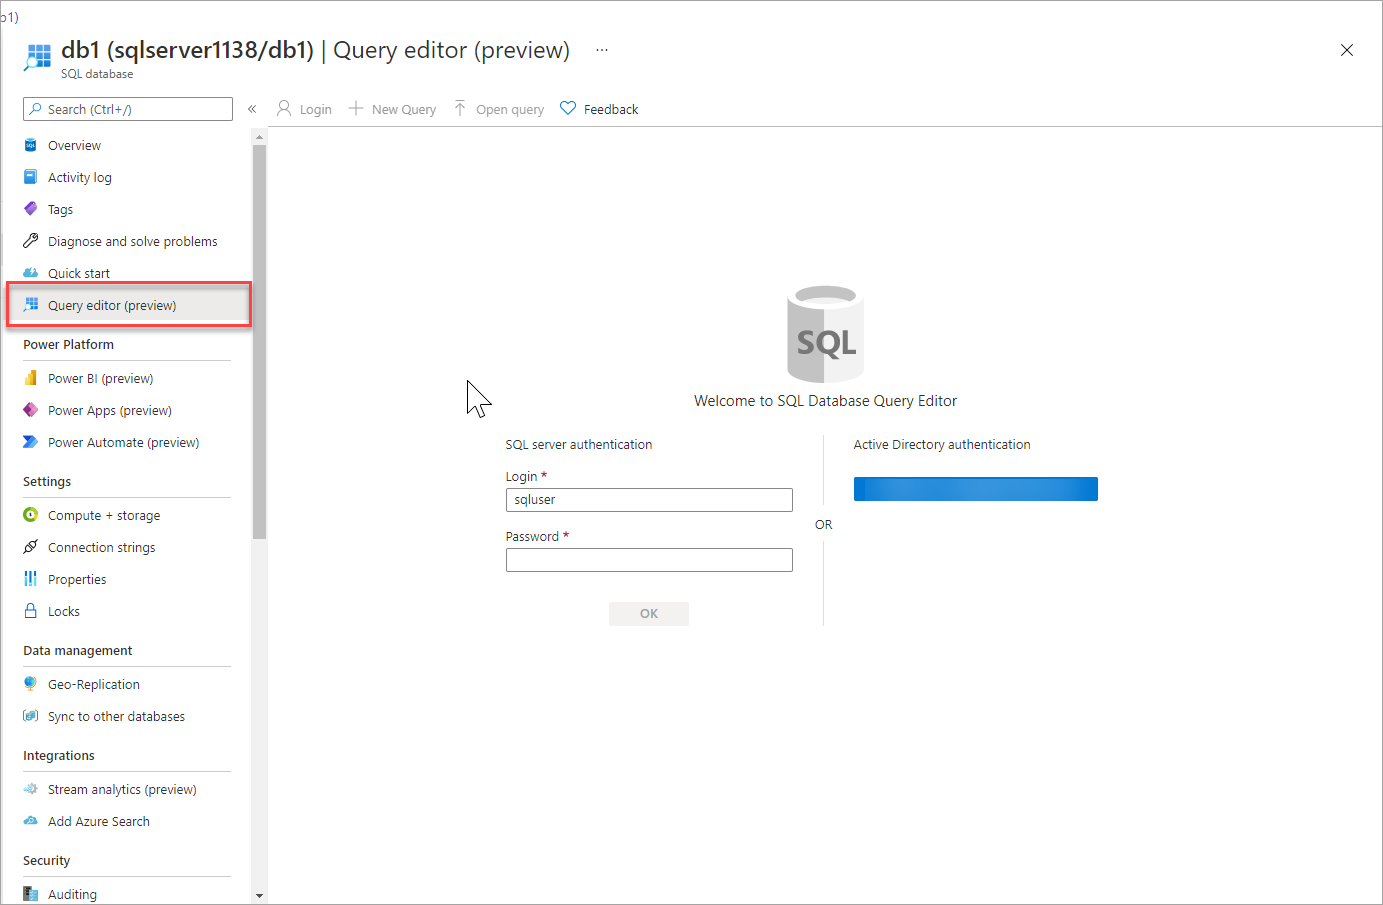
    Screenshot of the SQL database the Query editor preview highlighted.

  4. Sign in as sqluser, with the password Pa$$w0rd1234.

    You will not be able to sign in because your IP address needs to be enabled in a firewall rule.
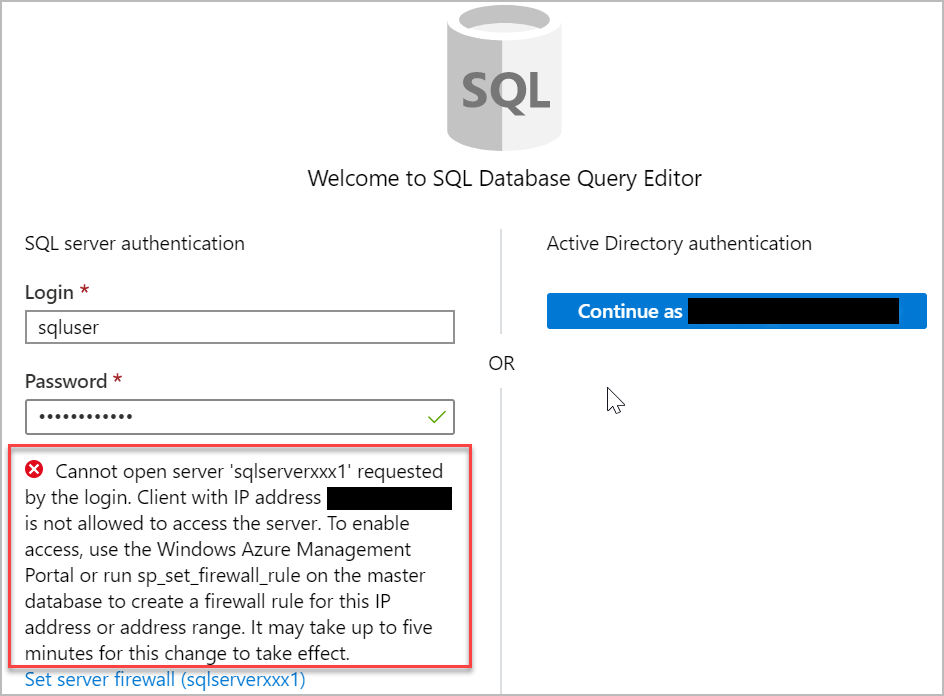
    Screenshot of the Query Editor sign-in page with the IP address error.

  5. In the Query editor menu, select Overview (your edits will be lost), and in the command bar, select Set server firewall. The Firewall settings page appears.

  6. In the Client IP address section, your IP will be shown (verify that it is the same client IP address from the error you received in the previous step).

  7. In the command bar select Add your client IPv4 address. This will add a Rule name that contains your IP address in both the Start IP and End IP fields.

  8. Select Save to save this firewall rule.

    Screenshot of the SQL Server firewall settings page, with your IP settings and the command bar buttons highlighted.

  9. Select your db1 database in the breadcrumb at the top of the page to return to your SQL database, and then select Query editor (preview) from the menu.

  10. Sign in again as sqluser, with the password Pa$$w0rd1234. This time you should succeed. It might take a couple of minutes for the new firewall rule to be deployed. If you still get an error, verify the client IP address in the error, and return to Firewall settings to add the correct client IP address.

  11. After you sign in successfully, the query pane appears. Enter the following SQL query into the editor pane.

    SQL
    SELECT TOP 20 pc.Name as CategoryName, p.name as ProductName
    FROM SalesLT.ProductCategory pc
    JOIN SalesLT.Product p
    ON pc.productcategoryid = p.productcategoryid;
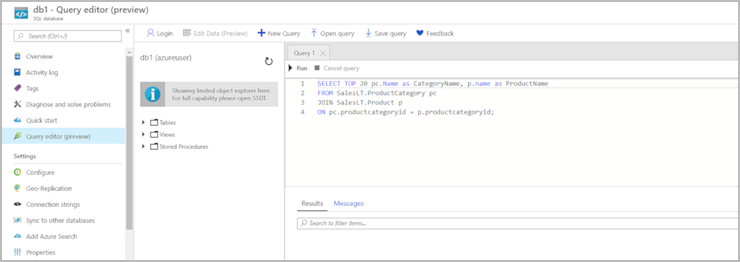
    

    Screenshot of the query editor with the query pane, and the commands running successfully.

  12. Select Run, and then review the query results in the Results pane. The query should run successfully.
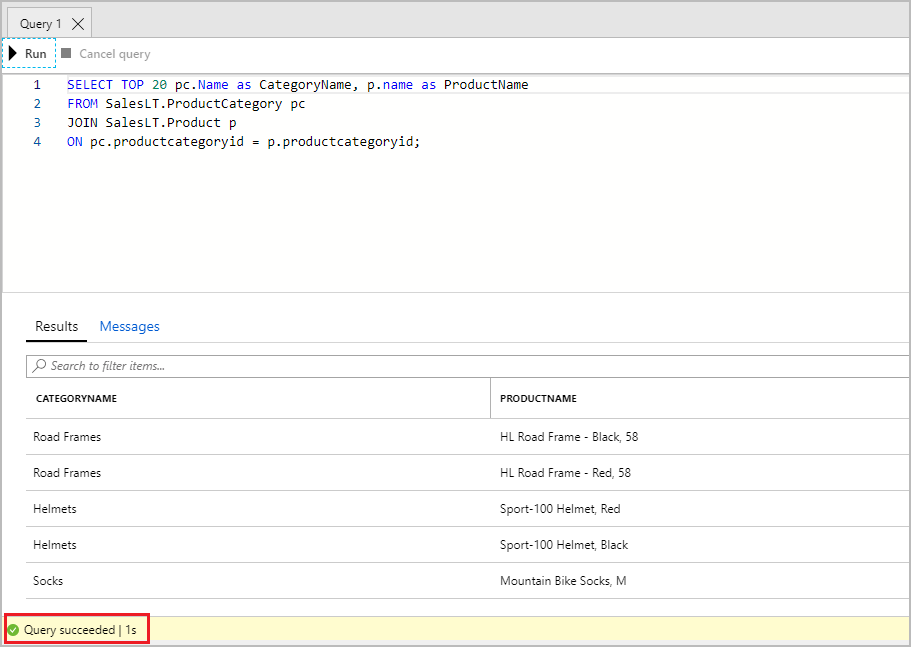
    Screenshot of the database query editor, showing the SQL code ran successfully and the output.

Congratulations! You've created a SQL database in Azure and successfully queried the data in that database.

Working with in Azure Cosmos DB using Core .Net

Introduction:

Welcome to Azure Cosmos DB

Today's applications are required to be highly responsive and always online. To achieve low latency and high availability, instances of these applications need to be deployed in datacenters that are close to their users. Applications need to respond in real time to large changes in usage at peak hours, store ever increasing volumes of data, and make this data available to users in milliseconds.

Azure Cosmos DB is a fully managed NoSQL database for modern app development. Single-digit millisecond response times, and automatic and instant scalability, guarantee speed at any scale. Business continuity is assured with SLA-backed availability and enterprise-grade security. App development is faster and more productive thanks to turnkey multi region data distribution anywhere in the world, open source APIs and SDKs for popular languages.

 As a fully managed service, Azure Cosmos DB takes database administration off your hands with automatic management, updates and patching. It also handles capacity management with cost-effective serverless and automatic scaling options that respond to application needs to match capacity with demand.


In this articles will discuss:

1. How to Create database Azure Cosmos DB in Azure portal

2. How to Create Container or table Azure Cosmos DB

3. How to Insert records in Container

4. Working the different types of queries.


We are assuming you have an Account in Azure portal.


Step 1. First you have to create a Cosmos Db account in Azure portal. For this you in https://portal.azure.com. You also use your free subscription here.

Step 2. Search Azure Cosmos DB in search box in select “Azure Cosmos DB” in this blade click on Create button as shown in below screen or image.


Step 3. Select Core (SQL) – Recommended as shown in below screen


Step 3: Provide required details and click on Review and Create button


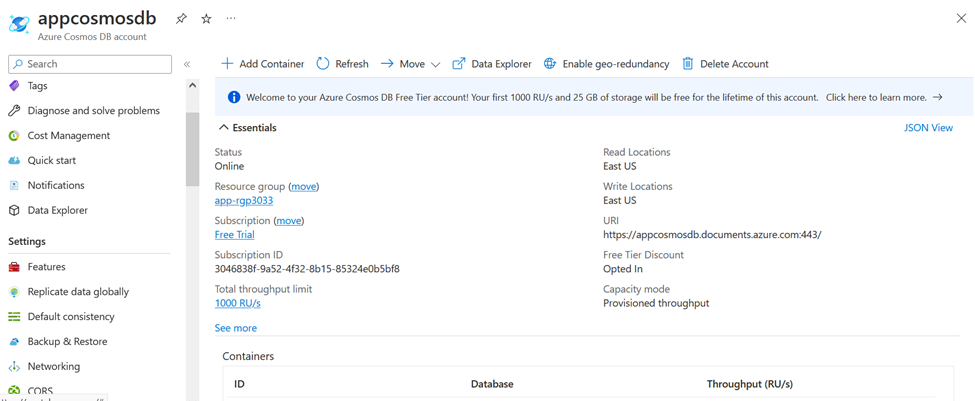
Now wait for 2-3 minutes. After then go to CosmosDB detail page as shown in below:


Now click on Data Explorer in left side panel then one popup will open, then click on full screen button as shown in below scree:


Next page will open and auto login in work in Cosmos DB.

New coding part:

Go to Visual Studio 2022 and create one Console application and give name "cosmosDB".

We need to install one NuGet package: Microsoft.Azure.Cosmos


Now, Go to Program.cs and write following codes:

How to Create Database in Azure Cosmos DB?

cosmosDBEndUrl  and cosmosDbKey  will get from Azure portal. Go to Cosmos DB and click on Key link


using Microsoft.Azure.Cosmos;

string cosmosDBEndUrl = "https://testdbtesttb.documents.azure.com:443/";
string cosmosDbKey = "keykeykeykey";

await CreateDatabase("appdb"); // calling here CreateDatabase method

async Task CreateDatabase(string dataBaseName)
{
    try
    {
        CosmosClient cosmosClient;
        cosmosClient = new CosmosClient(cosmosDBEndUrl, cosmosDbKey);
        await cosmosClient.CreateDatabaseAsync(dataBaseName);
        Console.WriteLine("Database Created.");
    }
    catch (Exception ex)
    {
        throw ex;
    }
}


How to Create Container in Azure Cosmos DB?

using Microsoft.Azure.Cosmos;

string cosmosDBEndUrl = "https://testdbtesttb.documents.azure.com:443/";
string cosmosDbKey = "keykeykeykey";

await CreateContainer("appdb", "Orders", "/category");

async Task CreateContainer(string dataBaseName, string containerName, string partitionKey)

{

    try

    {

        CosmosClient cosmosClient;

        cosmosClient = new CosmosClient(cosmosDBEndUrl, cosmosDbKey);

        Database database = cosmosClient.GetDatabase(dataBaseName);

        await database.CreateContainerAsync(containerName, partitionKey);

        Console.WriteLine("Container Created.");

    }

    catch (Exception ex)

    {

        throw ex;

    }

}


Now to Azure portal and View the details:


How to Insert records in Container?


using Microsoft.Azure.Cosmos;

string cosmosDBEndUrl = "https://testdbtesttb.documents.azure.com:443/";

string cosmosDbKey = "keykeykeykey"; 

string databaseName = "appdb";

string containerName = "Orders"; 

// calling Method in Main method

await AddItem("O1", "Laptops", 100);

await AddItem("O2", "Desktops", 200);

await AddItem("O3", "Mobiles", 150);

await AddItem("O4", "Laptop", 120); 

async Task CreateContainer(string dataBaseName, string containerName, string partitionKey)

{

    try

    {

        CosmosClient cosmosClient;

        cosmosClient = new CosmosClient(cosmosDBEndUrl, cosmosDbKey);

        Database database = cosmosClient.GetDatabase(dataBaseName);

        await database.CreateContainerAsync(containerName, partitionKey);

        Console.WriteLine("Container Created.");

    }

    catch (Exception ex)

    {

        throw ex;

    }

}


How to Get records from Container?


using Microsoft.Azure.Cosmos;

string cosmosDBEndUrl = "https://testdbtesttb.documents.azure.com:443/";

string cosmosDbKey = "keykeykeykey"; 

string databaseName = "appdb";

string containerName = "Orders"; 

// calling in Main method

await GetItem(); 

async Task GetItem()

{

    CosmosClient cosmosClient;

    cosmosClient = new CosmosClient(cosmosDBEndUrl, cosmosDbKey);

    Database database = cosmosClient.GetDatabase(databaseName);

    Container container = database.GetContainer(containerName);

    string sqlQuery = "select o.orderId,o.category,o.quantity from Orders o";

    QueryDefinition queryDefinition = new QueryDefinition(sqlQuery);

    FeedIterator<Order> feedIterator = container.GetItemQueryIterator<Order>(queryDefinition);

    while (feedIterator.HasMoreResults)

    {

        FeedResponse<Order> orders=await feedIterator.ReadNextAsync();

        foreach(Order item in orders)

        {

            Console.WriteLine("The orderId {0}, category is {1} and quantity {2}",item.orderId,item.category,item.quantity);

        }

    }

} 


How to update or replacing item in Container?

await ReplaceItem();// Calling the method in Main method

async Task ReplaceItem() // Updating item

{

    Console.WriteLine("Enter order Id:");

    string orderIdInput = Console.ReadLine();


    Console.WriteLine("Enter quantiry:");

    int quantity =Convert.ToInt32(Console.ReadLine());


    CosmosClient cosmosClient;

    cosmosClient = new CosmosClient(cosmosDBEndUrl, cosmosDbKey);

    Database database = cosmosClient.GetDatabase(databaseName);

    Container container = database.GetContainer(containerName);  

    string sqlQuery = $"select o.id,o.category from Orders o where o.orderId='{orderIdInput}'";

    string id = "";

    string category = "";

    QueryDefinition queryDefinition = new QueryDefinition(sqlQuery);

    FeedIterator<Order> feedIterator = container.GetItemQueryIterator<Order>(queryDefinition);

    while (feedIterator.HasMoreResults)

    {

        FeedResponse<Order> orders = await feedIterator.ReadNextAsync();

        foreach (Order item in orders)

        {

            id = item.id;

            category = item.category;

        }

    };


    ItemResponse<Order> response = await container.ReadItemAsync<Order>(id, new PartitionKey(category));

    var items = response.Resource;

    items.quantity = quantity;

    await container.ReplaceItemAsync<Order>(items, id, new PartitionKey(category));


    Console.Write("Item updated successfully.");

}  


Wednesday 14 September 2022

Azure Logic App - A Brief Introduction With An Example

 In Azure the Microsoft providing app services. The app services include web apps, logic apps, mobile apps, etc.

 
All these services are coming under PaaS.
 
As per Microsoft's definition, logic app is a cloud service which can be used to schedule, automate and orchestrate tasks, business process and workflows.
 
Logic apps can be used to integrate applications, data, services, systems across various enterprises or organizations.
 
The business process modeled in a software is called Workflows.
 
We can use the Azure logic app to automate a common business process that can be shared by multiple applications or enterprises.
 
For example, we can use the logic app to send email notifications to different users when an event happens in various applications, services, and systems, etc.
 
Similarly, we can use the logic app to transfer/copy a file uploaded to the blob storage to another location based on specific conditions. 
 
Another example might be to create a thumbnail image when a new image uploaded the blob storage.
 
In logic app, we can create a business process graphically using the workflow engine and visual designer and connect them through connecters.
 
Microsoft already developed connectors to interact with different applications. 
 
We have connector to connect to MS SQL, connector for MySQL, connector for Facebook, connector for Twitter, etc.
 
The beauty of the Azure logic app is we can do this all without writing a single line of code  
 
In short, we can say the Azure logic app help us to automate business processes.
 
Let's create an Azure logic app in Azure portal.
 

Create an Azure Logic App

 
In this article, we are going to create a logic app to read Azure database records and send mail to the users by checking the value of the mailSent column value.
 
I have already published an article about Azure database creation and use.
 
You can find the article here >> Create And Use SQL Database In Microsoft Azure
 
I am using the same database and table for our logic app.
 
In our Azure database, we have a table called tbl_problemTickets.
 
This table has 4 columns - ID, prblm_description, usermail, and mailSent.
 
Let's discuss our requirements next. 
 
Just assume we have an application to create client issues as problem tickets. The client can create different problem tickets for support.
 
And, we need to send an email to the client when they create a new ticket like an acknowledgment mail.
 
Once the email sent, we should update the mailSent column as 1 (initially it will be 0) 
 
Let's discuss how we can accomplish this task using Azure logic app. 
 
To create logic app please follow the below steps,
  • Open Azure portal
  • Search for Logic App


    We will be navigated to the below screen.

  • Click either Add button or Create Logic app button to create the logic app


  • A new section will be visible to provide the basic details about our logic app like name, resource group, location, etc.

    Fill the details and click the Create button. Please refer to the screenshot below.


    This will take a few minutes to create the Logic app.

  • Once it has been created, We can see the success notification in the notification section.

    We can enter into the newly created Logic app by clicking the Go to resource button in the notification.


  • In Logic app Designer home screen, we can see two sections.

    Trigger selection section and Template selection section.

    In trigger selection section, we can see few commonly used triggers. Similarly, we can see different types of commonly used templates under template selection section.

    Please refer to the below screenshot to get an idea about different types of triggers and templates. From its name, we can understand its purpose.


  • I am going to select the Recurrence trigger for our logic app. As its name implies, this trigger is used to repeat an event after a time period.

    We can set the interval and frequency as below screenshot.


    For this logic app, I've selected 5 minutes as the interval-which means our logic app will trigger every 5 minutes

  • Click the New step button to add a new action.

    We need to connect the database to read newly added records with mailSent column contains 0

    To do this, we need to add the SQL server. So type SQL in search column and select the SQL server.


  • Then choose the Getrows(V2) action from list. This action is used to read rows from the database tables.


  • We will get the below screen to fill the server details 


    Select the SQL server name from the drop-down box. It will show all available SQL servers in our Azure account

    Once the server is selected we can select the database from the next dropdown box. This will list all databases present in the selected SQL server.

    From the third dropdown box we can select the table.


  • We only need to select the records with mailSent status column contains value 0 (mail not send)

    To filter this data, we can add one more parameter by clicking the Add new parameter text box in the above screenshot.

    Then select the Filter Query item from the list.


    Then provide the filter as mailSent eq 0 . 


    At this point our logic app is capable of fetching the user records from our database every 5 minutes.

    Next we need to loop through the records, set and send mail to each user.

  • Add new action and search for for each loop


  • Click the Select an output from previous steps text box.

    Now we can see the value from the previous step. Select the value from Dynamic content window.


  • Then click the Add an action button.


  • Next, we need to add mail service to send mail. Here I am using my gmail account to send mail.

    Search for gmail and select Gmail action as below.


    Then select the Send mail action from the list.


    This will prompt us to provide the Gmail account credential and permission to use the gmail. This will be a one time task.

  • Next, we need to set the email configuration like To, subject, body, etc.

    Click the To text box. It will list all columns in the data set value in the Dynamic content window. Click the see more link to see all columns.


    This will list all columns available in the data set.

    From the list select the usermail column.


  • Then, we need to add the subject and body for the mail.

    To add these fields, click the Add new parameter text box.

    Select the subject and body items from the list.


  • Click the subject text box and select the prblm_description column from the Dynamic content window.


  • Provide some content for the body section as below.


  • Save the logic app by clicking the save button. 


    Finally, we created our Azure logic app successfully  

    Let's run our logic app by clicking the Run button and check the mailbox(I provided my other mail id as the usermail value in database).

    We can see our logic app mail as below . 


  • Next, we should update the database by changing the mailSent column value to 1.Otherwise same user details will be read from database and send mail again.

    To update the database back, we can add one more action by clicking the Add an action button in the loop action.


  • Then, select the SQL Update row(V2) action 


  • Select the SQL server ,database,table from corresponding dropdown boxes.

    For Row Id column, select the primary key column name from the dynamic content window


  • Click the add parameter text box and select the mailSent column from the list


  • Give the value of the mailSent text box as 1. This value will be used to update the mailSent column in the database table.

That's All !! 
 
All Completed 
 
Save our logic app and trigger it again. We will receive the same mail as earlier. 
 
Check the table in the database. mailSent column will be updated to 1. During the next run this rows will not be considered.
 
Once tested the logic app, disable it by clicking the Disable button in the Logic app home screen. Otherwise it will trigger every 5 minutes.