Saturday, 2 February 2019

Move validation messages to the component class in reactive form

         Move validation messages to the component class in reactive form


We will discuss, how to move validation messages to the component class. There are several benefits to this 
  • Easily unit test validation logic
  • Instead of hard-coding validation messages in the application, we can load them from an external source like a database or a file.
  • Change validation dynamically at run-time based on the decisions made in code or user selections

Let's move the validation messages to the component class and in our next video we will discuss moving the logic to show and hide these messages. 

Changes in create-employee.component.ts file :  

// This object will hold the messages to be displayed to the user
// Notice, each key in this object has the same name as the
// corresponding form control
formErrors = {
  'fullName': '',
  'email': '',
  'skillName': '',
  'experienceInYears': '',
  'proficiency': ''
};

// This object contains all the validation messages for this form
validationMessages = {
  'fullName': {
    'required': 'Full Name is required.',
    'minlength': 'Full Name must be greater than 2 characters.',
    'maxlength': 'Full Name must be less than 10 characters.'
  },
  'email': {
    'required': 'Email is required.'
  },
  'skillName': {
    'required': 'Skill Name is required.',
  },
  'experienceInYears': {
    'required': 'Experience is required.',
  },
  'proficiency': {
    'required': 'Proficiency is required.',
  },
};

ngOnInit() {
  // Modify the code to include required validators on
  // all form controls
  this.employeeForm = this.fb.group({
    fullName: ['', [Validators.required,
    Validators.minLength(2), Validators.maxLength(10)]],
    email: ['', Validators.required],
    skills: this.fb.group({
      skillName: ['', Validators.required],
      experienceInYears: ['', Validators.required],
      proficiency: ['', Validators.required]
    }),
  });
}

logValidationErrors(group: FormGroup): void {
  // Loop through each control key in the FormGroup
  Object.keys(group.controls).forEach((key: string) => {
    // Get the control. The control can be a nested form group
    const abstractControl = group.get(key);
    // If the control is nested form group, recursively call
    // this same method
    if (abstractControl instanceof FormGroup) {
      this.logValidationErrors(abstractControl);
      // If the control is a FormControl
    } else {
      // Clear the existing validation errors
      this.formErrors[key] = '';
      if (abstractControl && !abstractControl.valid) {
        // Get all the validation messages of the form control
        // that has failed the validation
        const messages = this.validationMessages[key];
        // Find which validation has failed. For example required,
        // minlength or maxlength. Store that error message in the
        // formErrors object. The UI will bind to this object to
        // display the validation errors
        for (const errorKey in abstractControl.errors) {
          if (errorKey) {
            this.formErrors[key] += messages[errorKey] + ' ';
          }
        }
      }
    }
  });
}

onLoadDataClick(): void {
  this.logValidationErrors(this.employeeForm);
  console.log(this.formErrors);
}

Loop through all form controls in formgroup in reactive form

               Loop through all form controls in formgroup in reactive form


Understanding this technique is very useful, as it can help us perform the following on all the form controls in a reactive form 
  • Reset form controls
  • Enable or disable all form controls or just the nested formgroup controls
  • Set validators and clear validators
  • Mark form controls as dirty, touched, untouched, pristine etc.
  • Move validation messages and the logic to show and hide them into the component class from the view template.

Here is what we want to do : Loop through each form control in the following employeeForm form group including nested skills form group and log the form control key and value to the console. 

this.employeeForm = this.fb.group({
  fullName: [''],
  email: [''],
  skills: this.fb.group({
    skillName: [''],
    experienceInYears: [''],
    proficiency: ['beginner']
  }),
});

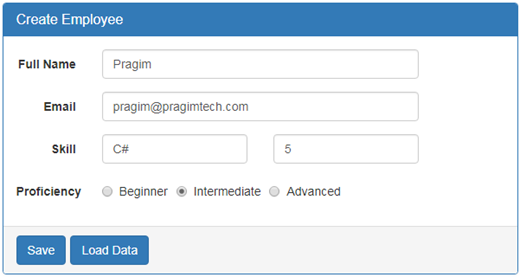
For example, if we have the following sample data on the form 

Loop through all form controls in formgroup in reactive form 

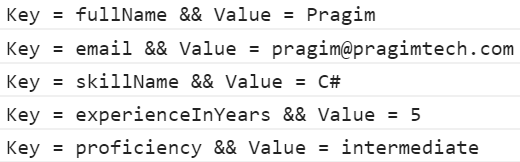
We want every form control key and value to be logged to the console as shown below. 

recursive loop through form controls in form groups 

Here is the method. It is commented and self-explanatory 

logKeyValuePairs(group: FormGroup): void {
  // loop through each key in the FormGroup
  Object.keys(group.controls).forEach((key: string) => {
    // Get a reference to the control using the FormGroup.get() method
    const abstractControl = group.get(key);
    // If the control is an instance of FormGroup i.e a nested FormGroup
    // then recursively call this same method (logKeyValuePairs) passing it
    // the FormGroup so we can get to the form controls in it
    if (abstractControl instanceof FormGroup) {
      this.logKeyValuePairs(abstractControl);
      // If the control is not a FormGroup then we know it's a FormControl
    } else {
      console.log('Key = ' + key + ' && Value = ' + abstractControl.value);
    }
  });
}

Angular form control valuechanges

                               Angular form control valuechanges


Angular valueChanges Observable 
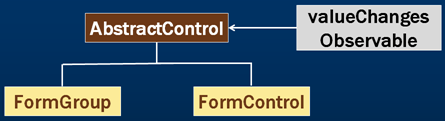
  • Both FormControl and FormGroup classes inherit from the base AbstractControl class
  • AbstractControl class has valueChanges property
  • valueChanges property is an observable that emits an event every time the value of the control changes
  • To be able to monitor and react when the FormControl or FormGroup value changes, subscribe to the valueChanges observable 
Angular form control valuechanges 

For example, if you want to monitor and log to the console as the value of a fullName form control changes, subscribe to it's valueChanges observable as shown below. 

ngOnInit() {

  this.employeeForm = this.fb.group({
    fullName: ['',
      [
        Validators.required,
        Validators.minLength(2),
        Validators.maxLength(10)]
    ],
    email: [''],
    skills: this.fb.group({
      skillName: ['C#'],
      experienceInYears: [''],
      proficiency: ['beginner']
    }),
  });

  // Subscribe to valueChanges observable
  this.employeeForm.get('fullName').valueChanges.subscribe(
    value => {
      console.log(value);
    }
  );

}

We placed the code to subscribe to the valueChanges Observable in ngOnInit lifecycle hook. This is because, we want to start monitoring and reacting to fullName form control value immediately after the component is initialised.

Every time the value of the fullName form control changes, the value is passed as a parameter to the subscribe method and the associated code is executed.

Since FormGroup class also inherit from AbstractControl class, we can also subscribe to the FormGroup valueChanges observable. This allows us to monitor and react when any control value in that FormGroup changes. 

// Subscribe to FormGroup valueChanges observable
this.employeeForm.valueChanges.subscribe(
  value => {
    console.log(JSON.stringify(value));
  }
);

Subscribing to valueChanges observable and there by monitoring a form control or form group allow us to do several things like 
  • Implementing auto-complete feature
  • Dynamically validating form controls
  • Move validation messages from the view template to the component class

Angular reactive forms validation

                             Angular reactive forms validation


We will discuss implementing validation in a reactive form. 


Here is what we want to do. We want to make Full Name 
1. Required and
2. The number of characters must be between 2 and 10 


Step 1 - Import Angular Validators class : The first thing to do, when implementing validation in a reactive form is to import angular's Validators class.  

import { Validators } from '@angular/forms';

This class has the following validator functions

FunctionDescription
requiredValidate that a field has a value. Used for required fields. For example, Name is required.
requiredTrueValidate that the field value is true. This validator is commonly used on a required checkbox. For example, "I Agree to the terms" checkbox must be checked to submit the form.
emailValidate that the field value has a valid email pattern. For example, abc is not a valid email.
patternValidate that the field value matches the specified regex pattern.
minValidate that the field value is greater than or equal to the provided number. For example, minimum age to vote is 18.
maxValidate that the field value is less than or equal to the provided number. For example, people over the age of 90 are not eligible for this insurance policy.
minLengthThe number of characters in the field must be greater than or equal to the provided minimum length. For example, Full Name must be at least 3 characters.
maxLengthThe number of characters in the field must be less than or equal to the provided maximum length. For example, Description cannot exceed 500 characters.

Most of our validation requirements can be met using one or more of the following built-in validator functions. You can also write your own custom validator, if your requirements are not met using one of the above built-in validator functions. We will discuss, implementing a custom validator in a reactive form in our upcoming videos. 

Step 2 - Specify the validators on the fullName Field : Notice, along with a default value of empty string, we are passing an array of validator functions. In our case 3 - required, minLength and maxLength. 

this.employeeForm = this.fb.group({
  fullName: ['', [Validators.required, Validators.minLength(2), Validators.maxLength(10)]],
  // OtherFields...
});

Step 3 - Modify the fullName field in the template to display validation error messages. 

<div class="form-group"
      [ngClass]="{'has-error': ((employeeForm.get('fullName').touched ||
                                 employeeForm.get('fullName').dirty) &&
                                 employeeForm.get('fullName').errors)}">
  <label class="col-sm-2 control-label" for="fullName">Full Name</label>
  <div class="col-sm-8">
    <input id="fullName" type="text" class="form-control"formControlName="fullName">
    <span class="help-block"
          *ngIf="((employeeForm.get('fullName').touched ||
                   employeeForm.get('fullName').dirty) &&
                   employeeForm.get('fullName').errors)">
      <span *ngIf="employeeForm.get('fullName').errors.required">
        Full Name is required
      </span>
      <span *ngIf="employeeForm.get('fullName').errors.minlength ||
                   employeeForm.get('fullName').errors.maxlength">
          Full Name must be greater than 2 characters and less than 10 characters
      </span>
    </span>
  </div>
</div>

At the moment, the validation messages are still in the template HTML. In our upcoming videos, we will discuss, how to move them into the component class. 

Angular formbuilder example

                                        Angular formbuilder example


We will discuss an easier way of creating reactive forms using the FormBuilder class 

In Angular, there are 2 ways to create reactive forms 
  1. Explicitly creating instances of FormGroup and FormControl classes using the new keyword. We discussed this in Part 4 and Part 6 of Angular 6 tutorial.
  2. Using the FormBuilder class

The FormBuilder class provides syntactic sugar that shortens creating instances of a FormControl, FormGroup, or FormArray. It reduces the amount of code we have to write to build complex reactive forms. The FormBuilder service has three methods:  
  • control() - Construct a new FormControl instance
  • group() - Construct a new FormGroup instance
  • array() - Construct a new FormArray instance
We will discuss FormArrays in our upcoming videos. 

Step 1 : Import FormBuilder  

The FormBuilder class is provided as a service, so first let's import the service 

import { FormBuilder } from '@angular/forms';

Step 2 : Inject the FormBuilder service  

Once the FormBuilder service is imported, inject it into the component using the constructor 

constructor(private fb: FormBuilder) { }

Step 3 : Use the FormBuilder  
  • Notice in the example below, we are using the FormBuilder group() method to create a FormGroup instance. 
  • To the method we pass an object that contains a collection of child controls. 
  • For each child control we specify a key and value. 
  • Key is the name of the form control and the value is an array.
  • The first element of the array is used to specify an initial value for the form control.
  • The second and third elements of the array are used to specify synchronous and asynchronous validators for the form control. We will discuss these when we discuss form validation in our upcoming videos.
  • For now, we have defined just the initial value using the first element of the array.
  • We have specified an empty string as the default value for all the controls except proficiency radio buttons.
  • For proficiency we have a default value of beginner. So the respective radio button is selected when the form loads.
this.employeeForm = this.fb.group({
  fullName: [''],
  email: [''],
  skills: this.fb.group({
    skillName: [''],
    experienceInYears: [''],
    proficiency: ['beginner']
  }),
});

FormBuilder reduces the amount of boilerplate code we have to write to build complex reactive forms.