Friday, 2 October 2020

How To Use Sessions In ASP.NET Core

 In this article, you will learn how to use your C# coding prowess to set up the session state in your ASP.NET Core and MVC Core Web applications.

Create your core application

Step 1

Open Visual Studio and select File >> New Project.

The ”New Project” window will pop up. Select .NET Core and select “ASP.NET Core Web Application”. Name your project and click “OK”.


A "New Project" window will pop up. Select Web Application and click “OK”, as shown below.

Step 2

Once your project is ready, open Solution Explorer, right-click “dependencies”, and click “Manage NuGet Packages…”.


Packages Required

We need to install the stable version of “Microsoft.AspNetCore.Session” from the NuGet Package Manager. Then only we can access the session state in ASP.NET Core. Click on the “Install” button.


Step 3

Now, double click “HomeControllers.cs”. The following is an example of a session sharing in ASP.NET Core.
  1. using System;  
  2. using System.Collections.Generic;  
  3. using System.Diagnostics;  
  4. using System.Linq;  
  5. using System.Threading.Tasks;  
  6. using Microsoft.AspNetCore.Http;  
  7. using Microsoft.AspNetCore.Mvc;  
  8. using Session_State.Models;  
  9.   
  10. namespace Session_State.Controllers  
  11. {  
  12.     public class HomeController : Controller  
  13.     {  
  14.   
  15.         const string SessionName = "_Name";  
  16.         const string SessionAge = "_Age";  
  17.         public IActionResult Index()  
  18.         {  
  19.             HttpContext.Session.SetString(SessionName, "Jarvik");  
  20.             HttpContext.Session.SetInt32(SessionAge, 24);  
  21.             return View();  
  22.         }  
  23.   
  24.         public IActionResult About()  
  25.         {  
  26.             ViewBag.Name = HttpContext.Session.GetString(SessionName);  
  27.             ViewBag.Age = HttpContext.Session.GetInt32(SessionAge);  
  28.             ViewData["Message"] = "Asp.Net Core !!!.";  
  29.   
  30.             return View();  
  31.         }  
  32.   
  33.         public IActionResult Contact()  
  34.         {  
  35.             ViewData["Message"] = "Your contact page.";  
  36.   
  37.             return View();  
  38.         }  
  39.   
  40.         public IActionResult Error()  
  41.         {  
  42.             return View(new ErrorViewModel { RequestId = Activity.Current?.Id ?? HttpContext.TraceIdentifier });  
  43.         }  
  44.     }  
  45. }  

Step 4

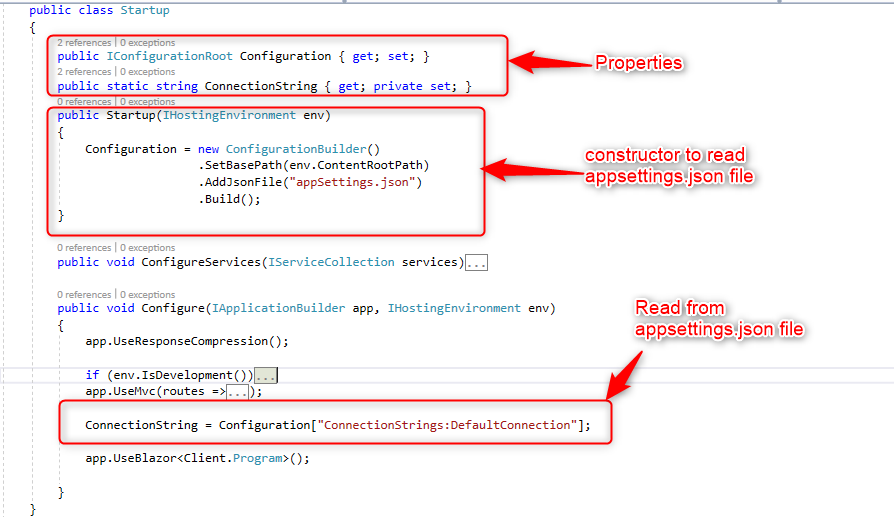
Now, double click ”Startup.cs” to configure the services. The very first step we need to take is to add the session service to the container so that we can add the services in the “configureServices” function.

  1. public void ConfigureServices(IServiceCollection services)  
  2. {  
  3.      
  4.     services.AddDistributedMemoryCache();  
  5.     services.AddSession(options => {  
  6.         options.IdleTimeout = TimeSpan.FromMinutes(1);//You can set Time   
  7.     });  
  8.     services.AddMvc();  
  9. }  

Configure the HTTP Request Pipeline

Now, in the same class, we add “app.Usersession()” inside the “configure” function so that it gets called by the runtime.

  1. public void Configure(IApplicationBuilder app, IHostingEnvironment env)  
  2. {  
  3.     if (env.IsDevelopment())  
  4.     {  
  5.         app.UseDeveloperExceptionPage();  
  6.         app.UseBrowserLink();  
  7.     }  
  8.     else  
  9.     {  
  10.         app.UseExceptionHandler("/Home/Error");  
  11.     }  
  12.   
  13.     app.UseStaticFiles();  
  14.   
  15.     app.UseSession();  
  16.   
  17.     app.UseMvc(routes =>  
  18.     {  
  19.         routes.MapRoute(  
  20.             name: "default",  
  21.             template: "{controller=Home}/{action=Index}/{id?}");  
  22.     });  
  23. }  

Now, run your projec. You will see the output of an Active Session, as below.

 
Let us set “one” minute as the Session TimeOut in the “ConfigureServices” function of the “Startup.cs” class.
  1. services.AddSession(options => {  
  2.     options.IdleTimeout = TimeSpan.FromMinutes(1);//You can set Time   
  3. });  

Session Expires

 
That's it. I hope you have found this article helpful. Do let me know via comments and likes. 

Dynamic Connection String In .NET Core

 To read connection string/keys from appsettings.json file, follow the below steps.

Put your connection string in appsettings.json file.

In ASP.NET Core, configuration API provides a way of configuring an app based on a list of name-value pairs that can be read at runtime from multiple sources. Please note that class libraries don’t have an appsettings.json by default. The solution is simple — access appsettings.json key-value pairs in your project through Dependency Injection principle in ASP.NET Core.

appsettings.json

Write the below code to Startup.cs file.

IConfiguration has two specializations,

  • IConfigurationRoot is used for root node. It can trigger a reload.
  • IConfigurationSection Represents a section of configuration values. The GetSection and GetChildrenmethods return an IConfigurationSection.
  • Use IConfigurationRoot when reloading configuration or for access to each provider.

In Configure method of Startup.cs class, put the below line.

Sensitive configuration settings like connection strings should only be stored outside the version control repository (for example- in UserSecrets or Environment Variables) but hopefully you get the idea.

In Context class, put this method.

Here, simply call our Startup class property using Startup(Class).Property, which you set in startup.cs class.

And that's all. Now, you can use a dynamic connection string in your project.

At the end, your startup.cs file looks like this.

  • .SetBasePath() It sets the FileProvider for file-based providers to a PhysicalFileProvider with the base path.
  • .AddJsonFile() We need to include the Microsoft.Extensions.Configuration.Json NuGet package if you want to call the.AddJsonFile() method.
  • ConfigurationBuilder Class Used to build key/value based configuration settings for use in an application.

Startup.cs

And your context file looks like this,

And using GetConnectionString() method we are going to call Startup class method, namely ConnectionString, which returns our connection string.

UseSqlServer is an extension method in the namespace Microsoft.Data.Entity, so you need to import that into your code like this:

  1. using Microsoft.EntityFrameworkCore;   

Output 

 Output