The Blazor WebAssembly project template doesn't feature an option to include authentication. If you want to add authentication to a WebAssembly-based Blazor application, you need to do it yourself. This article shows how to add application-wide authentication management and then to use built-in Razor components to protect the FetchData page in the standard template from unauthorised users.
There are some good starting points when looking at Authentication in Blazor applications. The official docs explain how to apply authentication to a Blazor Server application. On the client side, Chris Sainty has looked at managing authentication with an Identity database in one of his excellent series of Blazor articles. And Steve Sanderson (main Blazor bloke at Microsoft) provides a demo app that he showed at NDC Oslo in June this year.
Like the other examples, this article will show how to use a Web API endpoint to issue a JSON Web Token (JWT) to a validated user. Where this article builds on the other examples is in demonstrating how to manage the expiry of the token in the browser.
Warning
Just like input validation, client side authentication and authorisation management in Blazor can be circumvented. It is therefore very important that you properly protect server-side resources as well.
This walkthrough starts with the standard ASP.NET Core Hosted WebAssembly Blazor project:
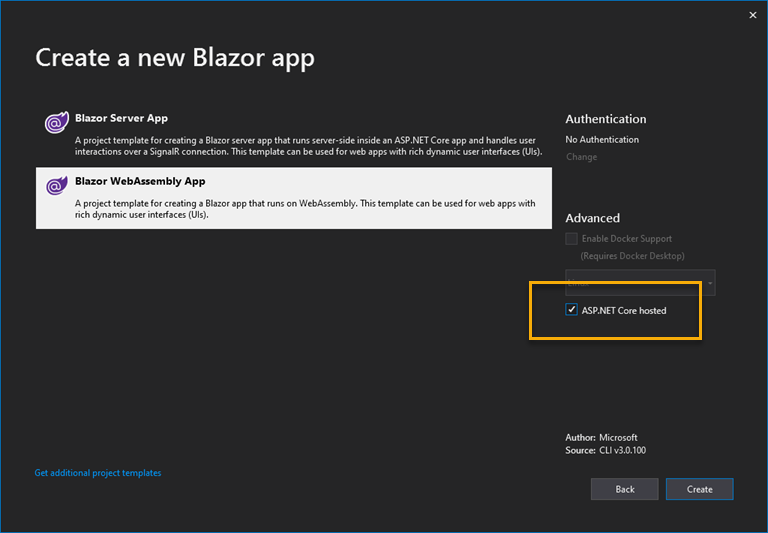
I've called mine BlazorWasmAuthentication if you want to copy and paste code from here. The resulting solution includes 3 projects: Server, Client and Shared. Each will require amending.
Amend the Shared Project
The first changes are made to the Shared project. This is the .NET class library that holds code (mainly model classes) that are shared between the Client and Server projects. Add two classes, Credentials and LoginResult:
using System.ComponentModel.DataAnnotations;

namespace BlazorWasmAuthentication.Shared
{
    public class Credentials
    {
        [Required]
        public string Email { get; set; }

        [Required]
        public string Password { get; set; }
    }
}
using System;

namespace BlazorWasmAuthentication.Shared
{
    public class LoginResult
    {
        public string Token { get; set; }
        public DateTime Expiry { get; set; }
    }
}
Amend the Server Project
The Server project requires a few amendments. It needs to be configured to make use of ASP.NET Core authentication management with JWT bearer tokens. It also needs to provide an API that allows users to authenticate, and it needs to store the authorised user's credentials securely.
To simplify things, I won't configure an Identity database for the user credentials. Chris Sainty provides clear instructions on how to do this in his article, should you need help. The credentials for this example will be stored in an appSettings file, with the password hashed using the Identity PasswordHasher introduced in this article.
- Add an appSettings.json file to the server project with the following content:
{
  "Jwt": {
    "Key": ITNN8mPfS2ivOqr1eRWK0Rac3sRAchQdG8BUy0pK4vQ3",
    "Issuer": "MyApp",
    "Audience": "MyAppAudience"
  },
  "Credentials": {
    "Email": "user@test.com",
    "Password": "AQAAAAEAACcQAAAAENsLEigZGIs6kEdhJ7X1d7ChFZ4TKQHHYZCDoLSiPYy/GpYw4lmMOalsn8g/7debnA=="
  }
}
The password has been hashed. Its original value was "test-password". - The next step is to amend project to include an additional package:
Microsoft.AspNetCore.Authentication.JwtBearer. You can add this in any way that you prefer. The simplest way is to add a package reference to the project file:<PackageReference Include="Microsoft.AspNetCore.Authentication.JwtBearer" Version="3.0.0" />
- Next, you need to configure the application to use JWT bearer tokens. This is done in Startup, and first requires the addition of some
usingdirectives:using System.Text; using Microsoft.IdentityModel.Tokens; using Microsoft.AspNetCore.Authentication.JwtBearer; using Microsoft.Extensions.Configuration;
- Then you need to access the Configuration API. Inject the
IConfigurationservice into a constructor, and assign it to a public property:public Startup(IConfiguration configuration) => Configuration = configuration; public IConfiguration Configuration { get; }
- Configure authentication in
ConfigureServices:services.AddAuthentication(JwtBearerDefaults.AuthenticationScheme).AddJwtBearer(options => { options.TokenValidationParameters = new TokenValidationParameters { ValidateIssuer = true, ValidateAudience = true, ValidateLifetime = true, ValidateIssuerSigningKey = true, ValidIssuer = Configuration["Jwt:Issuer"], ValidAudience = Configuration["Jwt:Audience"], IssuerSigningKey = new SymmetricSecurityKey(Encoding.UTF8.GetBytes(Configuration["Jwt:Key"])) }; });
- Then add authentication and authorisation middleware to the request pipeline in the
Configuremethod. Ensure that they are added after Routing and before EndPoint configuration:app.UseAuthentication(); app.UseAuthorization();
- Add an
[Authorize]attribute to the existing WeatherForecast controller:namespace BlazorWasmAuthentication.Server.Controllers { [Authorize] [ApiController] [Route("[controller]")] public class WeatherForecastController : ControllerBase {
Remembering the warning at the top of this article, this is an important step. If you don't want unauthorised users to be able to access the information provided by the weather forecast service, it is not enough to use client side code to prevent access. Anyone with fairly basic knowledge of browser developer tools might be able to circumvent client-side restrictions. - Finally, create a Web API controller named LoginContoller:
using BlazorWasmAuthentication.Shared;
using Microsoft.AspNetCore.Identity;
using Microsoft.AspNetCore.Mvc;
using Microsoft.Extensions.Configuration;
using Microsoft.IdentityModel.Tokens;
using System;
using System.IdentityModel.Tokens.Jwt;
using System.Security.Claims;
using System.Text;

namespace BlazorWasmAuthentication.Server.Controllers
{

    [ApiController]
    public class LoginController : ControllerBase
    {
        private readonly IConfiguration_configuration;

        public LoginController(IConfiguration configuration) => _configuration = configuration;

        [HttpPost("api/login")]

        public LoginResult Login(Credentials credentials)
        {
            var expiry = DateTime.Now.AddMinutes(2);
            return ValidateCredentials(credentials) ? new LoginResult { Token = GenerateJWT(credentials.Email, expiry), Expiry = expiry } : new LoginResult();
        }

        bool ValidateCredentials(Credentials credentials)
        {
          var user = _configuration.GetSection("Credentials").Get<Credentials>();
          var passwordHasher = new PasswordHasher<string>();
          return passwordHasher.VerifyHashedPassword(null, user.Password, credentials.Password) == PasswordVerificationResult.Success;
        }

        private string GenerateJWT(string email, DateTime expiry)
        {
          var securityKey = new SymmetricSecurityKey(Encoding.UTF8.GetBytes(_configuration["Jwt:Key"]));
          var token = new JwtSecurityToken(
              _configuration["Jwt:Issuer"],
              _configuration["Jwt:Audience"],
              new[] { new Claim(ClaimTypes.Name, email) },
              expires: expiry,
              signingCredentials: new SigningCredentials(securityKey, SecurityAlgorithms.HmacSha256)
          );
          var tokenHandler = new JwtSecurityTokenHandler();
          return tokenHandler.WriteToken(token);
        }
    }
}
For the purposes of demonstration, the token expiry is set to 2 minutes. This is so that you can test expiry without growing old. The Web API entry point validates the credentials. In this example, the code simply reads the credentials stored in the configuration file and compares them to the posted values. If they are valid, aLoginResultis returned complete with a token and an expiry. Otherwise an emptyLoginResultis returned. The code for generating the token is pretty much boilerplate, and lifted directly out of Steve Sanderson's demo.
The Client Application
Authentication management in the client application relies on two principal actors: a class that derives from AuthenticationStateProvider, implementing its GetAuthenticationStateAsync method; and a CascadingAuthenticationState component. The CascadingAuthenticationState component obtains the current authentication state of the user by subscribing to the AuthenticationStateProvider's AuthenticationStateChanged event. Then the CascadingAuthenticationState component makes that information available to children via a cascading value of type Task<AuthenticationState>. The AuthenticationStateProvider is responsible for setting the authentication status of the user.
- Start by adding a package reference to
Microsoft.AspNetCore.Components.Authorizationin the Client project's csproj file:<PackageReference Include="Microsoft.AspNetCore.Authentication.JwtBearer" Version="3.1.0-preview1.19508.20" />
- Add a
usingdirective to the _Imports.razor file to bring the contents of the package into scope along with the ASP.NET Core authentication package:@using Microsoft.AspNetCore.Authorization @using Microsoft.AspNetCore.Components.Authorization
- Add a folder named AuthenticationStateProviders, and inside it, add a C# class file named TokenAuthenticationStateProvider.cs with the following code:
using Microsoft.AspNetCore.Components.Authorization;
using Microsoft.JSInterop;
using System;
using System.Collections.Generic;
using System.Linq;
using System.Security.Claims;
using System.Text.Json;
using System.Threading.Tasks;

namespace BlazorWasmAuthentication.Client.AuthenticationStateProviders
{
    public class TokenAuthenticationStateProvider : AuthenticationStateProvider
    {
        private readonly IJSRuntime_jsRuntime;

        public TokenAuthenticationStateProvider(IJSRuntime jsRuntime)
        {
            _jsRuntime = jsRuntime;
        }

        public async Task SetTokenAsync(string token, DateTime expiry = default)
        {
            if (token == null)
            {
                await _jsRuntime.InvokeAsync<object>("localStorage.removeItem", "authToken");
                await _jsRuntime.InvokeAsync<object>("localStorage.removeItem", "authTokenExpiry");
            }
            else
            {
                await _jsRuntime.InvokeAsync<object>("localStorage.setItem", "authToken", token);
                await _jsRuntime.InvokeAsync<object>("localStorage.setItem", "authTokenExpiry", expiry);
            }

            NotifyAuthenticationStateChanged(GetAuthenticationStateAsync());
        }

        public async Task<string> GetTokenAsync()
        {
            var expiry = await _jsRuntime.InvokeAsync<object>("localStorage.getItem", "authTokenExpiry");
            if(expiry != null)
            {
                if(DateTime.Parse(expiry.ToString()) > DateTime.Now)
                {
                    return await _jsRuntime.InvokeAsync<string>("localStorage.getItem", "authToken");
                }
                else
                {
                    await SetTokenAsync(null);
                }
            }
            return null;
        }


        public override async Task<AuthenticationState> GetAuthenticationStateAsync()
        {
            var token = await GetTokenAsync();
            var identity = string.IsNullOrEmpty(token)
                ? new ClaimsIdentity()
                : new ClaimsIdentity(ParseClaimsFromJwt(token), "jwt");
            return new AuthenticationState(new ClaimsPrincipal(identity));
        }

        private static IEnumerable<Claim> ParseClaimsFromJwt(string jwt)
        {
            var payload = jwt.Split('.')[1];
            var jsonBytes = ParseBase64WithoutPadding(payload);
            var keyValuePairs = JsonSerializer.Deserialize<Dictionary<string, object>>(jsonBytes);
            return keyValuePairs.Select(kvp => new Claim(kvp.Key, kvp.Value.ToString()));
        }

        private static byte[] ParseBase64WithoutPadding(string base64)
        {
            switch (base64.Length % 4)
            {
                case 2: base64 += "=="; break;
                case 3: base64 += "="; break;
            }
            return Convert.FromBase64String(base64);
        }
    }
}
This code is largely based on the Mission Control demo. TheAuthenticationStateProviderincludes aSetTokenAsyncmethod and aGetTokenAsyncmethod. TheSetTokenAsyncmethod uses Blazor's JavaScript interop service to use the browser's local storage feaure to store the token, if one is provided. It also stores the token's expiry time. If no token is provided, the method removes both the storage keys related to the token and its expiry time, effectively logging the user out. Finally, the method callsNotifyAuthenticationStateChanged, which raises theAuthenticationStateChangedevent that theCascadingAuthenticationStatecomponent subscribes to, updating theCascadingAuthenticationStatecomponent about the current authentication status of the user.
TheGetTokenAsyncmethod checks the expiry time of the token. If the expiry time has expired, theSetTokenmethod is called without a token being provided, logging the user out. Otherwise a valid token is returned, if one exists.
The final public method, which must be overridden in classes that derive fromAuthenticationStateProvider, is theGetAuthenticationStateAsyncmethod. This method parses the JSON Web Token and creates aClaimsPrincipal(representing the current user) with either the identity information (ClaimsIdentity) obtained from the token, or an emptyClaimsIdentityif no token exists.The method for parsing the JWT is taken from the Mission Control demo. JWTs contain three parts: a header, a payload (the source of theClaimsIdentityinformation) and a signature. Each part is Base64 Url encoded and then the parts are joined using dots. The final output e.g.header.payload.signatureforms the token. When using Base64 Url encoding, output padding is optional, and in fact is not included in the generation of JWTs. TheSystem.Convert.FromBase64Stringmethod expects the input string to have output padding where necessary, and will raise aFormatExceptionif it is missing. Therefore the additional private method at the end of the class is used to put padding characters (=) on to the end of the payload if they are needed before the string is decoded. - The
AuthenticationStateProviderneeds to be registered with the dependency injection system. This is done in theConfigureServicesmethod in Startup. Add authentication services to the application too:public void ConfigureServices(IServiceCollection services) { services.AddAuthorizationCore(); services.AddScoped<TokenAuthenticationStateProvider>(); services.AddScoped<AuthenticationStateProvider>(provider => provider.GetRequiredService<TokenAuthenticationStateProvider>()); }
TheTokenAuthenticationStateProvideris registered so that it can be injected directly into components etc, and then the injected service is registered as the implementation ofAuthenticationStateProvider. This isn't necessarily a recommended pattern. But it makes things simpler for demo purposes. If you want to adopt a more robust approach, move the methods that get and set tokens from theTokenAuthenticationStateProviderinto a separate service and use that where this demo explicitly injects theTokenAuthenticationStateProvider. Check Chris Sainty's AuthService for some inspiration. - The next step involves creating the Login form. Add a new Razor Component to the Pages folder named Login.razor wih the following code:
@inject HttpClient Http
@inject TokenAuthenticationStateProvider AuthStateProvider

<div class="container col-6">
    @if (loginFailure)
    {
        <div class="alert alert-danger">Your credentials did not work. Please try again.</div>
    }
    <div class="card">
        <div class="card-body">
            <h5 class="card-title">Login</h5>
              <EditForm @ref="loginform" Model="credentials" OnValidSubmit="SubmitCredentials">
                <DataAnnotationsValidator />

                <div class="form-group">>
                    <label>Email address</label>
                    <InputText class="form-control" @bind-Value="credentials.Email" />
                    <ValidationMessage For="@(()=> credentials.Email)" />
                </div>
                <div class="form-group">
                    <label>Password</label>
                    <InputText type="password" class="form-control" @bind-Value="credentials.Password" />
                    <ValidationMessage For="@(()=> credentials.Password)" />
                <div/>
                <button type="submit" class="btn btn-outline-primary btn-sm">Submit</button>
            </EditForm>
        </div>
    </div>
</div>
@code {
    Credentials credentials = new Credentials();
    bool loginFailure;

    EditForm loginform { get; set; }

    async Task SubmitCredentials()
    {
        var result = await Http.PostJsonAsync<LoginResult>("api/login", credentials);
        loginFailure = result.Token == null;
        if (!loginFailure)
        {
            await AuthStateProvider.SetTokenAsync(result.Token, result.Expiry);
        }
    }
}
There is not much to explan here. If the form validation succeeds, theSubmitCredentialsmethod is called. If the login is successful (indicated by the presence of a token in the response from the LoginController), the injectedTokenAuthenticationStateProvidersets the token, which as you remember, results in the authentication status being updated with any component that subscribes to theNotifyAuthenticationStateChangedevent. - Now it's time to introduce the component that does subscribe to the
NotifyAuthenticationStateChangedevent, theCascadingAuthenticationStatecomponent. Open the App.razor file and replace the existing content with the following:<CascadingAuthenticationState> <Router AppAssembly="@typeof(Program).Assembly"> <Found Context="routeData"> <AuthorizeRouteView RouteData="@routeData" DefaultLayout="@typeof(MainLayout)"> <NotAuthorized> <Login/> </NotAuthorized> </AuthorizeRouteView> </Found> <NotFound> <LayoutView Layout="@typeof(MainLayout)"> <p>Sorry, there's nothing at this address.</p> </LayoutView> </NotFound> </Router> </CascadingAuthenticationState>
First, you added the wrapped the entire application in theCascadingAuthenticationStatecomponent, ensuring that any other application component is able to receive itsTask<AuthenticationState>cascading value as a parameter. You changed theRouteViewcomponent for anAuthorizeRouteView,which does the same except that it only displays the content of the page if the user is authenticated. If the user is not authenticated, the child content of theNotAuthorizedcomponent is displayed, i.e. the login component that you just created. - Change the top of the FetchData.razor file to look like this:
@page "/fetchdata"
@using BlazorWasmAuthentication.Shared
@using System.Net.Http.Headers;
@inject HttpClient Http
@inject TokenAuthenticationStateProvider TokenProvider
@attribute[Authorize]
<h1>Weather forecast</h1>
You changes involve the addition of a using directive to bringSystem.Net.Http.Headersinto scope; you injected theTokenAuthenticationStateProvider; and you added an[Authorize]attribute to the page. If you try to run the page at this stage, you should see the login form that you created: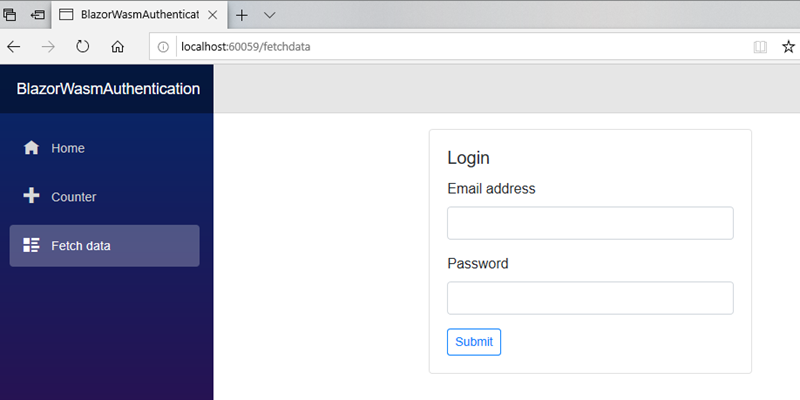
- Now amend the
@codeblock in Fetchdata as follows:@code { private WeatherForecast[] forecasts; protected override async Task OnInitializedAsync() { var token = await TokenProvider.GetTokenAsync(); if (token != null) { Http.DefaultRequestHeaders.Authorization = new AuthenticationHeaderValue("Bearer", token); forecasts = await Http.GetJsonAsync<WeatherForecast[]>("WeatherForecast"); } } }
The existing code has been altered to obtain the JWT token and then add it to the api request for weather forecast data as a request header. Without this, there is no way for the API to authenticate the user. Remember, theGetTokenAsyncmethod will log the user out if the token has expired. If that happens, the user will be presented with the login form again. - Open the MainLayout.razor file and replace the About link with the following code:
<AuthorizeView>Logged in as @context.User.Identity.Name
    <button class="btn btn-sm btn-outline-dark" @onclick="@(() => TokenProvider.SetTokenAsync(null))">Logout</button>
</AuthorizeView>
This last step completes the demo. Ensuring that the Server project is set as the Startup project, run the application in the browser. Navigate to the FetchData page and log in. You should see the data, and the message at the top of the page telling you that you are logged in together with a log out button. Click it, and you should be presented with the login form again. This time, after you have logged in, wait for a couple of minutes. Then refresh the page. You should get logged out and presented with the login form again.


