Thursday, 6 January 2022

SOLID Principles in C# – An Overview

 SOLID is an acronym that stands for 5 important object oriented principles. The SOLID principles help in making the object oriented application source code robust, scalable, extensible and non-fragile. It is absolutely necessary when you have a layered architecture and they are bound to changes over a period of time. Following are the 5 principles.

1.Single Responsibility Principle

2.Open Closed Principle

3.Liskov Substitution Principle

4.Interface Segregation Principle

5.Dependency Inversion Principle

In this article I will take you through all five SOLID principles and also provide sample C# code to demonstrate how to use them.

Single Responsibility Principle (SRP)

SRP states that every class should have a single responsibility, and that responsibility should be entirely encapsulated by the class. There should only be a single reason for making the change to a class.

This means that a class should not be loaded with multiple responsibilities and a single responsibility should not be scattered across multiple classes and mixed with other responsibilities. The reason is that the more changes requested in the future, the more changes the class needs to undergo.

Below is a code violating the SRP. In the sample code, SRP is violated by mixing the OpenGate and CloseGate responsibility with the core vehicle service functionality.

public class ServiceStation
{
    public void OpenGate()
    {
        //Open the gate if the time is later than 9 AM
    }
 
    public void DoService(Vehicle vehicle)
    {
        //Check if service station is opened and then
        //complete the vehicle service
    }
 
    public void CloseGate()
    {
        //Close the gate if the time has crossed 6PM
    }
}

The re-factored code sample is as follows. A new interface is created and the gate related utility methods are moved to a different class called ServiceStationUtility.

public class ServiceStation
{
    IGateUtility _gateUtility;
 
    public ServiceStation(IGateUtility gateUtility)
    {
        this._gateUtility = gateUtility;
    }
    public void OpenForService()
    {
        _gateUtility.OpenGate();
    }
 
    public void DoService()
    {
        //Check if service station is opened and then
        //complete the vehicle service
    }
 
    public void CloseForDay()
    {
        _gateUtility.CloseGate();
    }
}
 
public class ServiceStationUtility : IGateUtility
{
    public void OpenGate()
    {
        //Open the shop if the time is later than 9 AM
    }
 
    public void CloseGate()
    {
        //Close the shop if the time has crossed 6PM
    }
}
 
 
public interface IGateUtility
{
    void OpenGate();
    void CloseGate();
}

Open Closed Principle (OCP)

OCP states that software application source codes should be open for extension but should be closed for modification.

According to the OCP principle the code should be easily extensible but it should not need any changes to be done to the core implementations. Following is a C# source code violating OCP where a new car has to be added then it will require changes in the core function CalculateMileage.

public class MileageCalculator
{
    IEnumerable<Car> _cars;
    public MileageCalculator(IEnumerable<Car> cars) { this._cars = cars; }
 
    public void CalculateMileage()
    {
        foreach (var car in _cars)
        {
            if (car.Name == "Audi")
                Console.WriteLine("Mileage of the car {0} is {1}", car.Name, "10M");
            else if (car.Name == "Mercedes")
                Console.WriteLine("Mileage of the car {0} is {1}", car.Name, "20M");
        }
    }
}

The OCP violation can be fixed as shown below, using an interface and creating classes for each car there, by reducing making the CalculateMileage method more generic and extensible.

public class MileageCalculator
{
    IEnumerable<Car> _cars;
    public MileageCalculator(IEnumerable<Car> cars) { this._cars = cars; }
 
    public void CalculateMileage()
    {
        CarController controller = new CarController();
        foreach (var car in _cars)
        {
                Console.WriteLine("Mileage of the car {0} is {1}", car.Name, controller.GetCarMileage(car.Name));
        }
    }
}
 
public class CarController
{
    List<ICar> cars;
    public CarController()
    {
        cars = new List<ICar>();
        cars.Add(new Audi());
        cars.Add(new Mercedes());
    }
 
    public string GetCarMileage(string name)
    {
        return cars.First(car => car.Name == name).GetMileage();
    }
}
 
public interface ICar
{
    string Name { get; set; }
    string GetMileage();
}
 
public class Audi : ICar
{
    public string Name { get; set; }
 
    public string GetMileage()
    {
        return "10M";
    }
}
 
public class Mercedes : ICar
{
    public string Name { get; set; }
 
    public string GetMileage()
    {
        return "20M";
    }
}

Liskov Substitution Principle (LSP)

LSP states that the derived classes should be perfectly substitutable for their base classes. If class D is derived from A then D should be substitutable for A.

Look at the following C# code sample where the LSP is broken. Simply, an Orange cannot substitute an Apple, which results in printing the color of apple as Orange.

namespace SolidDemo
{
    class Program
    {
        static void Main(string[] args)
        {
            Apple apple = new Orange();
            Console.WriteLine(apple.GetColor());
        }
    }
 
    public class Apple
    {
        public virtual string GetColor()
        {
            return "Red";
        }
    }
 
    public class Orange : Apple
    {
        public override string GetColor()
        {
            return "Orange";
        }
    }
}

Now let us re-factor and make it comply with LSP by having a generic base class for both Apple and Orange.

namespace SolidDemo
{
    class Program
    {
        static void Main(string[] args)
        {
            Fruit fruit = new Orange();
            Console.WriteLine(fruit.GetColor());
            fruit = new Apple();
            Console.WriteLine(fruit.GetColor());
        }
    }
 
    public abstract class Fruit
    {
        public abstract string GetColor();
    }
 
    public class Apple : Fruit
    {
        public override string GetColor()
        {
            return "Red";
        }
    }
 
    public class Orange : Apple
    {
        public override string GetColor()
        {
            return "Orange";
        }
    }
}

Interface Segregation Principle (ISP)

ISP states that no clients should be forced to implement methods which it does not use and the contracts should be broken down to thin ones.

Say for example when a thick interface is defined declaring a wide responsibility of members then there will be opportunities where some clients may have to implement members, which they don’t even use. In the below mentioned example ISP is violated where ProcessCreditCard method is not required by InpersonOrder class but is forced to implement.

    public interface IOrder
    {
        void Purchase();
        void ProcessCreditCard();
    }
 
    public class OnlineOrder : IOrder
    {
        public void Purchase()
        {
            //Do purchase
        }
 
        public void ProcessCreditCard()
        {
            //process through credit card
        }
    }
 
    public class InpersionOrder : IOrder
    {
        public void Purchase()
        {
            //Do purchase
        }
 
        public void ProcessCreditCard()
        {
            //Not required for inperson purchase
            throw new NotImplementedException();
        }
    }

Now let us fix the violation by breaking down the IOrder interface.

public interface IOrder
    {
        void Purchase();
    }
 
    public interface IOnlineOrder
    {
        void ProcessCreditCard();
    }
 
    public class OnlineOrder : IOrder, IOnlineOrder
    {
        public void Purchase()
        {
            //Do purchase
        }
 
        public void ProcessCreditCard()
        {
            //process through credit card
        }
    }
 
    public class InpersionOrder : IOrder
    {
        public void Purchase()
        {
            //Do purchase
        }
    }

Dependency Inversion Principle (DIP)

Principles of SOLID in C# and .Net

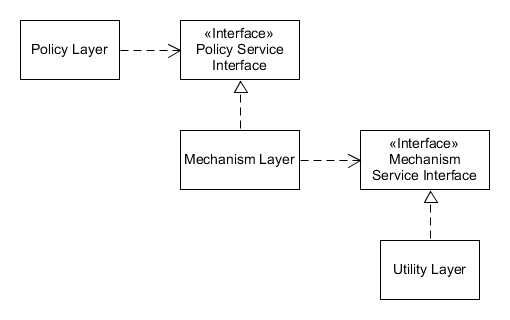
DIP states that the higher level modules should be coupled with the lower level modules with complete abstraction.

GridView with CheckBox: Get Selected Rows in ASP.Net


When the Button to get the selected rows of GridView is clicked, a loop will be executed over the GridView rows and all the rows whose CheckBox is checked will be marked as selected and will be copied to another GridView.

The data from the selected GridView Cells or controls like Label, TextBox, DropDownList, etc. will be fetched and copied to the other GridView.


In this article I will explain with an example, how to get the selected rows of GridView using CheckBox in ASP.Net with C# and VB.Net.
When the Button to get the selected rows of GridView is clicked, a loop will be executed over the GridView rows and all the rows whose CheckBox is checked will be marked as selected and will be copied to another GridView.
The data from the selected GridView Cells or controls like Label, TextBox, DropDownList, etc. will be fetched and copied to the other GridView.

HTML Markup
The HTML Markup consists of an ASP.Net GridView containing two TemplateField columns and a BoundField column.
The TemplateField columns consist of a CheckBox and a Label respectively.
Below the GridView, there’s a Button and another GridView control.
<asp:GridView ID="GridView1" runat="server" HeaderStyle-BackColor="#3AC0F2" HeaderStyle-ForeColor="White"
    AutoGenerateColumns="false">
    <Columns>
        <asp:TemplateField>
            <ItemTemplate>
                <asp:CheckBox ID="chkRow" runat="server" />
            </ItemTemplate>
        </asp:TemplateField>
        <asp:BoundField DataField="Name" HeaderText="Name" ItemStyle-Width="150" />
        <asp:TemplateField HeaderText="Country" ItemStyle-Width="150">
            <ItemTemplate>
                <asp:Label ID="lblCountry" runat="server" Text='<%# Eval("Country") %>'></asp:Label>
            </ItemTemplate>
        </asp:TemplateField>
    </Columns>
</asp:GridView>
<br />
<asp:Button ID="btnGetSelected" runat="server" Text="Get selected records" OnClick="GetSelectedRecords" />
<hr />
<u>Selected Rows</u>
<br />
<asp:GridView ID="gvSelected" runat="server" HeaderStyle-BackColor="#3AC0F2" HeaderStyle-ForeColor="White"
    AutoGenerateColumns="false">
    <Columns>
        <asp:BoundField DataField="Name" HeaderText="Name" ItemStyle-Width="150" />
        <asp:BoundField DataField="Country" HeaderText="Country" ItemStyle-Width="150" />
    </Columns>
</asp:GridView>
 
 
Namespaces
You will need to import the following namespace.
C#
using System.Data;
 
VB.Net
Imports System.Data
 
 
Binding the ASP.Net GridView control
The GridView is populated with a dynamic DataTable with some dummy data inside the Page Load event.
Note: You can learn more about this dynamic DataTable in my article Create DataTable dynamically and bind to GridView in ASP.Net.
 

C#
protected void Page_Load(object sender, EventArgs e)
{
    if (!this.IsPostBack)
    {
        DataTable dt = new DataTable();
        dt.Columns.AddRange(new DataColumn[2] { new DataColumn("Name"), new DataColumn("Country") });
        dt.Rows.Add("John Hammond""Canada");
        dt.Rows.Add("Rick Stewards""United States");
        dt.Rows.Add("Huang He""China");
        dt.Rows.Add("Mudassar Khan""India");
        GridView1.DataSource = dt;
        GridView1.DataBind();
    }
}
 
VB.Net
Protected Sub Page_Load(sender As Object, e As EventArgsHandles Me.Load
    If Not Me.IsPostBack Then
        Dim dt As New DataTable()
        dt.Columns.AddRange(New DataColumn(1) {New DataColumn("Name"), New DataColumn("Country")})
        dt.Rows.Add("John Hammond""Canada")
        dt.Rows.Add("Rick Stewards""United States")
        dt.Rows.Add("Huang He""China")
        dt.Rows.Add("Mudassar Khan""India")
        GridView1.DataSource = dt
        GridView1.DataBind()
    End If
End Sub
 
 
Fetching selected (checked) rows from GridView
When the Button is clicked, a loop is executed over the GridView Rows and CheckBox control is referenced. If the CheckBox is checked (selected), the name and country values are fetched from the BoundField and the TemplateField columns and are added to a DataTable.
Finally, the DataTable is used to populate the other GridView which displays the selected records.
C#
protected void GetSelectedRecords(object sender, EventArgs e)
{
    DataTable dt = new DataTable();
    dt.Columns.AddRange(new DataColumn[2] { new DataColumn("Name"), new DataColumn("Country") });
    foreach (GridViewRow row in GridView1.Rows)
    {
        if (row.RowType == DataControlRowType.DataRow)
        {
            CheckBox chkRow = (row.Cells[0].FindControl("chkRow"as CheckBox);
            if (chkRow.Checked)
            {
                string name = row.Cells[1].Text;
                string country = (row.Cells[2].FindControl("lblCountry"as Label).Text;
                dt.Rows.Add(name, country);
            }
        }
    }
    gvSelected.DataSource = dt;
    gvSelected.DataBind();
}
 
VB.Net
Protected Sub GetSelectedRecords(sender As Object, e As EventArgs)
    Dim dt As New DataTable()
    dt.Columns.AddRange(New DataColumn(1) {New DataColumn("Name"), New DataColumn("Country")})
    For Each row As GridViewRow In GridView1.Rows
        If row.RowType = DataControlRowType.DataRow Then
            Dim chkRow As CheckBox = TryCast(row.Cells(0).FindControl("chkRow"), CheckBox)
            If chkRow.Checked Then
                Dim name As String = row.Cells(1).Text
                Dim country As String = TryCast(row.Cells(2).FindControl("lblCountry"), Label).Text
                dt.Rows.Add(name, country)
            End If
        End If
    Next
    gvSelected.DataSource = dt
    gvSelected.DataBind()
End Sub
 

How to Allow Only One Checkbox to be Checked using jQuery

 Generally, we use radio buttons to let a user select ONE option from a limited number of choices. Most of the cases radio buttons are ideal to select a single option from a group of the options. But sometimes you required to use the checkbox to do the same functionality like a radio button. If you want to allow the user to check only one checkbox from a group of the checkboxes, it can be done easily using jQuery.

At first, include the jQuery library.

<script src="https://ajax.googleapis.com/ajax/libs/jquery/3.2.1/jquery.min.js"></script>

To modify the default functionality of checkboxes and use like the radio buttons, you need to restrict the user to select multiple checkboxes. Use the following code to allow only one checkbox to be checked using jQuery.
HTML

<input type="checkbox" name="skill" value="male"> Male
<input type="checkbox" name="skill" value="female"> Female
<input type="checkbox" name="skill" value="other"> Other

JavaScript

<script>
$(document).ready(function(){
    $('input:checkbox').click(function() {
        $('input:checkbox').not(this).prop('checked', false);
    });
});
</script>

You can use a class selector to allow only one checkbox to be checked with jQuery.
HTML

<input type="checkbox" name="skill" class="check" value="male"> Male
<input type="checkbox" name="skill" class="check" value="female"> Female
<input type="checkbox" name="skill" class="check" value="other"> Other

JavaScript

<script>
$(document).ready(function(){
    $('.check').click(function() {
        $('.check').not(this).prop('checked', false);
    });
});
</script>