This article demonstrates how to upload a video file of up to 100MB and play dynamically using ASP.NET MVC 5. I will upload the video file to my project folder name (VideoFileUpload) and add its path in SQL Server database table. I will display all uploaded video files and their names.
Step 1
Create a database in the SQL Server of your choice.
- CREATE TABLE [dbo].[VideoFiles](
- [ID] [int] IDENTITY(1,1) NOT NULL,
- [Name] [nvarchar](50) NULL,
- [FileSize] [int] NULL,
- [FilePath] [nvarchar](100) NULL,
- CONSTRAINT [PK_VideoFiles] PRIMARY KEY CLUSTERED
- (
- [ID] ASC
- )WITH (PAD_INDEX = OFF, STATISTICS_NORECOMPUTE = OFF, IGNORE_DUP_KEY = OFF, ALLOW_ROW_LOCKS = ON, ALLOW_PAGE_LOCKS = ON) ON [PRIMARY]
- ) ON [PRIMARY]
- GO
- CREATE procedure [dbo].[spAddNewVideoFile]
- (
- @Name nvarchar(50),
- @FileSize int,
- @FilePath nvarchar(100)
- )
- as
- begin
- insert into VideoFiles (Name,FileSize,FilePath)
- values (@Name,@FileSize,@FilePath)
- end
- CREATE procedure [dbo].[spGetAllVideoFile]
- as
- begin
- select ID,Name,FileSize,FilePath from VideoFiles
- end

Step 2
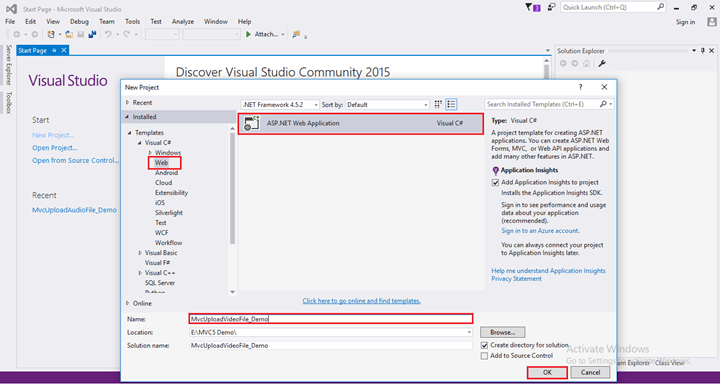
Open Visual Studio 2015. Create an empty ASP.NET Web Application project in it. As shown in below screenshot, click on new project >> choose web template >> choose ASP.NET Web Application and give it a meaningful name to click ok.
Screenshot 1
Choose empty from ASP.NET Templates, select checkbox MVC, and click on OK, as shown in the image below.
Screenshot 2
Step 3
Double click and open web config file to add the database connection.
- <connectionStrings>
- <add name="DBCS" connectionString="data source=FARHAN\SQLEXPRESS; database=MvcDemo; integrated security=true;" />
- </connectionStrings>
Add the below code in webconfig file to allow 100MB file to upload.
- <httpRuntime executionTimeout="3600" maxRequestLength="104857600" enable="true" />
- <system.webServer>
- <security>
- <requestFiltering>
- <requestLimits maxAllowedContentLength="104857600" />
- </requestFiltering>
- </security>
- </system.webServer>
Step 4
Right-click on project Add select New Folder, name it VideoFileUpload to upload all the audio files in that folder.
Step 5
Right-click on Models folder, select Add, then select Class.
Screenshot for creating model class 1

A window will appear. Choose Class, give it the name VideoFiles, then click on Add.
Screenshot for creating model class 2

Write class field and property as we have in the database table.
- using System;
- using System.Collections.Generic;
- using System.Linq;
- using System.Web;
- namespace MvcUploadVideoFile_Demo.Models
- {
- public class VideoFiles
- {
- public int ID { get; set; }
- public string Name { get; set; }
- public Nullable<int> FileSize { get; set; }
- public string FilePath { get; set; }
- }
- }
Step 6
Right-click on Controllers folder, select Add, then select Controller. HomeController.
Screenshot for creating controller 1

After clicking on controller a window will appear; choose MVC 5 Controller-Empty and click on Add.
Screenshot for creating controller 2

After that, another window will appear with DefaultController. Remember, don’t change the suffix name of controller here. Click on Add and a Home controller will be added in Controllers folder.
Screenshot for creating controller 3

Add the following namespace
- using MvcUploadVideoFile_Demo.Models;
- using System.Configuration;
- using System.Data;
- using System.Data.SqlClient;
- using System.IO;
Create UploadVideo action method with [HttpGet] in controller. Write the following code to retrieve the data from the database table.
- [HttpGet]
- public ActionResult UploadVideo()
- {
- List<VideoFiles> videolist = new List<VideoFiles>();
- string CS = ConfigurationManager.ConnectionStrings["DBCS"].ConnectionString;
- using (SqlConnection con = new SqlConnection(CS))
- {
- SqlCommand cmd = new SqlCommand("spGetAllVideoFile", con);
- cmd.CommandType = CommandType.StoredProcedure;
- con.Open();
- SqlDataReader rdr = cmd.ExecuteReader();
- while (rdr.Read())
- {
- VideoFiles video = new VideoFiles();
- video.ID = Convert.ToInt32(rdr["ID"]);
- video.Name = rdr["Name"].ToString();
- video.FileSize = Convert.ToInt32(rdr["FileSize"]);
- video.FilePath = rdr["FilePath"].ToString();
- videolist.Add(video);
- }
- }
- return View(videolist);
- }
Create UploadVideo action method with [HttpPost] in controller. Write following code to insert data into database and upload file in VideoFileUpload folder of project.
- [HttpPost]
- public ActionResult UploadVideo(HttpPostedFileBase fileupload)
- {
- if (fileupload != null)
- {
- string fileName= Path.GetFileName(fileupload.FileName);
- int fileSize = fileupload.ContentLength;
- int Size = fileSize / 1000;
- fileupload.SaveAs(Server.MapPath("~/VideoFileUpload/" + fileName));
- string CS = ConfigurationManager.ConnectionStrings["DBCS"].ConnectionString;
- using (SqlConnection con = new SqlConnection(CS))
- {
- SqlCommand cmd = new SqlCommand("spAddNewVideoFile", con);
- cmd.CommandType = CommandType.StoredProcedure;
- con.Open();
- cmd.Parameters.AddWithValue("@Name",fileName);
- cmd.Parameters.AddWithValue("@FileSize", Size);
- cmd.Parameters.AddWithValue("FilePath", "~/VideoFileUpload/" + fileName);
- cmd.ExecuteNonQuery();
- }
- }
- return RedirectToAction("UploadVideo");
- }
Complete HomeController code
- using System;
- using System.Collections.Generic;
- using System.Configuration;
- using System.Data;
- using System.Data.SqlClient;
- using System.IO;
- using System.Web;
- using System.Web.Mvc;
- using MvcUploadVideoFile_Demo.Models;
- namespace MvcUploadVideoFile_Demo.Controllers
- {
- public class HomeController : Controller
- {
- // GET: Home
- public ActionResult Index()
- {
- return View();
- }
- [HttpGet]
- public ActionResult UploadVideo()
- {
- List<VideoFiles> videolist = new List<VideoFiles>();
- string CS = ConfigurationManager.ConnectionStrings["DBCS"].ConnectionString;
- using (SqlConnection con = new SqlConnection(CS))
- {
- SqlCommand cmd = new SqlCommand("spGetAllVideoFile", con);
- cmd.CommandType = CommandType.StoredProcedure;
- con.Open();
- SqlDataReader rdr = cmd.ExecuteReader();
- while (rdr.Read())
- {
- VideoFiles video = new VideoFiles();
- video.ID = Convert.ToInt32(rdr["ID"]);
- video.Name = rdr["Name"].ToString();
- video.FileSize = Convert.ToInt32(rdr["FileSize"]);
- video.FilePath = rdr["FilePath"].ToString();
- videolist.Add(video);
- }
- }
- return View(videolist);
- }
- [HttpPost]
- public ActionResult UploadVideo(HttpPostedFileBase fileupload)
- {
- if (fileupload != null)
- {
- string fileName= Path.GetFileName(fileupload.FileName);
- int fileSize = fileupload.ContentLength;
- int Size = fileSize / 1000;
- fileupload.SaveAs(Server.MapPath("~/VideoFileUpload/" + fileName));
- string CS = ConfigurationManager.ConnectionStrings["DBCS"].ConnectionString;
- using (SqlConnection con = new SqlConnection(CS))
- {
- SqlCommand cmd = new SqlCommand("spAddNewVideoFile", con);
- cmd.CommandType = CommandType.StoredProcedure;
- con.Open();
- cmd.Parameters.AddWithValue("@Name",fileName);
- cmd.Parameters.AddWithValue("@FileSize", Size);
- cmd.Parameters.AddWithValue("FilePath", "~/VideoFileUpload/" + fileName);
- cmd.ExecuteNonQuery();
- }
- }
- return RedirectToAction("UploadVideo");
- }
- }
- }
Step 7
Right click on UploadVideo action method and Add view (uncheck use a layout page). Click on Add.

Add the following jquery script and bootstrap file in head section of view page. Download or add package from NuGet Package Manager Click on Tools => NuGet Package Manager => Manage NuGet Package. Select Browse type bootstrap in search bar, and select and install similar jquery. All downloaded files will be in content and scripts.
Add the following styles and scripts in the head section.
- <link rel="stylesheet" href="https://cdnjs.cloudflare.com/ajax/libs/font-awesome/4.7.0/css/font-awesome.min.css">
- <link href="~/Content/bootstrap.min.css" rel="stylesheet" />
- <script src="~/scripts/jquery-3.3.1.min.js"></script>
- <script src="~/scripts/bootstrap.min.js"></script>
Write the following style for video frame and title of video
- <style type="text/css">
- .video-frame {
- width: 100%;
- height: 195px;
- border: 4px solid #dc3545;
- box-shadow: 1px 2px 3px #dc3545;
- border-radius: 3px;
- }
- .title {
- font-weight: 500;
- font-size: 14px;
- text-align: center;
- margin-bottom: 10px;
- margin-top: 10px;
- background-color: #dc3545;
- color: white;
- box-shadow: 1px 2px 4px #dc3545;
- }
- </style>
Complete view code
- @{
- Layout = null;
- }
- <!DOCTYPE html>
- <html>
- <head>
- <meta name="viewport" content="width=device-width" />
- <title>Upload Video</title>
- <link rel="stylesheet" href="https://cdnjs.cloudflare.com/ajax/libs/font-awesome/4.7.0/css/font-awesome.min.css">
- <link href="~/Content/bootstrap.min.css" rel="stylesheet" />
- <script src="~/scripts/jquery-3.3.1.min.js"></script>
- <script src="~/scripts/bootstrap.min.js"></script>
- <style type="text/css">
- .video-frame {
- width: 100%;
- height: 195px;
- border: 4px solid #dc3545;
- box-shadow: 1px 2px 3px #dc3545;
- border-radius: 3px;
- }
- .title {
- font-weight: 500;
- font-size: 14px;
- text-align: center;
- margin-bottom: 10px;
- margin-top: 10px;
- background-color: #dc3545;
- color: white;
- box-shadow: 1px 2px 4px #dc3545;
- }
- </style>
- </head>
- <body>
- <div class="container py-4">
- <h3 class="text-center text-uppercase">How to Dynamically Upload and Play Video File Using ASP.NET MVC5</h3>
- <div class="card">
- <div class="card-header bg-danger text-white">
- <h6 class="text-uppercase">video List</h6>
- </div>
- <div class="card-body">
- <div class="row">
- <button style="margin-left: 27px; margin-bottom:10px;" type="button" class="btn btn-danger rounded-0" data-toggle="modal" data-target="#UploadVideo">
- <i class="fa fa-plus-circle"></i> Add New
- </button>
- <div class="modal fade" id="UploadVideo">
- <div class="modal-dialog">
- <div class="modal-content">
- <div class="modal-header">
- <h4 class="modal-title">Upload New video File</h4>
- <button type="button" class="close" data-dismiss="modal">×</button>
- </div>
- <div class="modal-body">
- @using (Html.BeginForm("UploadVideo", "Home", FormMethod.Post, new { enctype = "multipart/form-data" }))
- {
- <div class="form-group">
- <label>Choose File:</label>
- <div class="input-group">
- <div class="custom-file">
- <input type="file" id="fileupload" name="fileupload" class="custom-file-input" />
- <label class="custom-file-label"></label>
- </div>
- <div class="input-group-append">
- <input type="submit" id="btnUpload" class="btn btn-secondary" value="Upload" />
- </div>
- </div>
- </div>
- }
- </div>
- <div class="modal-footer">
- <button type="button" class="btn btn-danger" data-dismiss="modal">Close</button>
- </div>
- </div>
- </div>
- </div>
- </div>
- <div class="row">
- @foreach (var item in Model)
- {
- <div class="col-sm-4 col-md-4 col-xs-12">
- <div class="title">@item.Name</div>
- <div class="video-frame">
- <video style="width:100%; height:auto;" controls>
- <source src="@Url.Content(@item.FilePath)" type="video/mp4" />
- </video>
- </div>
- </div>
- }
- </div>
- </div>
- </div>
- </div>
- </body>
- </html>
Step 8
Run Project ctr+F5
Screenshot 1

Screenshot 2

Screenshot 3

No comments:
Post a Comment