Problem
Sometimes you may have issues connecting to SQL Server and you may get messages such as the following:
Or
Or
These errors could be for either Named Pipes connections or TCP/IP connections. In this tip, we look at what may be causes to these errors and how to resolve.
Solution
There could be several reasons you get these error messages. Follow the below steps to see if you can resolve the issue.
Step 1 - Check that you can ping the SQL Server box
Make sure you are able to ping the physical server where SQL Server is installed from the client machine.
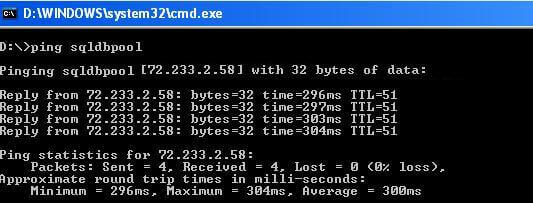
If this does not work, you can try to connect to the SQL Server using just the IP Address (for the default instance) or the IP Address\Instance Name for a named instance.
If you can connect using the IP address, you can add the SQL Server machine into the hosts file. To add the entry in the hosts file open the file located in %SystemRoot%\system32\drivers\etc\ and add the info using Notepad.
For example, let's say my server SQLDBPool uses IP address 74.200.243.253, I can add this to the hosts file with the machine name of SQLDBPool. Now I should be able to use the machine name instead of the IP address to connect to the SQL Server.
Step 2 - Check that the SQL Services are running
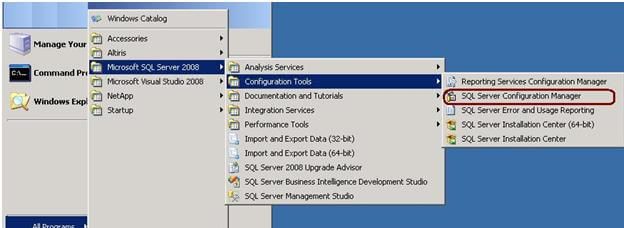
Make sure the SQL services are running. You can check the SQL Server services by using the SC command opening SQL Server Configuration Manager. Many times you may find that the SQL Server instance is not running.
Using SQL Server Configuration Manager
You can use SQL Server Configuration Manager to make sure the services are running. If for some reason you cannot find SQL Server Configuration Manager check out this article.

Using SC command
From a Windows command line you can issue the following command to see the status of the services.

Please note for a named instance you have to write the command as follows using the correct instance name, by replacing instancename with the actual SQL Server instance name.
sc query mssql$instancename
Step 3 - Check that the SQL Server Browser service is running
Check that the SQL Server Browser service is running. If you have installed a SQL Server named instance and not configured a specific TCP/IP port, incoming requests will be listening on a dynamic port. To resolve this you will need to have the SQL Server Browser service enabled and running. You can check the browser service status using either SQL Server Configuration Manager (see step 2) or the SC command as follows.

Step 4 - Check that you are using the correct SQL Server instance name
Make sure you are using the correct instance name. When you connect to a default instance, machinename is the best representative for the instance name and when you connect to a named instance such as sqlexpress, you need to specify the instancename as follows: machinename\instancename where you enter the SQL Server instance name for instancename.
Step 5 - Check that you can find the SQL Server
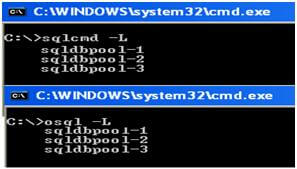
Check that SQL Server is in the network. You can use the SQLCMD -L command to retrieve the list of SQL Servers installed in the network. Note that this will only return SQL Servers if the SQL Server Browser service is running.
Step 6 - Check that TCP/IP and Named Pipes are enabled
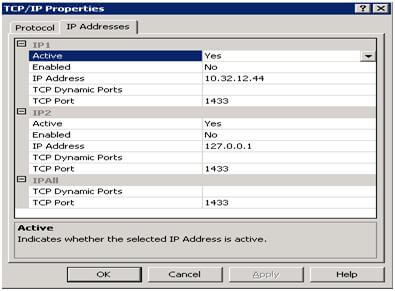
Check the TCP/IP and Named Pipes protocols and port. Open SQL Server Configuration Manager and check the SQL Server Network Configuration protocols. You should enable Named Pipes and TCP/IP protocol.
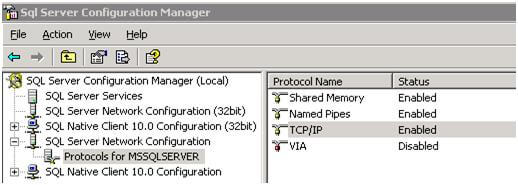
For the TCP/IP protocol, right click and select properties to check the TCP/IP communication port as well. The default port is 1433, which can be changed for security purposes if needed.
Step 7 - Check that allow remote connections for this server is enabled
Check to see if allow remote connections for this server is enabled. In SSMS, right click on the instance name and select Properties. Go to the Connections tab and make sure Allow remote connections to this server is checked. If you need to make a change, you must restart the SQL Server instance to apply the change.
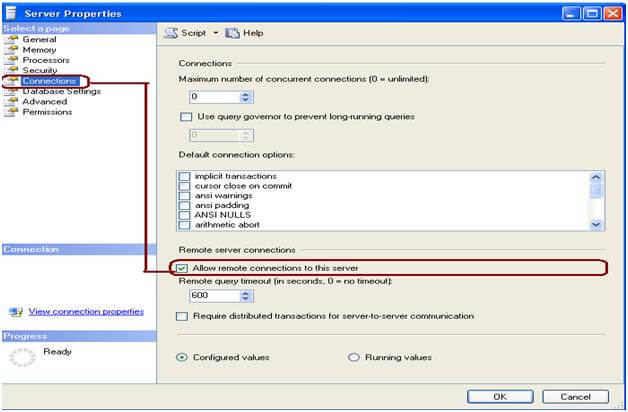
You can also configure the remote server connections using the below commands. If you make changes you will need to restart SQL Server for these to take affect.
The settings below are equivalent to the settings in the image above.
exec sp_configure "remote access", 1          -- 0 on, 1 off
exec sp_configure "remote query timeout", 600 -- seconds
exec sp_configure "remote proc trans", 0      -- 0 on, 1 off
Step 8 - Check the port number that SQL Server is using
Locally connect to SQL Server and check the error log for the port entry. You can execute XP_READERRORLOG procedure to read the errors or use SSMS by going to Management > SQL Server Logs and select the Current log. Scroll to the bottom for the first entries in the error log and look for entries similar to below that shows Named Pipes and TCP/IP are enabled and the port used for TCP/IP which is 1433 in this case.

Step 9 - Check that the firewall is not blocking access to SQL Server
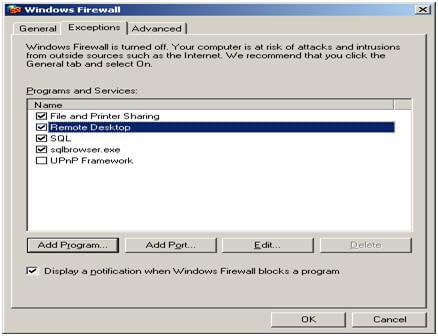
Configure the Windows Firewall for the SQL Server port and SQL Server Browser service. Go to Control Panel and click on Windows Firewall. Go to exceptions tab as shown below. You can read this tip Configure Windows Firewall to Work with SQL Server for more information.

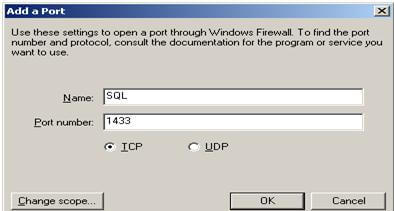
Click on Add Port... and enter the port number and name.
Click on Add Program... to add the SQL Server Browser service. Here you need to get the browser service executable path, normally it is located at C:\Program Files\Microsoft SQL Server\90\Shared location for SQL 2005 or similar for other versions of SQL Server. Browse the location and add the SQLBrowser.exe in the exception list.
Step 10 - Check that the Service Principal Name has been registered
If you are able to connect to SQL Server by physically logging on to the server, but unable to connect from a client computer then execute the below query in a query window to check the SPN.
-- run this command to see if SPN is not found
EXEC xp_readerrorlog 0,1,"could not register the Service Principal Name",Null
No comments:
Post a Comment