Sunday, 7 May 2023

Resolving could not open a connection to SQL Server errors


Problem

Sometimes you may have issues connecting to SQL Server and you may get messages such as the following:

ERROR: (provider: Named Pipes Provider, error: 40 - Could not open a connection to SQL Server) (Microsoft SQL Server, Error:) An error has occurred while establishing a connection to the server. (provider: Named Pipes Provider, error: 40 - Could not open a connection to SQL Server) (Microsoft SQL Server, Error: 5)

Or

An error has occurred while establishing a connection to the server. When connecting to SQL Server 2005, this failure may be caused by the fact that under the default settings SQL Server does not allow remote connections. (provider: Named Pipes Provider, error: 40 - Could not open a connection to SQL Server) (Microsoft SQL Server, Error: 1326)

Or

A network-related error or instance-specific error occurred while establishing a connection to SQL Server. The server was not found or was not accessible. Verify that the instance name is correct and that SQL Server is configured to allow remote connections. (provider: TCP Provider, error: 0 - No such host is known.) (Microsoft SQL Server, Error: 11001)

These errors could be for either Named Pipes connections or TCP/IP connections. In this tip, we look at what may be causes to these errors and how to resolve.

Solution

There could be several reasons you get these error messages. Follow the below steps to see if you can resolve the issue.

Step 1 - Check that you can ping the SQL Server box

Make sure you are able to ping the physical server where SQL Server is installed from the client machine.
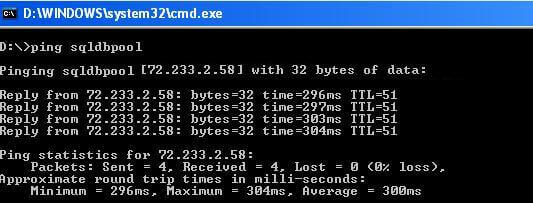
resolving issues connecting to sql server

If this does not work, you can try to connect to the SQL Server using just the IP Address (for the default instance) or the IP Address\Instance Name for a named instance.

If you can connect using the IP address, you can add the SQL Server machine into the hosts file. To add the entry in the hosts file open the file located in %SystemRoot%\system32\drivers\etc\ and add the info using Notepad.

For example, let's say my server SQLDBPool uses IP address 74.200.243.253, I can add this to the hosts file with the machine name of SQLDBPool. Now I should be able to use the machine name instead of the IP address to connect to the SQL Server.
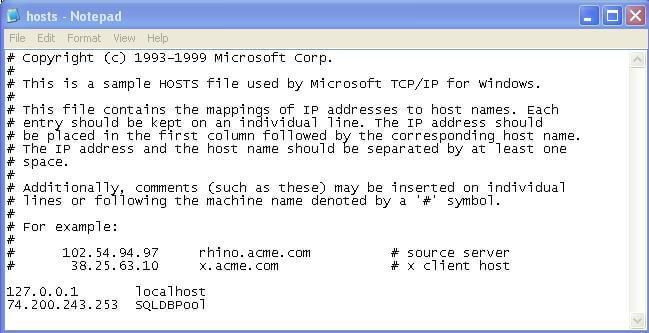
try to connect to the sql server using an ip address

Step 2 - Check that the SQL Services are running

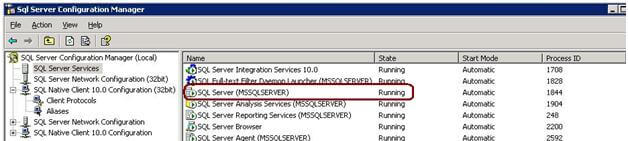
Make sure the SQL services are running. You can check the SQL Server services by using the SC command opening SQL Server Configuration Manager. Many times you may find that the SQL Server instance is not running.

Using SQL Server Configuration Manager

You can use SQL Server Configuration Manager to make sure the services are running. If for some reason you cannot find SQL Server Configuration Manager check out this article.
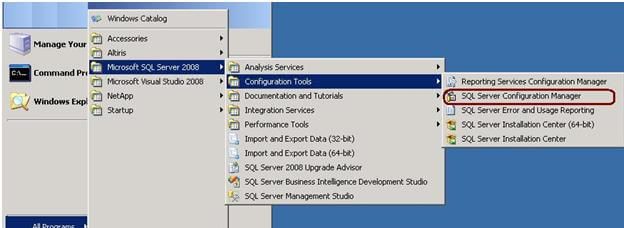
using sql server configuration manager
sql server configuration manager

Using SC command

From a Windows command line you can issue the following command to see the status of the services.
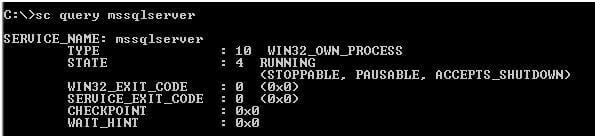
using the sc command to check that sql services are running

Please note for a named instance you have to write the command as follows using the correct instance name, by replacing instancename with the actual SQL Server instance name.

sc query mssql$instancename

Step 3 - Check that the SQL Server Browser service is running

Check that the SQL Server Browser service is running. If you have installed a SQL Server named instance and not configured a specific TCP/IP port, incoming requests will be listening on a dynamic port. To resolve this you will need to have the SQL Server Browser service enabled and running. You can check the browser service status using either SQL Server Configuration Manager (see step 2) or the SC command as follows.
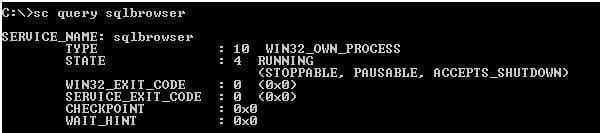
check that the sql browser service is running

Step 4 - Check that you are using the correct SQL Server instance name

Make sure you are using the correct instance name. When you connect to a default instance, machinename is the best representative for the instance name and when you connect to a named instance such as sqlexpress, you need to specify the instancename as follows: machinename\instancename where you enter the SQL Server instance name for instancename.

Step 5 - Check that you can find the SQL Server

Check that SQL Server is in the network. You can use the SQLCMD -L command to retrieve the list of SQL Servers installed in the network. Note that this will only return SQL Servers if the SQL Server Browser service is running.
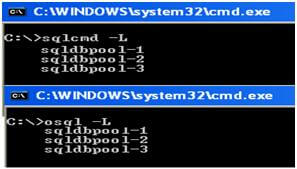
use the sqlcmd-L to check that sql server is in the network

Step 6 - Check that TCP/IP and Named Pipes are enabled

Check the TCP/IP and Named Pipes protocols and port. Open SQL Server Configuration Manager and check the SQL Server Network Configuration protocols. You should enable Named Pipes and TCP/IP protocol.
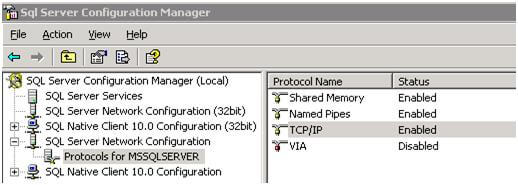
open ssms and check the sql server network configuration protocols

For the TCP/IP protocol, right click and select properties to check the TCP/IP communication port as well. The default port is 1433, which can be changed for security purposes if needed.
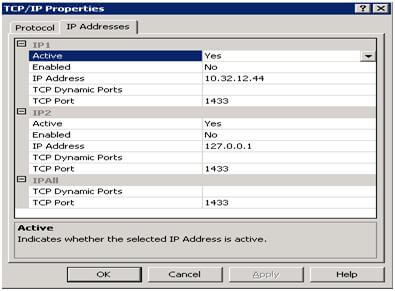
check the tcp/ip communication port

Step 7 - Check that allow remote connections for this server is enabled

Check to see if allow remote connections for this server is enabled. In SSMS, right click on the instance name and select Properties. Go to the Connections tab and make sure Allow remote connections to this server is checked. If you need to make a change, you must restart the SQL Server instance to apply the change.
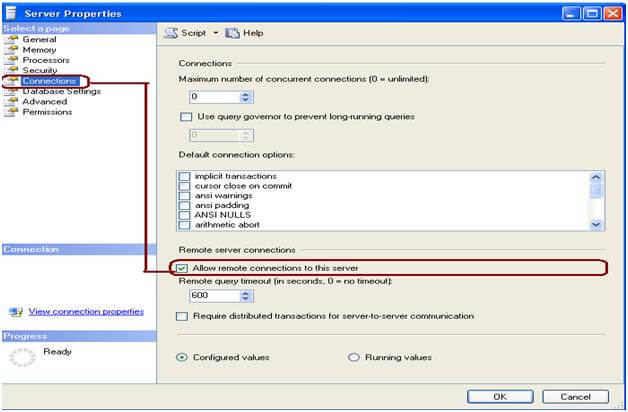
in ssms select properties and go to the connections tab

You can also configure the remote server connections using the below commands. If you make changes you will need to restart SQL Server for these to take affect.

The settings below are equivalent to the settings in the image above.

exec sp_configure "remote access", 1          -- 0 on, 1 off
exec sp_configure "remote query timeout", 600 -- seconds
exec sp_configure "remote proc trans", 0      -- 0 on, 1 off

Step 8 - Check the port number that SQL Server is using

Locally connect to SQL Server and check the error log for the port entry. You can execute XP_READERRORLOG procedure to read the errors or use SSMS by going to Management > SQL Server Logs and select the Current log. Scroll to the bottom for the first entries in the error log and look for entries similar to below that shows Named Pipes and TCP/IP are enabled and the port used for TCP/IP which is 1433 in this case.

locally connect to sql server and check the error log

Step 9 - Check that the firewall is not blocking access to SQL Server

Configure the Windows Firewall for the SQL Server port and SQL Server Browser service. Go to Control Panel and click on Windows Firewall. Go to exceptions tab as shown below. You can read this tip Configure Windows Firewall to Work with SQL Server for more information.

configure the windows firewall for the sql server port and sql browser service

Click on Add Port... and enter the port number and name.
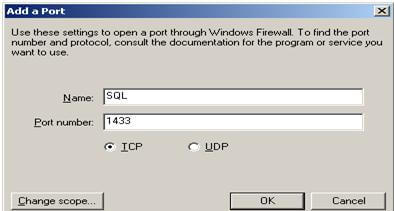
enter the port number and name

Click on Add Program... to add the SQL Server Browser service. Here you need to get the browser service executable path, normally it is located at C:\Program Files\Microsoft SQL Server\90\Shared location for SQL 2005 or similar for other versions of SQL Server. Browse the location and add the SQLBrowser.exe in the exception list.
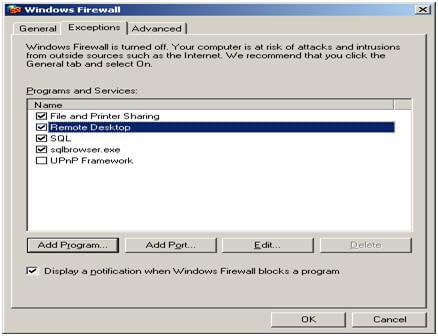
add the sql browser service

Step 10 - Check that the Service Principal Name has been registered

If you are able to connect to SQL Server by physically logging on to the server, but unable to connect from a client computer then execute the below query in a query window to check the SPN.

-- run this command to see if SPN is not found
EXEC xp_readerrorlog 0,1,"could not register the Service Principal Name",Null


Sunday, 23 April 2023

CRUD Operations Using Blazor, .Net 6.0, Entity Framework Core

 In this article, we are going to create a web application using Blazor, .Net 6.0 with the help of Entity Framework Core perform CRUD operations hosted by Asp.Net Core.

Here I am going to use Visual Studio 2022 and SQL Server 2014.

Creating Table

We will use the “userdetails” table to perform CRUD operations. Open SQL Server and create the “userdetails” table using the below query.

CREATE TABLE [dbo].[userdetails](
    [userid] [int] IDENTITY(1,1) NOT NULL,
    [username] [nvarchar](100) NULL,
    [address] [nvarchar](500) NULL,
    [cellnumber] [nvarchar](50) NULL,
    [emailid] [nvarchar](50) NULL,
    CONSTRAINT [PK_userdetails] PRIMARY KEY CLUSTERED
    (
        [userid] ASC
    )
)
SQL

Create Blazor Web Application

Here we will create a new project using Blazor WebAssembly App and .Net 6.0. Now open Visual Studio 2022 and follow the below steps.

Step 1

Step 2

In this step we will select “Blazor WebAssembly App” project type.

Step 3

Step 4

Here we will select Framework type as .NET 6.0 and also select the ASP.NET Core hosted option.

Now, our Blazor application will be created and the folder structure in Solution Explorer as given in the below image.

In the above image we can see that we have 3 project files created inside the “BlazorApp” solution.

  • BlazorApp.Client – It contains the client side code and the pages that will be rendered on the browser.
  • BlazorApp.Server – It contains the server side codes like database connection, operations and web API.
  • BlazorApp.Shared – It contains the shared code that can be accessed by both client and server.

If now we run the application by pressing F5, then we can see a landing page of the application similar to the below image.

Install Required Nuget Packages

Go to “Tools” menu, select NuGet Package Manager > Package Manager Console

and then run the below commands to add database provider and Entity Framework Tools.

=> Install-Package Microsoft.EntityFrameworkCore.SqlServer

=> Install-Package Microsoft.EntityFrameworkCore.Tools

Adding the Model to the Application

Now we will create a Model class which will contain the User model properties.

To do that right click on “BlazorApp.Shared” project and add a New Folder as “Models”.

Then right click on “Models” folder and add a Class as “User.cs”.

Now open “User.cs” file and paste the below code to it.

using System;
using System.Collections.Generic;
using System.Linq;
using System.Text;
using System.Threading.Tasks;
namespace BlazorApp.Shared.Models
{
    public class User
    {
        public int Userid { get; set; }
        public string Username { get; set; } = null!;
        public string Address { get; set; } = null!;
        public string Cellnumber { get; set; } = null!;
        public string Emailid { get; set; } = null!;
    }
}
C#

Adding Data Access Layer to the Application

Now we will create a “DatabaseContext.cs” class where we define database connection. To do that right click on “BlazorApp.Server” project and add a folder as “Models”. Add “DatabaseContext.cs” file to the “Models” folder and put the below code to it.

using BlazorApp.Shared.Models;
using Microsoft.EntityFrameworkCore;
namespace BlazorApp.Server.Models
{
    public partial class DatabaseContext : DbContext
    {
        public DatabaseContext()
        {
        }
        public DatabaseContext(DbContextOptions<DatabaseContext> options)
            : base(options)
        {
        }
        public virtual DbSet<User> Users { get; set; } = null!;
        protected override void OnModelCreating(ModelBuilder modelBuilder)
        {
            modelBuilder.Entity<User>(entity =>
            {
                entity.ToTable("userdetails");
                entity.Property(e => e.Userid).HasColumnName("Userid");
                entity.Property(e => e.Username)
                    .HasMaxLength(100)
                    .IsUnicode(false);
                entity.Property(e => e.Address)
                    .HasMaxLength(500)
                    .IsUnicode(false);
                entity.Property(e => e.Cellnumber)
                    .HasMaxLength(50)
                    .IsUnicode(false);
                entity.Property(e => e.Emailid)
                    .HasMaxLength(50)
                    .IsUnicode(false);
            });
            OnModelCreatingPartial(modelBuilder);
        }
        partial void OnModelCreatingPartial(ModelBuilder modelBuilder);
    }
}
C#

Now we will create another two folder “Interfaces” and “Services” to handle database related operations.

Right click on “BlazorApp.Server” project and add two new folders as “Interfaces” and “Services”.

Now add an interface to the “Interfaces” folder, name it as “IUser.cs” and put the below code to it.

using BlazorApp.Shared.Models;
namespace BlazorApp.Server.Interfaces
{
    public interface IUser
    {
        public List<User> GetUserDetails();
        public void AddUser(User user);
        public void UpdateUserDetails(User user);
        public User GetUserData(int id);
        public void DeleteUser(int id);
    }
}
C#

Now add a class name as “UserManager.cs” to the “Services” folder, which will inherit “IUser” interface and put the below code to it.

using BlazorApp.Server.Interfaces;
using BlazorApp.Server.Models;
using BlazorApp.Shared.Models;
using Microsoft.EntityFrameworkCore;
namespace BlazorApp.Server.Services
{
    public class UserManager : IUser
    {
        readonly DatabaseContext _dbContext = new();
        public UserManager(DatabaseContext dbContext)
        {
            _dbContext = dbContext;
        }
        //To Get all user details
        public List<User> GetUserDetails()
        {
            try
            {
                return _dbContext.Users.ToList();
            }
            catch
            {
                throw;
            }
        }
        //To Add new user record
        public void AddUser(User user)
        {
            try
            {
                _dbContext.Users.Add(user);
                _dbContext.SaveChanges();
            }
            catch
            {
                throw;
            }
        }
        //To Update the records of a particluar user
        public void UpdateUserDetails(User user)
        {
            try
            {
                _dbContext.Entry(user).State = EntityState.Modified;
                _dbContext.SaveChanges();
            }
            catch
            {
                throw;
            }
        }
        //Get the details of a particular user
        public User GetUserData(int id)
        {
            try
            {
                User? user = _dbContext.Users.Find(id);
                if (user != null)
                {
                    return user;
                }
                else
                {
                    throw new ArgumentNullException();
                }
            }
            catch
            {
                throw;
            }
        }
        //To Delete the record of a particular user
        public void DeleteUser(int id)
        {
            try
            {
                User? user = _dbContext.Users.Find(id);
                if (user != null)
                {
                    _dbContext.Users.Remove(user);
                    _dbContext.SaveChanges();
                }
                else
                {
                    throw new ArgumentNullException();
                }
            }
            catch
            {
                throw;
            }
        }
    }
}
C#

Now we will add “DatabaseContext”,“IUser” and “UserManager” reference to the “Program.cs” file of the“BlazorApp.Server” project.

Open “Program.cs” file and put the below code to it.

using BlazorApp.Server.Interfaces;
using BlazorApp.Server.Models;
using BlazorApp.Server.Services;
using Microsoft.AspNetCore.ResponseCompression;
using Microsoft.EntityFrameworkCore;
var builder = WebApplication.CreateBuilder(args);
// Add services to the container.
//Donot forgot to add ConnectionStrings as "DefaultConnection" to the appsetting.json file
builder.Services.AddDbContext<DatabaseContext>
    (options =>
    options.UseSqlServer(builder.Configuration.GetConnectionString("DefaultConnection")));
builder.Services.AddTransient<IUser, UserManager>();
builder.Services.AddControllersWithViews();
builder.Services.AddRazorPages();
var app = builder.Build();
// Configure the HTTP request pipeline.
if (app.Environment.IsDevelopment())
{
    app.UseWebAssemblyDebugging();
}
else
{
    app.UseExceptionHandler("/Error");
    // The default HSTS value is 30 days. You may want to change this for production scenarios, see https://aka.ms/aspnetcore-hsts.
    app.UseHsts();
}
app.UseHttpsRedirection();
app.UseBlazorFrameworkFiles();
app.UseStaticFiles();
app.UseRouting();
app.MapRazorPages();
app.MapControllers();
app.MapFallbackToFile("index.html");
app.Run();
C#

Adding the web API Controller to the Application

Right click on “BlazorApp.Server/Controllers” folder and select “Add” then “New Item”. It will open an “Add New Item” dialog box. Select “ASP.NET” from the left panel, then select “API Controller - Empty” from templates and put the controller class name as “UserController.cs”. Press Add to create the controller.

Now open “UserController.cs” file and put the below code into it.

using BlazorApp.Server.Interfaces;
using BlazorApp.Shared.Models;
using Microsoft.AspNetCore.Http;
using Microsoft.AspNetCore.Mvc;
namespace BlazorApp.Server.Controllers
{
    [Route("api/[controller]")]
    [ApiController]
    public class UserController : ControllerBase
    {
        private readonly IUser _IUser;
        public UserController(IUser iUser)
        {
            _IUser = iUser;
        }
        [HttpGet]
        public async Task<List<User>> Get()
        {
            return await Task.FromResult(_IUser.GetUserDetails());
        }
        [HttpGet("{id}")]
        public IActionResult Get(int id)
        {
            User user = _IUser.GetUserData(id);
            if (user != null)
            {
                return Ok(user);
            }
            return NotFound();
        }
        [HttpPost]
        public void Post(User user)
        {
            _IUser.AddUser(user);
        }
        [HttpPut]
        public void Put(User user)
        {
            _IUser.UpdateUserDetails(user);
        }
        [HttpDelete("{id}")]
        public IActionResult Delete(int id)
        {
            _IUser.DeleteUser(id);
            return Ok();
        }
    }
}
C#

Adding Razor View to the Application

Here we will add three page to the “BlazorApp.Client” project. “UserDetails.razor” for view user records, “AddUser.razor” page for add and edit user details and “DeleteUser.razor” for delete user.

Now right click on “Pages” folder of “BlazorApp.Client” project and select “Add” then “New Item”. It will open an “Add New Item” dialog box. Select “Web” from the left panel, then select “Razor Component” from templates and put name as “UserDetails.razor”. Similarly, we will add more two pages “AddUser.razor” and “DeleteUser.razor” to the “BlazorApp.Client” project.

Now open the “UserDetails.razor” file and put the below code to it.

@page "/fetchuserdetails"
@using BlazorApp.Shared.Models
@inject HttpClient Http
<h1>User Data</h1>
<p>Blazor CRUD operation</p>
<div class="row">
    <div class="col-md-6">
        <a href='/user/add' class="btn btn-primary" role="button">
            <i class="fas fa-user-plus"></i>
            Add User
        </a>
    </div>
    <div class="input-group col">
        <input type="text" class="form-control" placeholder="Search user by name"
               @bind="SearchString" @bind:event="oninput" @onkeyup="FilterUser" />
        @if (SearchString.Length > 0)
        {
            <div class="input-group-append">
                <button class="btn btn-danger" @onclick="ResetSearch">
                    <i class="fas fa-times"></i>
                </button>
            </div>
        }
    </div>
</div>
<br />
@if (userList == null)
{
    <p><em>Loading...</em></p>
}
else
{
    <table class="table table-striped align-middle table-bordered">
        <thead class="table-success">
            <tr>
                <th>ID</th>
                <th>Name</th>
                <th>Address</th>
                <th>Department</th>
                <th>Cell No</th>
                <th>E-mail</th>
            </tr>
        </thead>
        <tbody>
            @foreach (var user in userList)
            {
                <tr>
                    <td>@user.Userid</td>
                    <td>@user.Username</td>
                    <td>@user.Address</td>
                    <td>@user.Cellnumber</td>
                    <td>@user.Emailid</td>
                    <td>
                        <a href='/user/edit/@user.Userid' class="btn btn-outline-dark" role="button">
                            Edit
                        </a>
                        <a href='/user/delete/@user.Userid' class="btn btn-outline-danger" role="button">
                            Delete
                        </a>
                    </td>
                </tr>
            }
        </tbody>

    </table>
}
@code {
    protected List<User> userList = new();
    protected List<User> searchUserData = new();
    protected User user = new();
    protected string SearchString { get; set; } = string.Empty;
    protected override async Task OnInitializedAsync()
    {
        await GetUser();
    }
    protected async Task GetUser()
    {
        userList = await Http.GetFromJsonAsync<List<User>>("api/User");
        searchUserData = userList;
    }
    protected void FilterUser()
    {
        if (!string.IsNullOrEmpty(SearchString))
        {
            userList = searchUserData
                .Where(x => x.Username.IndexOf(SearchString, StringComparison.OrdinalIgnoreCase) != -1)
                .ToList();
        }
        else
        {
            userList = searchUserData;
        }
    }
    protected void DeleteConfirm(int userID)
    {
        user = userList.FirstOrDefault(x => x.Userid == userID);
    }
    public void ResetSearch()
    {
        SearchString = string.Empty;
        userList = searchUserData;
    }
}
C#

Now open “AddUser.razor” page and put the below code to it, where we can add a new user and also edit user details.

@page "/user/add"
@page "/user/edit/{userId:int}"
@using BlazorApp.Shared.Models
@inject HttpClient Http
@inject NavigationManager NavigationManager
<h1>@Title User</h1>
<hr />
<EditForm Model="@user" OnValidSubmit="SaveUser">
    <DataAnnotationsValidator />
    <div class="mb-3">
        <label for="Name" class="form-label">Name</label>
        <div class="col-md-4">
            <InputText class="form-control" @bind-Value="user.Username" />
        </div>
        <ValidationMessage For="@(() => user.Username)" />
    </div>
    <div class="mb-3">
        <label for="Address" class="form-label">Address</label>
        <div class="col-md-4">
            <InputText class="form-control" @bind-Value="user.Address" />
        </div>
        <ValidationMessage For="@(() => user.Address)" />
    </div>
    <div class="mb-3">
        <label for="Cellnumber" class="form-label">Cell No</label>
        <div class="col-md-4">
            <InputText class="form-control" @bind-Value="user.Cellnumber" />
        </div>
        <ValidationMessage For="@(() => user.Cellnumber)" />
    </div>
    <div class="mb-3">
        <label for="Emailid" class="form-label">E-mail</label>
        <div class="col-md-4">
            <InputText class="form-control" @bind-Value="user.Emailid" />
        </div>
        <ValidationMessage For="@(() => user.Emailid)" />
    </div>
    <div class="form-group">
        <button type="submit" class="btn btn-primary">Save</button>
        <button class="btn btn-light" @onclick="Cancel">Cancel</button>
    </div>
</EditForm>
@code {
    [Parameter]
    public int userId { get; set; }
    protected string Title = "Add";
    protected User user = new();
    protected override async Task OnParametersSetAsync()
    {
        if (userId != 0)
        {
            Title = "Edit";
            user = await Http.GetFromJsonAsync<User>("api/User/" + userId);
        }
    }
    protected async Task SaveUser()
    {
        if (user.Userid != 0)
        {
            await Http.PutAsJsonAsync("api/User", user);
        }
        else
        {
            await Http.PostAsJsonAsync("api/User", user);
        }
        Cancel();
    }
    public void Cancel()
    {
        NavigationManager.NavigateTo("/fetchuserdetails");
    }
}
C#

Now open the “DeleteUser.razor” page and paste below code to it.

@page "/user/delete/{userId:int}"
@using BlazorApp.Shared.Models
@inject HttpClient Http
@inject NavigationManager NavigationManager
<h2>Delete User</h2>
<br />
<div class="form-group">
    <h4>Do you want to delete this user?</h4>
    <table class="table">
        <tbody>
            <tr>
                <td>Name</td>
                <td>@user.Username</td>
            </tr>
            <tr>
                <td>Address</td>
                <td>@user.Address</td>
            </tr>
            <tr>
                <td>Cell No</td>
                <td>@user.Cellnumber</td>
            </tr>
            <tr>
                <td>E-mail</td>
                <td>@user.Emailid</td>
            </tr>
        </tbody>
    </table>
</div>
<div class="form-group">
    <input type="submit" value="Delete" @onclick="(async () => await RemoveUser(user.Userid))" class="btn btn-danger" />
    <input type="submit" value="Cancel" @onclick="(() => Cancel())" class="btn btn-warning" />
</div>
@code {
    [Parameter]
    public int userId { get; set; }
    User user = new User();
    protected override async Task OnInitializedAsync()
    {
        user = await Http.GetFromJsonAsync<User>("/api/User/" + Convert.ToInt32(userId));
    }
    protected async Task RemoveUser(int userID)
    {
        await Http.DeleteAsync("api/User/" + userID);
        NavigationManager.NavigateTo("/fetchuserdetails");
    }
    void Cancel()
    {
        NavigationManager.NavigateTo("/fetchuserdetails");
    }
}
C#

Now we add the “User Details” menu link to the navigation menu. To do that open  “BlazorApp.Client/Shared/ NavMenu.razor” file and put the below code in it.

<div class="top-row ps-3 navbar navbar-dark">
    <div class="container-fluid">
        <a class="navbar-brand" href="">BlazorApp</a>
        <button title="Navigation menu" class="navbar-toggler" @onclick="ToggleNavMenu">
            <span class="navbar-toggler-icon"></span>
        </button>
    </div>
</div>
<div class="@NavMenuCssClass" @onclick="ToggleNavMenu">
    <nav class="flex-column">
        <div class="nav-item px-3">
            <NavLink class="nav-link" href="" Match="NavLinkMatch.All">
                <span class="oi oi-home" aria-hidden="true"></span> Home
            </NavLink>
        </div>
        <div class="nav-item px-3">
            <NavLink class="nav-link" href="counter">
                <span class="oi oi-plus" aria-hidden="true"></span> Counter
            </NavLink>
        </div>
        <div class="nav-item px-3">
            <NavLink class="nav-link" href="fetchdata">
                <span class="oi oi-list-rich" aria-hidden="true"></span> Fetch data
            </NavLink>
        </div>
        <div class="nav-item px-3">
            <NavLink class="nav-link" href="fetchuserdetails">
                <span class="oi oi-list-rich" aria-hidden="true"></span> User Details
            </NavLink>
        </div>
    </nav>

</div>
@code {
    private bool collapseNavMenu = true;
    private string? NavMenuCssClass => collapseNavMenu ? "collapse" : null;
    private void ToggleNavMenu()
    {
        collapseNavMenu = !collapseNavMenu;
    }
}
C#

Now we will execute the application. When we execute the application will see a navigation link for “User Details” below the Fetch Data link in left side like below image.

When we click on “User Details” in the navigation menu, it will redirect to “User Details” view and display all the user data on the page.

On the “User Details” page we can find a button to “Add User”. It will redirect to the “Add User” page where we can add new user.

If we want to edit or delete an existing user record, then click on Edit or Delete button link of that current record. It will open respective (edit/delete) view as shown below where we can edit or delete the user data.

In the above article we have created an ASP.NET Core application using Blazor Entity Framework and .NET 6.0 and also performed the CRUD operation on it.