Monday, 11 July 2022

Use INSERT with a column list to exclude the GENERATED ALWAYS column, or insert a DEFAULT into GENERATED ALWAYS column.

  Use INSERT with a column list to exclude the GENERATED ALWAYS column, or insert a DEFAULT into GENERATED ALWAYS column.

-------------------------------------------------------------------------

The error message states that an insert could not be performed.

Cause:

The timestamp data type is an 8-byte data type that exposes automatically generated, unique binary numbers within a database.  It is generally used as a mechanism for version-stamping table rows.

Each database has a counter that is incremented for each insert or update operation that is performed on a table that contains a timestamp column within the database. This counter, the database timestamp, tracks a relative time within a database and not an actual time that can be associated with a clock.

A table can only have one timestamp column.  Every time that a row with a timestamp column is modified or inserted, the incremented databasetimestamp value is inserted in the timestamp column.


Non Working Insert


INSERT INTO [TableName]
VALUES
(-999999999999,
-899999999999999,
‘Smith’,
‘John’,
null,
1/1/2012,
1/1/2012
)

Solution:

Perform insert using “DEFAULT” see example below.

INSERT INTO [TableName]
VALUES
(-999999999999,
-899999999999999,
‘Smith’,
‘John’,
null,
DEFAULT,
DEFAULT
)

The timestamp column of a row can be used to easily determine whether any value in the row has changed since the last time it was read. If any change is made to the row, the timestamp value is updated. If no change is made to the row, the timestamp value is the same as when it was previously read.

Sunday, 10 July 2022

Introduction to Azure Advisor

What is Advisor?

Advisor is a personalized cloud consultant that helps you follow best practices to optimize your Azure deployments. It analyzes your resource configuration and usage telemetry and then recommends solutions that can help you improve the cost effectiveness, performance, Reliability (formerly called High availability), and security of your Azure resources.

With Advisor, you can:

  • Get proactive, actionable, and personalized best practices recommendations.
  • Improve the performance, security, and reliability of your resources, as you identify opportunities to reduce your overall Azure spend.
  • Get recommendations with proposed actions inline.

You can access Advisor through the Azure portal. Sign in to the portal, locate Advisor in the navigation menu, or search for it in the All services menu.

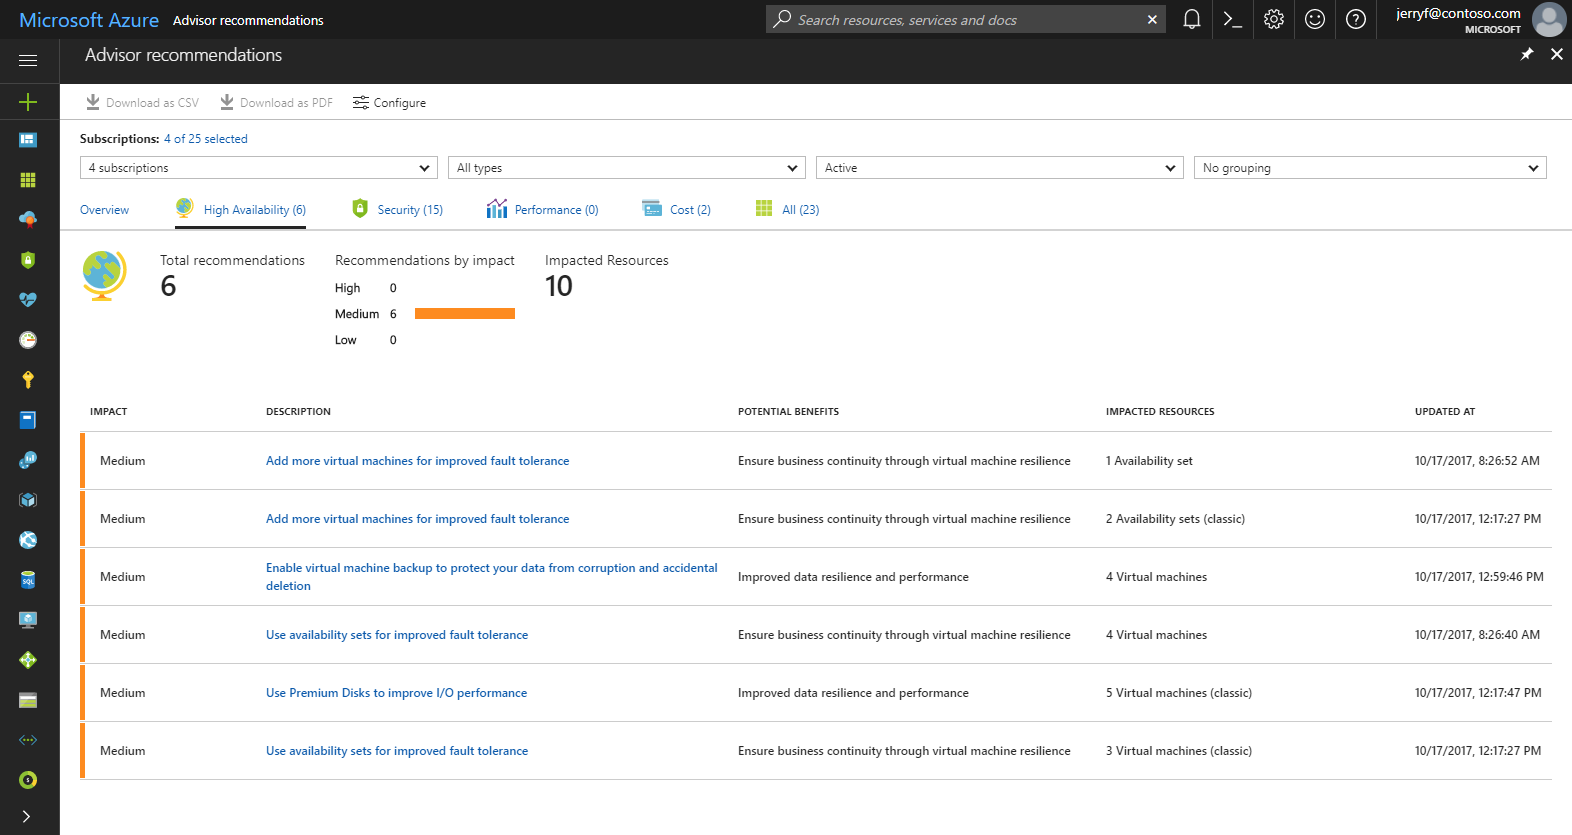
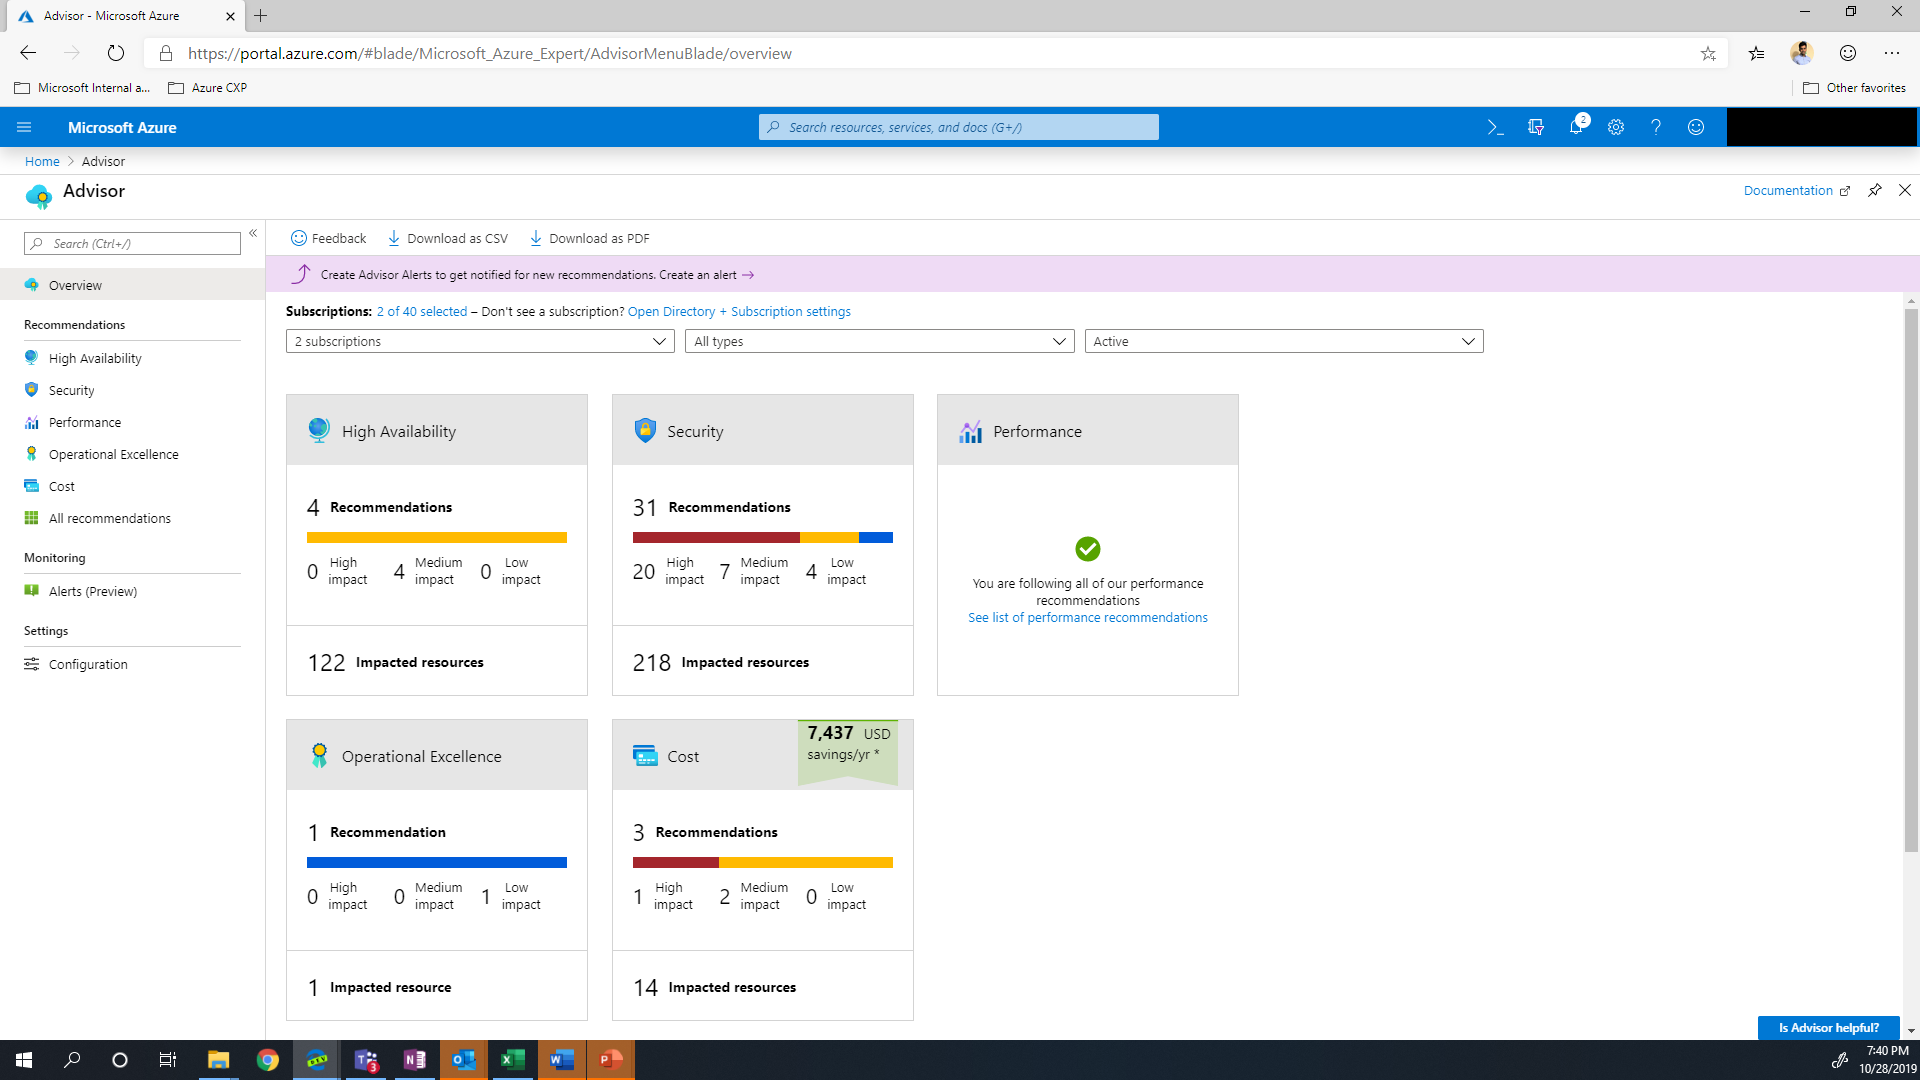
The Advisor dashboard displays personalized recommendations for all your subscriptions. You can apply filters to display recommendations for specific subscriptions and resource types. The recommendations are divided into five categories:

  • Reliability (formerly called High Availability): To ensure and improve the continuity of your business-critical applications. 

  • Security: To detect threats and vulnerabilities that might lead to security breaches.

  • Performance: To improve the speed of your applications. 

  • Cost: To optimize and reduce your overall Azure spending. 

  • Operational Excellence: To help you achieve process and workflow efficiency, resource manageability and deployment best practices. 

    Advisor recommendation types

You can click a category to display the list of recommendations within that category, and select a recommendation to learn more about it. You can also learn about actions that you can perform to take advantage of an opportunity or resolve an issue.

Advisor recommendation category

Select the recommended action for a recommendation to implement the recommendation. A simple interface will open that enables you to implement the recommendation or refer you to documentation that assists you with implementation. Once you implement a recommendation, it can take up to a day for Advisor to recognize that.

If you do not intend to take immediate action on a recommendation, you can postpone it for a specified time period or dismiss it. If you do not want to receive recommendations for a specific subscription or resource group, you can configure Advisor to only generate recommendations for specified subscriptions and resource groups.

Frequently asked questions

How do I access Advisor?

You can access Advisor through the Azure portal. Sign in to the portal, locate Advisor in the navigation menu, or search for it in the All services menu.

You can also view Advisor recommendations through the virtual machine resource interface. Choose a virtual machine, and then scroll to Advisor recommendations in the menu.

What permissions do I need to access Advisor?

You can access Advisor recommendations as OwnerContributor, or Reader of a subscription, Resource Group or Resource.

What resources does Advisor provide recommendations for?

Advisor provides recommendations for Application Gateway, App Services, availability sets, Azure Cache, Azure Data Factory, Azure Database for MySQL, Azure Database for PostgreSQL, Azure Database for MariaDB, Azure ExpressRoute, Azure Cosmos DB, Azure public IP addresses, Azure Synapse Analytics, SQL servers, storage accounts, Traffic Manager profiles, and virtual machines.

Azure Advisor also includes your recommendations from Microsoft Defender for Cloud which may include recommendations for additional resource types.

Can I postpone or dismiss a recommendation?

To postpone or dismiss a recommendation, click the Postpone link. You can specify a postpone period or select Never to dismiss the recommendation.

How to Create and configure Azure DDoS Protection Standard using Azure PowerShell?

 Get started with Azure DDoS Protection Standard by using Azure PowerShell.

A DDoS protection plan defines a set of virtual networks that have DDoS protection standard enabled, across subscriptions. You can configure one DDoS protection plan for your organization and link virtual networks from multiple subscriptions to the same plan.

In this quickstart, you'll create a DDoS protection plan and link it to a virtual network.

Prerequisites

 Note

This article uses the Azure Az PowerShell module, which is the recommended PowerShell module for interacting with Azure. To get started with the Az PowerShell module, see Install Azure PowerShell. To learn how to migrate to the Az PowerShell module, see Migrate Azure PowerShell from AzureRM to Az.

Use Azure Cloud Shell

Azure hosts Azure Cloud Shell, an interactive shell environment that you can use through your browser. You can use either Bash or PowerShell with Cloud Shell to work with Azure services. You can use the Cloud Shell preinstalled commands to run the code in this article, without having to install anything on your local environment.

To start Azure Cloud Shell:

OptionExample/Link
Select Try It in the upper-right corner of a code block. Selecting Try It doesn't automatically copy the code to Cloud Shell.Screenshot that shows an example of Try It for Azure Cloud Shell.
Go to https://shell.azure.com, or select the Launch Cloud Shell button to open Cloud Shell in your browser.Screenshot that shows how to launch Cloud Shell in a new window.
Select the Cloud Shell button on the menu bar at the upper right in the Azure portal.Screenshot that shows the Cloud Shell button in the Azure portal

To run the code in this article in Azure Cloud Shell:

  1. Start Cloud Shell.

  2. Select the Copy button on a code block to copy the code.

  3. Paste the code into the Cloud Shell session by selecting Ctrl+Shift+V on Windows and Linux, or by selecting Cmd+Shift+V on macOS.

  4. Select Enter to run the code.

Create a DDoS Protection plan

In Azure, you allocate related resources to a resource group. You can either use an existing resource group or create a new one.

To create a resource group, use New-AzResourceGroup. In this example, we'll name our resource group MyResourceGroup and use the East US location:

Azure PowerShell
New-AzResourceGroup -Name MyResourceGroup -Location "East US"

Now create a DDoS protection plan named MyDdosProtectionPlan:

Azure PowerShell
New-AzDdosProtectionPlan -ResourceGroupName MyResourceGroup -Name MyDdosProtectionPlan -Location "East US"

Enable DDoS for a virtual network

Enable DDoS for a new virtual network

You can enable DDoS protection when creating a virtual network. In this example, we'll name our virtual network MyVnet:

Azure PowerShell
#Gets the DDoS protection plan ID
$ddosProtectionPlanID = Get-AzDdosProtectionPlan -ResourceGroupName MyResourceGroup -Name MyDdosProtectionPlan

#Creates the virtual network
New-AzVirtualNetwork -Name MyVnet -ResourceGroupName MyResourceGroup -Location "East US" -AddressPrefix 10.0.0.0/16 -DdosProtectionPlan $ddosProtectionPlanID -EnableDdosProtection  

Enable DDoS for an existing virtual network

You can associate an existing virtual network when creating a DDoS protection plan:

Azure PowerShell
#Gets the DDoS protection plan ID
$ddosProtectionPlanID = Get-AzDdosProtectionPlan -ResourceGroupName MyResourceGroup -Name MyDdosProtectionPlan

# Gets the most updated version of the virtual network
$vnet = Get-AzVirtualNetwork -Name MyVnet -ResourceGroupName MyResourceGroup
$vnet.DdosProtectionPlan = New-Object Microsoft.Azure.Commands.Network.Models.PSResourceId

# Update the properties and enable DDoS protection
$vnet.DdosProtectionPlan.Id = $ddosProtectionPlanID.Id
$vnet.EnableDdosProtection = $true
$vnet | Set-AzVirtualNetwork

Validate and test

Check the details of your DDoS protection plan and verify that the command returns the correct details of your DDoS protection plan.

Azure PowerShell
Get-AzDdosProtectionPlan -ResourceGroupName MyResourceGroup -Name MyDdosProtectionPlan

Check the details of your vNet and verify the DDoS protection plan is enabled.

Azure PowerShell
Get-AzVirtualNetwork -Name MyVnet -ResourceGroupName MyResourceGroup

Clean up resources

You can keep your resources for the next tutorial. If no longer needed, delete the MyResourceGroup resource group. When you delete the resource group, you also delete the DDoS protection plan and all its related resources.

Azure PowerShell
Remove-AzResourceGroup -Name MyResourceGroup

To disable DDoS protection for a virtual network:

Azure PowerShell
# Gets the most updated version of the virtual network
$vnet = Get-AzVirtualNetwork -Name MyVnet -ResourceGroupName MyResourceGroup
$vnet.DdosProtectionPlan = $null
$vnet.EnableDdosProtection = $false
$vnet | Set-AzVirtualNetwork

If you want to delete a DDoS protection plan, you must first dissociate all virtual networks from it.

Create and configure Azure DDoS Protection Standard

 Get started with Azure DDoS Protection Standard by using the Azure portal.

A DDoS protection plan defines a set of virtual networks that have DDoS Protection Standard enabled, across subscriptions. You can configure one DDoS protection plan for your organization and link virtual networks from multiple subscriptions under a single AAD tenant to the same plan.

In this quickstart, you'll create a DDoS protection plan and link it to a virtual network.

Prerequisites

Create a DDoS protection plan

  1. Select Create a resource in the upper left corner of the Azure portal.

  2. Search the term DDoS. When DDoS protection plan appears in the search results, select it.

  3. Select Create.

  4. Enter or select the following values.

    SettingValue
    SubscriptionSelect your subscription.
    Resource groupSelect Create new and enter MyResourceGroup.
    NameEnter MyDdosProtectionPlan.
    RegionEnter East US.
  5. Select Review + create then Create

 Note

Although DDoS Protection Plan resources needs to be associated with a region, users can enable DDoS protection on Virtual Networks in different regions and across multiple subscriptions under a single Azure Active Directory Tenant.

Enable DDoS protection for a virtual network

Enable DDoS protection for a new virtual network

  1. Select Create a resource in the upper left corner of the Azure portal.

  2. Select Networking, and then select Virtual network.

  3. Enter or select the following values.

    SettingValue
    SubscriptionSelect your subscription.
    Resource groupSelect Use existing, and then select MyResourceGroup
    NameEnter MyVnet.
    RegionEnter East US.
  4. Select Next: IP Addresses and enter the following values.

    SettingValue
    IPv4 address spaceEnter 10.1.0.0/16.
    Subnet nameUnder Subnet name, select the Add subnet link and enter mySubnet.
    Subnet address rangeEnter 10.1.0.0/24.
  5. Select Add.

  6. Select Next: Security.

  7. Select Enable on the DDoS Protection Standard radio.

  8. Select MyDdosProtectionPlan from the DDoS protection plan pane. The plan you select can be in the same, or different subscription than the virtual network, but both subscriptions must be associated to the same Azure Active Directory tenant.

  9. Select Review + create then Create.

 Note

You cannot move a virtual network to another resource group or subscription when DDoS Standard is enabled for the virtual network. If you need to move a virtual network with DDoS Standard enabled, disable DDoS Standard first, move the virtual network, and then enable DDoS standard. After the move, the auto-tuned policy thresholds for all the protected public IP addresses in the virtual network are reset.

Enable DDoS protection for an existing virtual network

  1. Create a DDoS protection plan by completing the steps in Create a DDoS protection plan, if you don't have an existing DDoS protection plan.
  2. Enter the name of the virtual network that you want to enable DDoS Protection Standard for in the Search resources, services, and docs box at the top of the Azure portal. When the name of the virtual network appears in the search results, select it.
  3. Select DDoS protection, under Settings.
  4. Select Enable. Under DDoS protection plan, select an existing DDoS protection plan, or the plan you created in step 1, and then click Save. The plan you select can be in the same, or different subscription than the virtual network, but both subscriptions must be associated to the same Azure Active Directory tenant.

You can also enable the DDoS protection plan for an existing virtual network from the DDoS Protection plan, not from the virtual network.

  1. Search for "DDoS protection plans" in the Search resources, services, and docs box at the top of the Azure portal. When DDoS protection plans appears in the search results, select it.
  2. Select the desired DDoS protection plan you want to enable for your virtual network.
  3. Select Protected resources under Settings.
  4. Click +Add and select the right subscription, resource group and the virtual network name. Click Add again.

Configure an Azure DDoS Protection Plan using Azure Firewall Manager (preview)

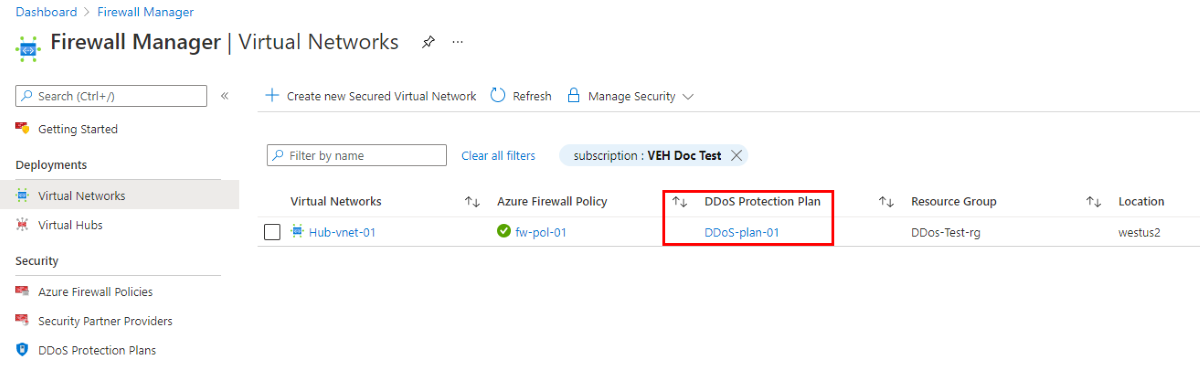
Azure Firewall Manager is a platform to manage and protect your network resources at scale. You can associate your virtual networks with a DDoS protection plan within Azure Firewall Manager. This functionality is currently available in Public Preview. See Configure an Azure DDoS Protection Plan using Azure Firewall Manager.

Screenshot showing virtual network with DDoS Protection Plan.

Enable DDoS protection for all virtual networks

This built-in policy will detect any virtual networks in a defined scope that don't have DDoS Protection Standard enabled. This policy will then optionally create a remediation task that will create the association to protect the Virtual Network. See Azure Policy built-in definitions for Azure DDoS Protection Standard for full list of built-in policies.

Validate and test

First, check the details of your DDoS protection plan:

  1. Select All services on the top, left of the portal.
  2. Enter DDoS in the Filter box. When DDoS protection plans appear in the results, select it.
  3. Select your DDoS protection plan from the list.

The MyVnet virtual network should be listed.

View protected resources

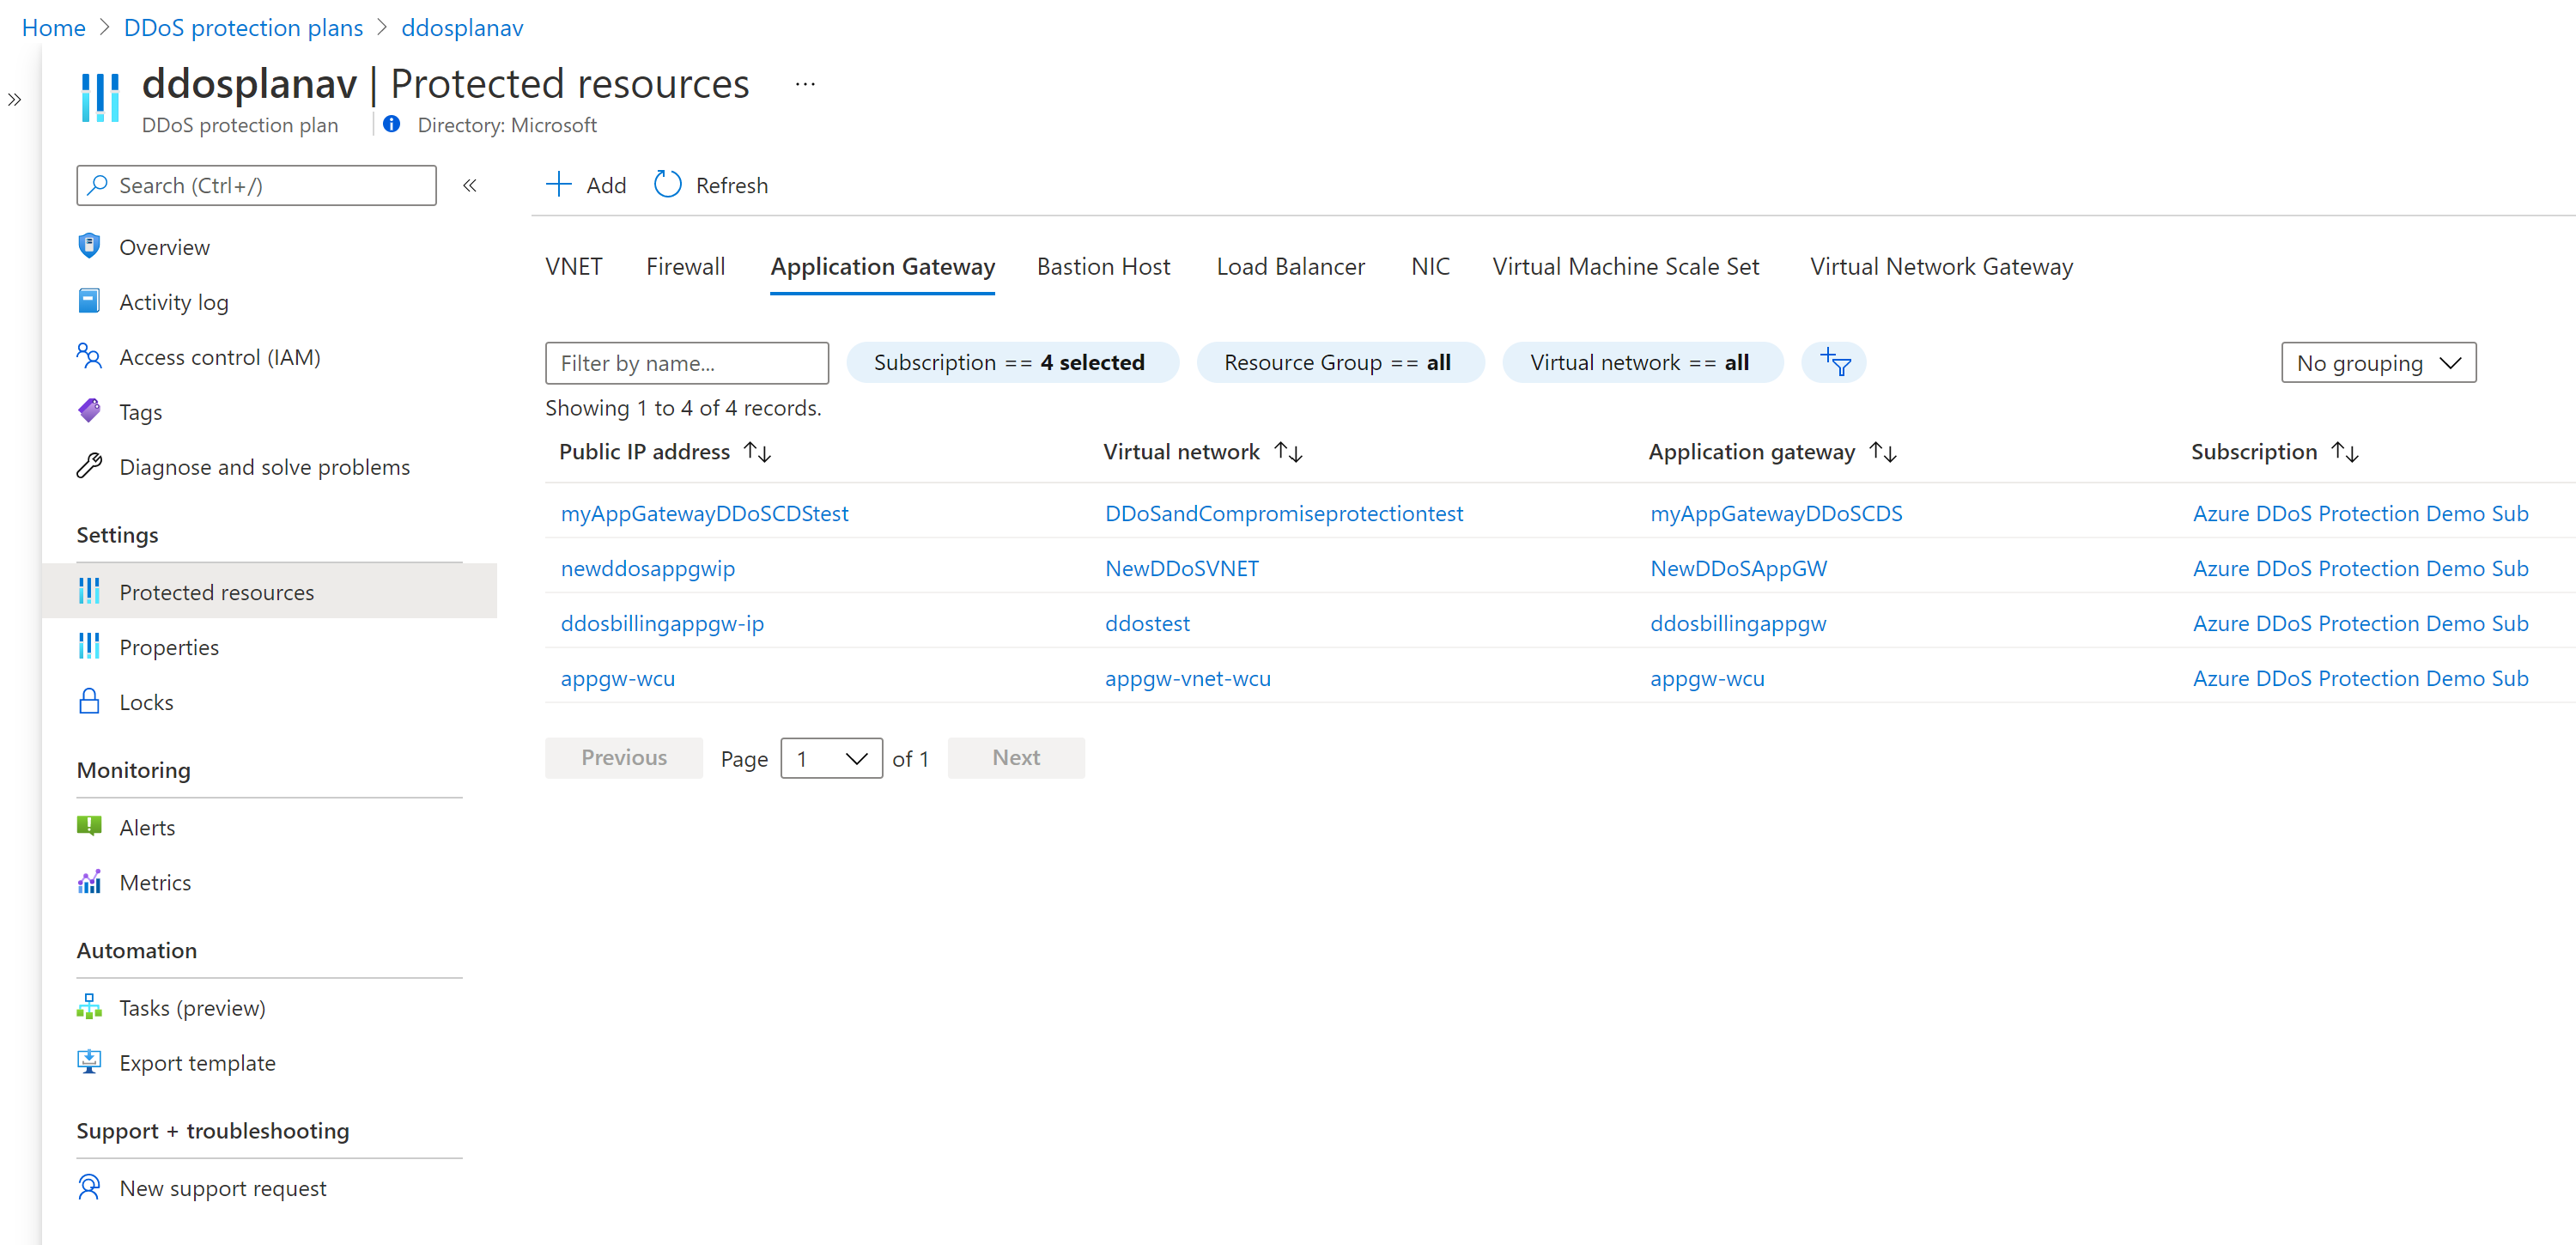
Under Protected resources, you can view your protected virtual networks and public IP addresses, or add more virtual networks to your DDoS protection plan:

Screenshot showing protected resources.

Clean up resources

You can keep your resources for the next tutorial. If no longer needed, delete the MyResourceGroup resource group. When you delete the resource group, you also delete the DDoS protection plan and all its related resources. If you don't intend to use this DDoS protection plan, you should remove resources to avoid unnecessary charges.

 Warning

This action is irreversible.

  1. In the Azure portal, search for and select Resource groups, or select Resource groups from the Azure portal menu.

  2. Filter or scroll down to find the MyResourceGroup resource group.

  3. Select the resource group, then select Delete resource group.

  4. Type the resource group name to verify, and then select Delete.

To disable DDoS protection for a virtual network:

  1. Enter the name of the virtual network you want to disable DDoS protection standard for in the Search resources, services, and docs box at the top of the portal. When the name of the virtual network appears in the search results, select it.
  2. Under DDoS Protection Standard, select Disable.

 Note:

If you want to delete a DDoS protection plan, you must first dissociate all virtual networks from it.